“ontextC” – Technical Diary 9

What happened so far?

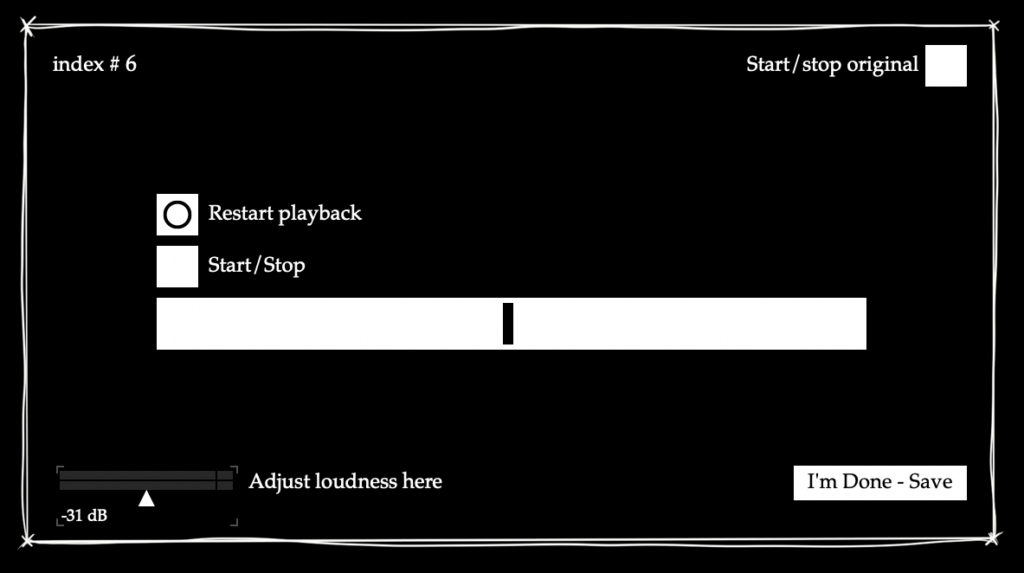
Recently, time spent working on the project was dedicated to figuring out how to best turn it into an exhibit that is both somewhat valuable for the user, as well as for research purposes. I knew that it would be important to keep the interface intuitive, and at the same time not to clutter it with information. Furthermore, a good solution was needed to collect parameter data – after some research and experiments I found that the coll object would work best for my purpose, with its ability to capture an index number and separate data input with commas, allowing me to then export the anonymous results as a CSV file. The save button and volume adjustments were non-negotiable, but I struggled a bit with how to best implement options to play back the source sound as well as the processed sound in a way that made sense just from looking at the interface. Another aspect I considered was that I would need a “phantom” slider for the visible interface for the user, meaning that after the previous person saves it always jumps to a random value, but looks as if the slider is back at the center. Like this, test subjects cannot copy the results from the previous person and really have to rely on their hearing to match the processed audio as closely as possible to the source sound.

Preliminary interface for the exhibition/survey

Ongoing

During a supervisor meeting, we tried think of a way to improve the playback situation – ideally three buttons at the centre of the screen would be enough. One option would be to have the playback of the original sound be gated, so that whenever it stops playing, the processed sound starts automatically. It is definitely something that still needs more thought and a better practical solution.

Results and Reflection

That this part of the project will be shown to the public definitely added a new challenge, because now it is not just about whether the software makes sense to me, but also whether it can be translated to a first-time user with little to no experience. The idea of people using their hearing to adjust the parameter in a sort of audioscope-like manner is very interesting to me though, and I look forward to seeing the results – I wonder how accurate the resolution of the parameter has to be for people to not notice a significant difference anymore, and how much it varies between people.

Objectives for Next Time

  • Finalise exhibit version (software)
  • Figure out physical exhibition setup
  • Write guideline how to set up/turn the exhibit off and on for the showcase supervisors

02/09 Sound Design & Musik

Um die Stimmung des Videos zu schaffen/zu verstärken und die Optik der Animation zu unterstreichen, habe ich mich entschieden, ein eigenes Sound Design zu gestalten. „AMA“ von Julie Gautier, hat mich nicht nur visuell, sondern auch mit dem Pianostück, das unterlegt ist, inspiriert. Mein Sound Design soll eine entspannte und immersive Atmosphäre zu erzeugen und vor allem die Unterwasserwelt widerspiegeln. Hier möchte ich die Stilelemente, die ich gewählt habe, zeigen.

Stilelemente und Stimmung

Meeresrauschen & Wellen
Das Meeresrauschen ist ein zentrales Element des Sounds. Es vermittelt ein Gefühl von Ruhe und Weite. Als konstantes Hintergrundgeräusch erzeugt es eine beruhigende Atmosphäre, die die Zuschauer zusätzlich in die Szene eintauchen lässt.

Tropfen
Die Geräusche von Tropfen, die ins Wasser fallen, sind eine rhythmische Komponente. Diese habe ich mit den Synthesizern und Glockenklängen imitiert.

Ein- und Ausatmen
Das Einatmen zu Beginn und das Ausatmen zum Schluss bildet einen dramaturgischen Kreis und schafft Spannung. Gleichzeitig wird die Thematik Tauchen und Unterwasser aufgegriffen.

Piano
Ich verwende Pianoklänge als musikalisches Fundament. Die Melodien sind minimalistisch und klingen eher sanft.

Synthesizer-Elemente (Rauschen, leichtes Dröhnen …)
Die Synthesizer-Klänge fügen eine mystische Note hinzu. Damit kann ein Klangteppich erzeugt werden, der einen fließenden Übergang zwischen den verschiedenen Parts ermöglicht.

Verwendete Technik
Als Software zum Aufnehmen habe ich Reaper verwendet. Zur Klanggestaltung habe ich verschiedene Synthesizer (KORG) und einen Reverb verwendet.

Zwei Spuren mit Meeresrauschen und Tropfen beinhalten Sounds von Freesound.org – ebenso ist das Ein- und Ausatmen ein fertiger Sound, der hier Verwendung gefunden hat.

Workplace Reaper

Zusammenfassung:

Die Kombination aus den verschiedenen Elementen erzeugt eine beruhigende Klanglandschaft. Die akustischen Stilelemente unterstützen die Visuals und machen meiner Meinung nach einen großen Teil des Eindrucks aus.

Sounds & Musik des finalen Videos

Visual Prototype

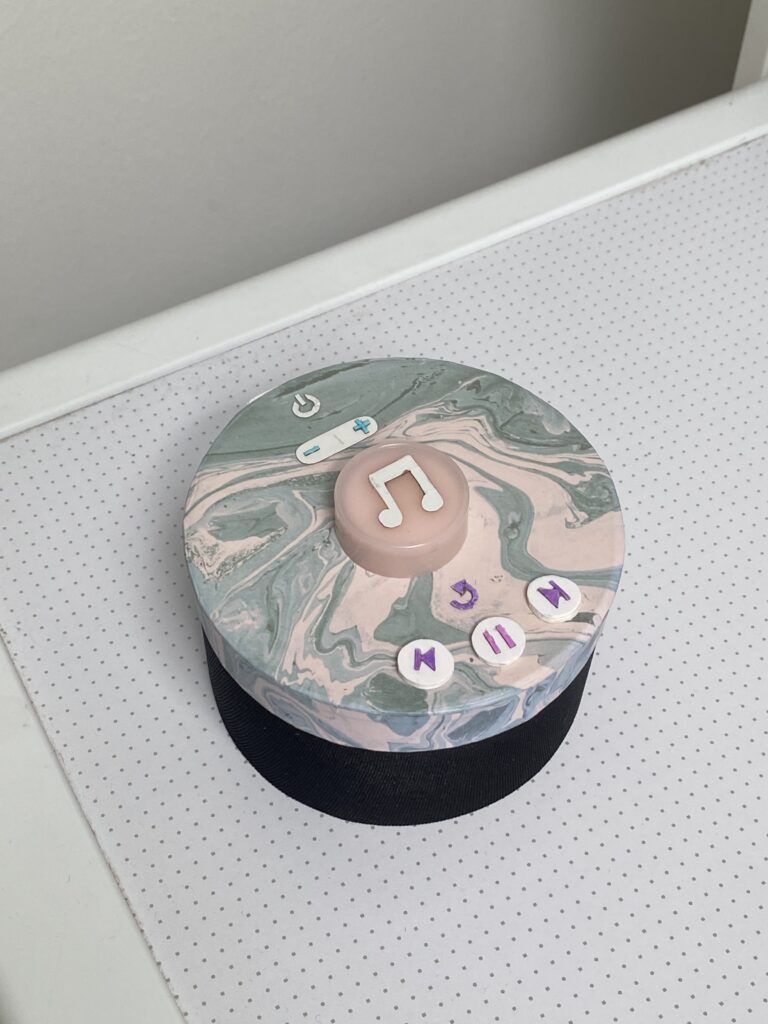
After spending some weeks developing a technical prototype, I started building a visual one as well. The visual prototype represents the size and appearance of my concept, but serves no functionality. It is made of paper, cardboard, plastic, tape and fabric. 

I started drawing some sketches of the intended design. In the blog post Concept Definition and Aim from May, I stated what buttons I find important to include. I worked further with these and concluded to implement seven buttons: 

  • Power on/off
  • Sound up/down
  • Play melody/record
  • Replay melody
  • Return to previous melody
  • Pause melody
  • Skip to next melody

I want the design to be clean and understandable, without any unnecessary buttons. But after my user tests, I also understood that buttons such as replay and skip were crucial in order to serve good user experiences. 

The lower part of the product is the speaker, and the upper part involve the buttons. The biggest button in the middle is the one that will be used the most. When it is pressed, the random generated melody plays. This is also the button that must be pressed in order to record the sound of the user input. In the next version of my prototype, I will also include a LED ring around that gives instant feedback on the input. 

How To Build the Prototype

To be able to user test my concept, I want to create a prototype with a certain technical functionality. Based on ease of use and personal prior knowledge, I decided to use Arduino to test the desired functions. 

Required equipment

  • Arduino Uno
  • Battery pack
  • Breadboard
  • Buttons
  • LED lights
  • NeoPixel ring
  • Electret microphone
  • Piezo speaker
  • Wires
  • Resistors

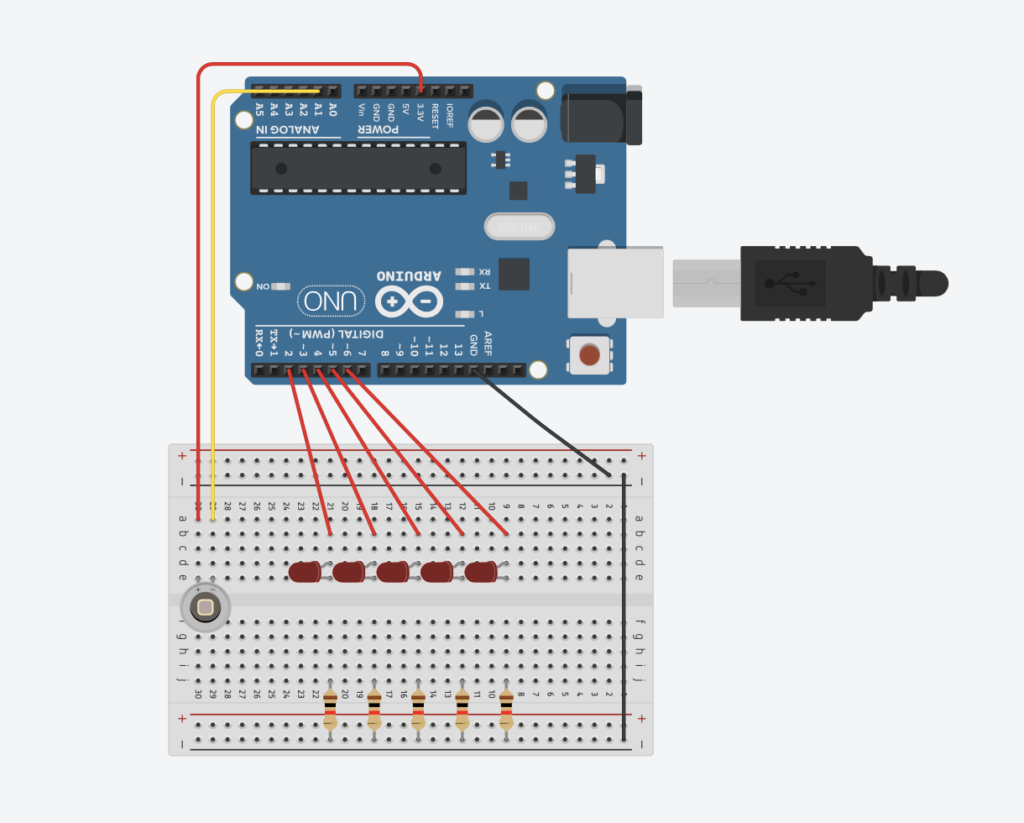
To begin the prototyping, I watched this tutorial on YouTube: https://www.youtube.com/watch?v=bMs5J4bJOD0. It shows how to connect a microphone to LED lights for instant feedback in an Arduino setup. I thought this was a good way of starting the building of my prototype, because it contains some of the major functionalities of my concept. 

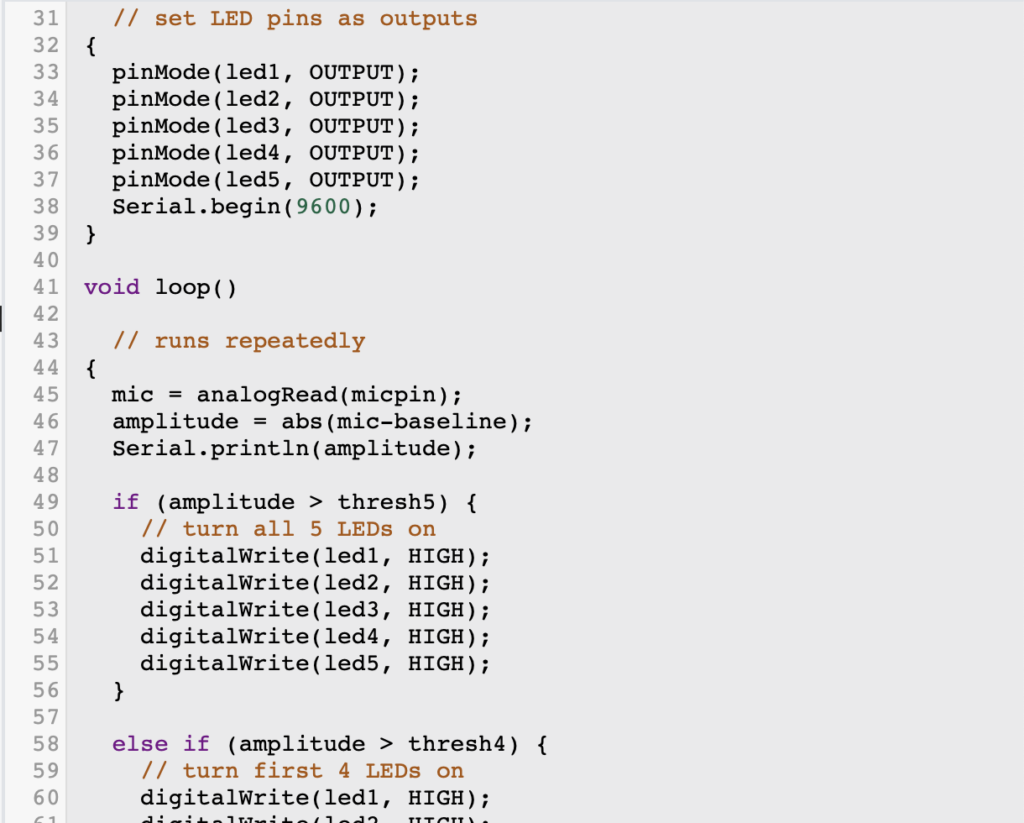
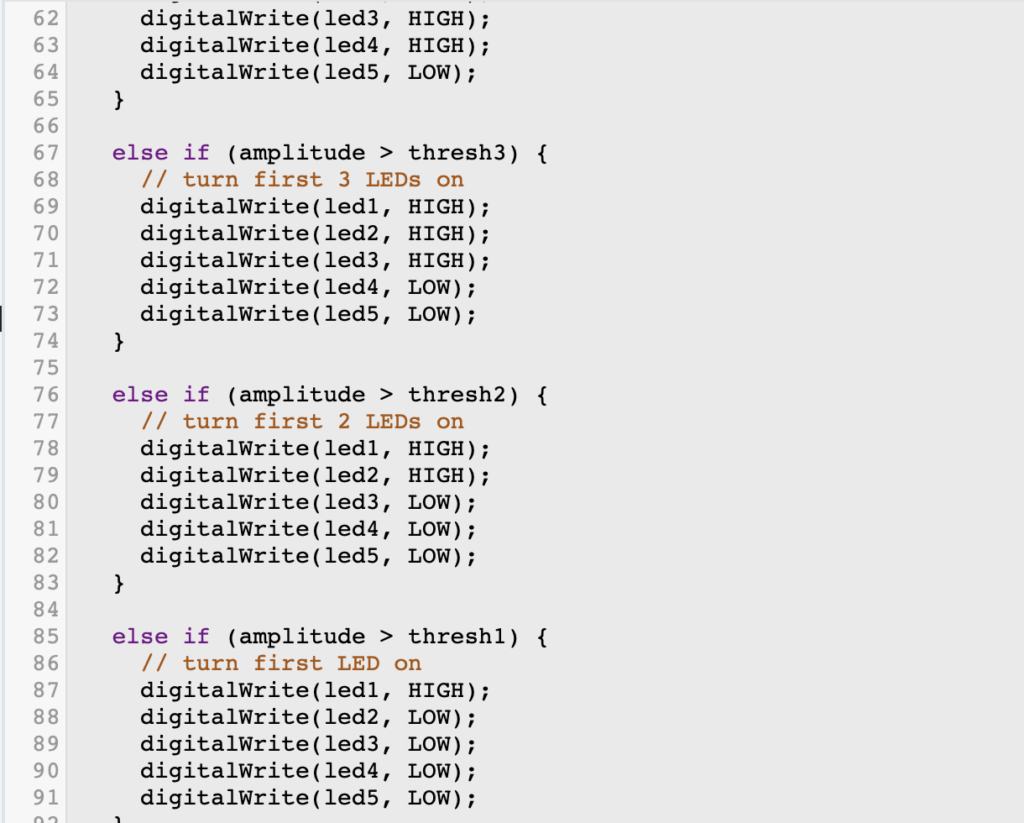
I used the online web-based tool on tinkercad.com to build my Arduino setup and write the code. This is how it looks like so far:  

In the next step, I will research how to add a speaker. This tutorial shows a setup with both a microphone and speaker: https://www.youtube.com/watch?v=nIDhkvomrcg. It will hopefully help me on the way. If I can access the required equipment, I will also attempt to build it in a physical format. 

Further, I need to figure out how to generate random melodies and play them on the Arduino speaker. This website shows examples on how the melodies could sound: https://random-music-generators.onrender.com/melody. I ideally want the tempo parameter to be around 70, and the number of notes to be 4. 

For visual purposes, I also want to build a non-technical prototype to demonstrate the indented design in the end. The two prototypes will complement each other, and optimally be merged together in the final prototype video. 

Calm Interfaces

In this excursion into sound design, I’ll be exploring a paper from the International Conference on New Interfaces for Musical Expression (NIME23). The paper is about a new type of interface that transforms brush movements into electronic sounds, creating a method for creating electronic music in a natural and expressive way.

The paper presents the Brushing Interface, a DIY multi-touch interface designed to translate brushing gestures into expressive musical performances. It consists of 216 handmade force-sensitive resistive sensors and 8 piezo microphones for precise gesture tracking and sound production. The interface combines a unique gesture mapping strategy with continuous gesture tracking, enabling flexible and expressive performances. The hardware system, including the sensors, was built inexpensively and the software was developed using Max7 for real-time sound processing and gesture mapping. The interface offers four performative approaches: using the standard brush sound, applying audio effects, real-time audio synthesis and changing presets. A composition called „Drifting“ demonstrates the interface’s capabilities. Overall, the Brushing Interface expands the possibilities of gestural expression in musical performance, offering richness and versatility.1

As an interaction design student, I find Jaehoon Choi’s work on the brushing interface fascinating. The concept of transforming brushing gestures into a true musical/sonic performance opens up new avenues for exploring embodied interaction and expressive communication through technology. The DIY approach to building the hardware system is in line with the interaction design idea of iterating and testing with self-created prototypes before scaling up to finished, industrialised products. It also emphasises hands-on experimentation and customisation, which can empower designers and users alike to create personalised and meaningful experiences.

One aspect of the paper that stands out is the integration of multi-dimensional parameter mapping and continuous gesture tracking, enabling an expressive performance that can be configured in a variety of ways. This emphasis on flexibility and adaptability is very much in line with the principles of interaction design, which prioritise designing for different user needs and contexts. The Brushing interface is an example of how technology can be designed to support nuanced and intuitive forms of interaction, encouraging deeper engagement and creative expression.

However, while the paper provides a comprehensive overview of the design and implementation of the brush interface, there are some areas that could be further elaborated or addressed. For example, while the DIY approach is commendable for its affordability and accessibility, there may be limitations in terms of scalability, reliability and reproducibility, especially when considering larger scale applications or commercialisation. In addition, while the paper touches on the potential for improvisational performance, further research is needed into how the interface can support more planned & structured inputs or outputs, and how easy it is to learn and repeat to produce the same output again.

In terms of relevance to Calm Technologies, the Brushing Interface offers an interesting perspective on how technology can be seamlessly integrated into our daily lives in a subtle and non-intrusive way. By utilising the tactile and familiar action of brushing, the interface invites users to engage in a calming and almost natural interaction.

In conclusion, the Brushing interface represents an innovative fusion of art, design and technology, with implications for both musical performance and interaction design. While there are areas for further refinement and exploration, the work serves as a valuable contribution to the field, inspiring future research and creative endeavours in the realm of expressive gestural interfaces for musical performance, as well as Calm interfaces for our everyday interactions with the digital ecosphere.

  1. Jaehoon Choi. 2023. Brushing Interface – DIY multi-touch interface for expressive gestural performance. Proceedings of the International Conference on New Interfaces for Musical Expression.  ↩︎

12 | Cyclops: Designing an eye-controlled instrument for accessibility and flexible use

I have been reading the paper “Cyclops: Designing an eye-controlled instrument for accessibility and flexible use” which is written by William C Payne, Ann Paradiso, and Shaun Kane. In this blog post I will write about the paper and my reflections on the topic.

The Cyclops is an eye-gaze controlled instrument designed for live performances and improvisation. It is specially motivated by a need for expressive musical instruments that is accessible for people that rely on eye tracking for computer access, such as people diagnosed with amyotrophic lateral sclerosis (ALS). The instrument contains a synthesizer and sequencer, and is displayed as a 2D canvas on a screen and controlled with eye-tracking.

There are multiple challenges of varying size when it comes to eye-tracking being the only controller and interaction method.

Precision: Targets need careful placement, spread out from each other and made bigger. Because of this, the amount of input elements that can be displayed on one screen is reduced.

Timing: Getting to a target on screen means keeping your gaze fixed in one spot, and it’s difficult to difficult to control the timing or rhythm of inputs.

Midas touch: A design challenge when creating responsive gaze-only interfaces is when the user is activating controls accidentally when dwell time is reduced. The dwell time varys widely, depending on what kind of task it is, and it is therefore important that different tasks have different dwell time that is matching the task. The dwell time might also vary from person to person, and that might be more difficult to design for.

Other challenges: Varying accuracy and precision across users, trackers and lightning conditions. Usually more accurate around the center of the screen and less accurate around the edges.

From the users perspective, I think it can be challenging to get used to using such interfaces where the only interaction is eye-tracking. On the other hand, the project aims to help out people who are already used to eye-tracking for computer access, and they are probably already used to this way of interaction. I can imagine that one have to stay extremely focused while interacting, because when not focused and thinking on other things the eyes tend to move around. At the same time, it is like learning any instrument – you’ll need practice to be able to master the instrument. It is still important that the instrument ‘helps’ you along the way, by having different dwelling times depending on the interaction and what is the most natural.

The interface is created with some of these challenges in mind. The musical control is split across three screens which reduces cognitive load and possible unintended interactions. There is a section of the screen that is non-selectable representation of the pitch sequence that can be fixated upon without affecting the output in any way. There is room to grow – there are different screens that the user can select depending on their experience

  • William C Payne, Ann Paradiso, and Shaun Kane. 2020. Cyclops: Designing an eye-controlled instrument for accessibility and flexible use. Proceedings of the International Conference on New Interfaces for Musical Expression.