It is a documentary by director Louie Psihoyos, that follows a scientific experiment evolving around nutrition. It is based on an 8-week study conducted by Stanford University that put 22 sets of genetically identical twins on opposing (but healthy) diets: omnivore and vegan. It was released on January 1, 2024 on Netflix. Of the 22 sets of twins, the series focused on four pairs: Carolyn and Rosalyn, Pam and Wendy, John and Jevon as well as Michael and Charlie.
Why did the twins, the documentary focused on, participate and what were the outcomes for them?
Carolyn and Rosalyn participated in the study with the goal of „increasing Filipino representation in scientific studies“. After the study, both returned to an omnivorous diet but now include more plant-based meals. Pam (vegan) and Wendy (omnivore) are chefs who run a catering company. After the study, they returned to an omnivorous diet but reduced their intake of meat and cheese. John (vegan) and Jevon (omnivore) are nursing students who also like to work out. After the study, they both returned to an omnivorous diet but cut out most red meat from their diet. Michael (omnivore) and Charlie (vegan) own a cheese business and are known as „The Cheese Twins.“ Prior to the study, Michael was a pescetarian, and Charlie an omnivore. After the study, Michael became a vegetarian, and Charlie now follows a mostly vegetarian diet [You Are What You Eat: A Twin Experiment, Wikipedia].
What did I think of the documentary?
I thought it was a great documentary. I have watched many documentaries, and also a lot produced by Netflix. This one was one of the best. The study was very well followed, and it was hardly manipulated for the viewer. They did not show all the outcomes, and probably showed the ones working towards their agenda. But I really liked the different journeys, the documentary took me one. From the mayor of New York, a Michelin Chef to a family, living next to large pig farms. They touched based with many topics, and I learned a lot. Even though my knowledge level in these areas was already rather high. Especially the part about the salmon farms was new to me. Also that there are different types of fats in the body, which are more or less dangerous, was news to me. The only critic I have is that it is very focused on showing minorities. It does seem to have an Agenda in that regard, but I thought it was not a problem.
Apart from the informational value, the documentary had nice aesthetics. Especially the food was nicely filmed. It reminded me of Chef’s table even.
The overall experience was great, and I would recommend watching it. It was also not too preachy, which I liked. It is definitely for everyone.
To explore one of my possible research topics further, this blogpost will look into the strengths and weaknesses of virtual, augmented, mixed and extended reality systems as well as their exact definitions and current technological trends, to gain a better understanding of which system / technology to use in future endeavors when going for different experiences.
VR vs AR vs XR/MR – a comparison
To better understand the difference and similarities between the different technologies, it is first important to understand their definitions as well as their strengths and weaknesses. For this reason, a short overview will be provided.
Virtual Reality (VR)
Virtual reality creates a computer-generated environment that immerses the user in a completely digital, three-dimensional space, often experienced through specialized VR headsets, providing a sense of presence and interaction within the virtual world. The user, thereby, is completely seperated from the real world and any stimuli they experience is completely computer generated. As a result, it usually allows for a much deeper immersion than the other solutions researched in this blogpost, but has its own strengths and weaknesses to be aware of.
Strengths:
Offers a completely immersive experience, perfect for training, gaming and simulations
Can easily create spaces, that are not accessible normally and / or provide space where normally there would be none
Can be used in healthcare, especially in therapeutic applications, to provide immersive therapy, exposure therapy, pain management and rehabilitation
Weaknesses:
Isolation from real world may cause emotional distress (solitude)
Needs special equipment, that may be costly and / or not readily available
Augmented Reality (AR)
Augmented reality overlays digitally created content onto our real world, enhancing the user’s perception of their surroundings by integrating computer-generated information such as images, text, or 3D models into the real-time environment. These are typically viewed through devices like AR glasses, tablets or smartphone screens, though in recent years, more applications have surfaced. Especially in the automotive industry, heads-up displays also make use of AR to display necessary information directly to the driver while projecting said information directly onto the windshield.
Strengths:
Real world information overlay, that relays information in real-time and provides additional input
Allows for hands-free interaction, which allows the user to engage the digital content while also staying aware in the real world
Useful for product visualisation and trying out products before making a buying decision
Weaknesses:
Limited field of view, especially on smartphone screens or tablets
Mobile dependency means less computing power, limiting display performance and causes need for optimisation
Mixed Reality (MR)
Mixed reality combines elements of both virtual and augmented reality, allowing digital and physical objects to coexist and interact in real-time. It seamlessly blends the virtual and real worlds, and allows switching between them, enabling users to engage with both types of content simultaneously. While this, of course, can provide difficult to understand with at first, it also allows for a much deeper influence of the user’s perceived reality as a result.
Strengths:
A high level of versatility, as it combines both VR and AR, it allows for a broader range of experiences to be created
Enables both in-room and virtual connection, communication and collaboration
Can, same as VR, be used in a wide variety of industries for training purposes, while also allowing for direct testing in the real world in AR
Weaknesses:
Different technologies and their implementation can cause performance and optimisation issues, posing technical difficulties
Cost of adaption currently still very high, especially when compared to pure VR or AR solutions
Extended Reality (XR)
Finally, extended reality is an umbrella term, encompassing VR, AR, and MR. It referes to the spectrum of immersive technologies, that extend, enhance, or blend reality. XR is a comprehensive term covering the entire range of experiences, from completely virtual to fully augmented. It aims to offer a holistic approach to immersive technologies. As such, it comes with all of the previously strengths and can, if used correctly, mitigate some of their weaknesses. The opposite, when used incorrectly, is also true, however.
Current trends and technologies
While of course, the market around VR, AR, MR and other technological solutions like that is constantly evolving, it is still important to understand the general direction of these developments in order to better understand them and work with them. As such, some of the most important ones will be listed here.
Stand-alone, wireless VR, AR and MR headsets without the need for external trackers:
HTC recently presented their new inside-out tracker, that would allow for inbuilt-tracking on a multitude of existing 3rd party headsets
While some of the previous generation’s systems still require for external trackers / tracking stations to be set up or for the headset to be connected to a PC via cable in order to ensure a smooth and immersive experience, current trends have since begun to diverge from that. The current trend seems to be to offer stand-alone, wireless VR, AR and MR solutions without the need for a seperate computer or similar unit for calculations, that also offers tracking via inbuilt sensors instead of external stations. The tracker shown in the picture above, for example allows for complete controllerless tracking of a person’s arms, legs, torso and even head, all by attaching it to the limb in question and up to 8 trackers can currently be used together to provide a smooth and easy experience.
Hybrid systems:
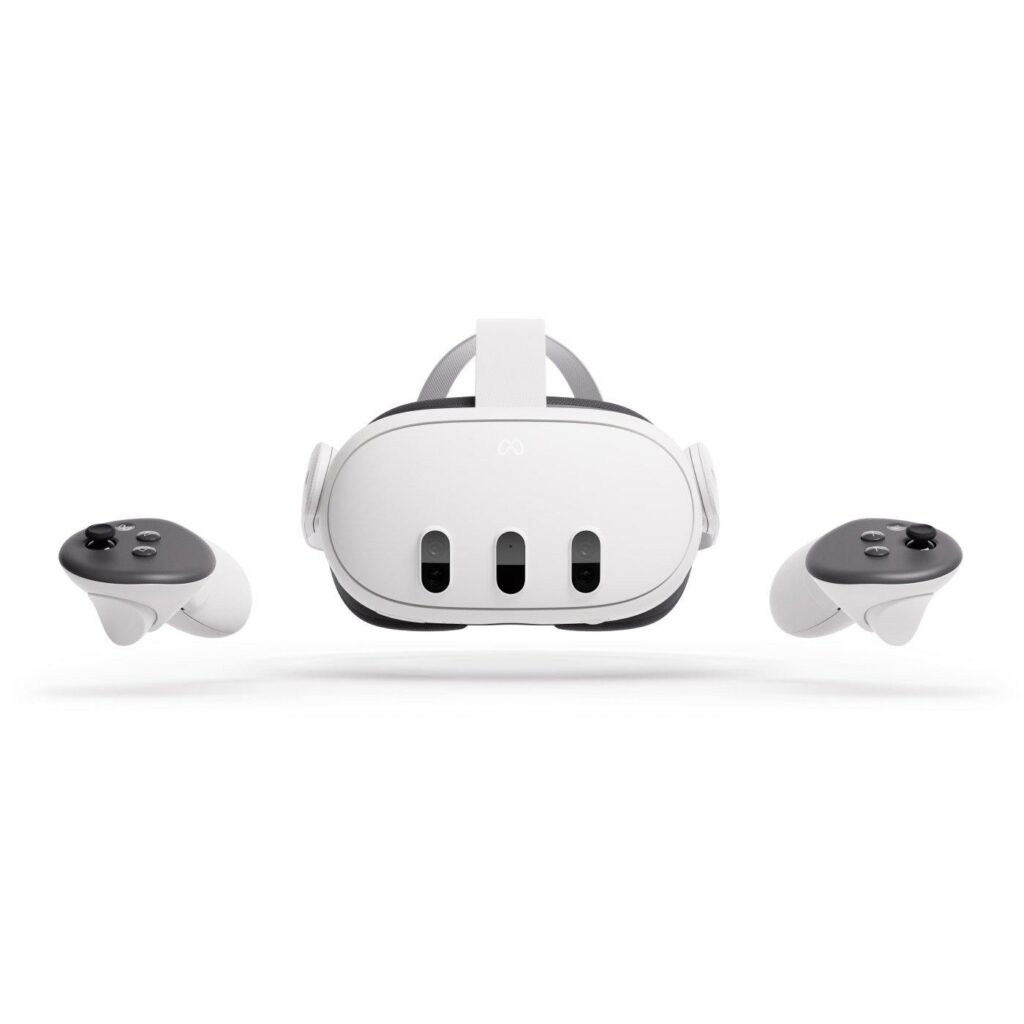
Both the Apple Vision Pro and the Meta Quest 3 offer hybrid solutions when it comes to VR and AR.
While there are still certainly solutions, that focus on either VR or AR in particular, MR seems to be the much more common trend, with passthrough headsets becoming more and more widespread. This is especially obvious when looking at both Apple’s recently released Vision Pro, but also Meta’s Quest 3.
Wider application in everyday life:
When looking at the adaption rate of VR, AR and MR solutions, it quickly becomes apparent that the possible applications for it have skyrocketed. While originally more of a niche development, nowadays a wide variety of experiences are offered, ranging from immersive nature documentaries, sport events, games, movies and more. Furthermore, with both the increasing variety of headsets to choose from and their increasing calculation power comes a lower price – except for the apple solution, of course – with an also increased quality in the experience, making the technology much more accessible in everyday life.
Next steps:
Look further into different XR solutions and their respective issues
Research essential tools for creating immersive virtual environments
Check methods of engagement and interaction within these digital environments
Tanzaufführungen verwenden Körpergesten als Sprache, um Emotionen auszudrücken, und Beleuchtung und Hintergrundbilder auf der Bühne, um die Szene und Atmosphäre zu schaffen. Bei herkömmlichen Tanzaufführungen werden die Hintergrundbilder in der Regel von professionellen Bühnenbildnern entsprechend dem Thema und dem Stil des Tanzes ausgewählt oder gestaltet. Bei Tanzaufführungen in den neuen Medien werden die Bühneneffekte in der Regel mit einer Medienbearbeitungssoftware erzeugt. Die Auswahl oder Produktion eines Tanzhintergrunds ist recht mühsam und wird im Allgemeinen von erfahrenen Fachleuten durchgeführt. (Visual Background Recommendation for Dance Performances Using Dancer-Shared Images)
Stage Visuals und Hintergrundbilder können eine Tanzchoreografie auf verschiedene Weisen unterstützen. Folglich einige mögliche Varianten zur praktischen Umsetzung solcher Visualisierungen.
Stimmung und Atmosphäre schaffen Visuals können dazu verwendet werden, eine bestimmte Stimmung oder Atmosphäre zu erzeugen, die die Emotionen der Tänzer und des Publikums verstärkt. Zum Beispiel könnten farbige Lichter, abstrakte Bilder oder animierte Hintergründe verwendet werden, um eine bestimmte emotionale Stimmung zu erzeugen, die die Choreografie unterstützt.
Erzählende Elemente hinzufügen Visuals können auch dazu verwendet werden, erzählende Elemente oder Geschichten in die Choreografie zu integrieren. Durch den Einsatz von Bildern, Videos oder Animationen können Geschichten erzählt werden, die die Tanzperformance ergänzen und das Publikum in die Handlung eintauchen lassen.
Interaktion mit den Tänzern Visuals können so gestaltet werden, dass sie direkt mit den Tänzern interagieren. Zum Beispiel könnten Bewegungssensoren verwendet werden, um die Bewegungen der Tänzer zu verfolgen und auf den Bildschirmen visuell darzustellen. Dies schafft eine enge Verbindung zwischen den Tänzern und den Visuals und kann zu einem faszinierenden visuellen Erlebnis führen.
Verstärkung der Choreografie Visuals können die Choreografie verstärken, indem sie visuelle Effekte wie Verzerrungen, Spiegelungen oder Wiederholungen der Bewegungen der Tänzer erzeugen. Dies kann dazu beitragen, die Dynamik und Ästhetik der Choreografie zu verbessern und das Publikum visuell zu fesseln.
Wenn Visuals auf diese Weise in eine Tanzchoreografie integriert werden, können sie eine inspirierende und kreative Umgebung schaffen, die nicht nur die Performance verbessert, sondern auch die Möglichkeit bietet, neue Verbindungen und Partnerschaften zwischen Tänzern und visuellen Künstlern zu schaffen. Ein visueller Künstler, der eng mit den Tänzern zusammenarbeitet, um die Visuals für ihre Choreografie zu gestalten, könnte sich sogar als Tanzpartner entwickeln, der die Bewegungen der Tänzer auf der Bühne auf einzigartige Weise unterstützt und ergänzt. Diese Zusammenarbeit kann zu einer kreativen Synergie führen, die die Performance auf ein höheres Niveau hebt und sowohl für die Tänzer als auch für das Publikum ein unvergessliches Erlebnis schafft.
Zu Beginn direkt etwas Literatur die ich zu meinem aktuellen Thema gefunden habe und für die Zukunft sehr hilfreich sein kann:
Köhler, Kristina: Der tänzerische Film. Frühe Filmkultur und moderner Tanz. Marburg: Schüren Verlag 2017
Bucher, Ladina u.a.: Tanz im Film. Das Politische in der Bewegung. Berlin: Verbrecher Verlag 2017
Hilton, Penny: Design in Motion. Applying Design Principles to Filmmaking. Ort?:Bloomsbury Publishing 2020
Gibson, Steve u.a.: Live Visuals. History, Theory, Practice. London/New York: Routledge 2023
Rosiny, Claudia (14.02.2018): Videotanz. nach dem film. In: https://nachdemfilm.de/issues/text/videotanz (zuletzt aufgerufen am 07.02.2024)
Cheung, Ming u.a.: Visual Background Recommendation for Dance Performances Using Dancer-Shared Images. IEEE International Conference on Internet of Things (iThings) and IEEE Green Computing and Communications (GreenCom) and IEEE Cyber, Physical and Social Computing (CPSCom) and IEEE Smart Data (SmartData) (2016),S. 521-527
Naess, Joan: A developmental approach to the interactive process in dance/movement therapy. In: American Journal of Dance Therapy Vol. 5 (1982), S. 43-55
Der Tänzer tanzt mit seinem Mittel, mit dem Körper. Die Kamera tanzt mitihrem Mittel [. . .], erst die Hilfe von kombinierten Fahr-, Schwenk- und Kranaufnahmen,erst die Hilfe von spezifisch filmischen Mitteln ermöglicht einenlebendigen tänzerischen Eindruck. (Drommert 1962: 32)
Jeder versteht nämlich unter Tanz etwas anderes, der eine etwas Ballettartiges,der andere Pantomimen, der dritte wieder etwas Kultisches, was seiner persönlichenVorstellung von griechischen Tänzen entspricht, und die meistenein Hüpfen und Sichdrehen nach schnellen Polka- und Walzertakten, dasdem geselligen Vergnügen des Volkes und der Ballsäle mehr oder wenigerähnlich ist. Andere wiederum wollen mit jenem Satz eine ihrer Meinung nacheinwandfreie Formulierung des strengen ästhetischen Begriffs Tanz einleitenoder sie erachten diesen Begriff als schon gegeben, als bereits vorhandenenfesten Maßstab. (Brandenburg 1921: 16, Herv. i. O.)
Seit es Film gibt, gibt es Tanzfilme. Zwischen dem tanzenden Licht und der Bewegung menschlicher Körper besteht eine ambivalente Verwandtschaft. Zwei gegensätzliche Erkenntnisweisen begegnen einander: der geometrisierende Blick und die Unmittelbarkeit körperlicher Erfahrung. Ob in Quentin Tarentinos »Pulp Fiction«, Jean Luc Godards »Bande à part« oder Lars von Triers »Dancer in the Dark«, in »Flashdance«, der »Step Up«-Reihe oder den amerikanischen Klassikern, überall lassen sich Einstiegspunkte zu Fragen finden, die das Feld der Tanzwissenschaft sprengen und zum Kern der Gesellschaft vordringen.
„Die Bewegungsregie in der zeitgenössischen Theaterproduktion wird zunehmend als wichtiger Bestandteil der ausdrucksstarken Kunst der körperlichen Kommunikation in der Live-Performance anerkannt und geschätzt. Von Szenenwechseln über die Entwicklung von Charakteren bis hin zu Tanzsequenzen – Bewegungsregie untermauert alles, was wir auf der Bühne und der Leinwand sehen. Dieses umfassende Buch zeigt die Kreativität, die Fähigkeiten und das Wissen auf, die für den Bewegungsregisseur im Kontext der Aufführung von Bedeutung sind. Schlüsselkonzepte werden mit aufschlussreichen Berichten erfahrener Praktiker kombiniert und durch kreative Aufgaben unterstützt, die darauf abzielen, Neugier, Geschick und ein tieferes Verständnis für dieses wertvolle Handwerk zu entwickeln. Zu den behandelten Themen gehören: Was ist Movement Direction?; der ausdrucksstarke Körper; der Prozess des Schauspielers; Bewegung in Zeit und Raum;? die Arbeit mit Tanzformen; Kontext, Recherche und Planung; Movement Direction für Theater und Oper und schließlich die Arbeit mit Regisseuren.“ ¹
Movement Direction mit der Kamera:
Die Bewegungsrichtung in einer Videoaufnahme ist von entscheidender Bedeutung, da sie die visuelle Dynamik des Videos maßgeblich beeinflusst und eine starke emotionale Wirkung auf das Publikum haben kann. Durch die geschickte Wahl der Bewegungsrichtung können Filmemacher eine Vielzahl von Effekten erzielen, die die Erzählung verstärken und das Zuschauererlebnis intensivieren.
Erstens kann die Bewegungsrichtung dazu beitragen, die Aufmerksamkeit des Publikums zu lenken und den Fokus auf bestimmte Elemente innerhalb der Szene zu lenken. Wenn sich die Kamera beispielsweise auf eine Person oder ein Objekt zubewegt, wird die Aufmerksamkeit des Zuschauers automatisch darauf gelenkt und die Bedeutung dieser Elemente wird betont. Auf der anderen Seite kann eine Bewegung weg von einem bestimmten Objekt oder einer Person Spannung erzeugen und Fragen beim Publikum aufwerfen, was sich außerhalb des Bildausschnitts befinden könnte.
Zweitens kann die Bewegungsrichtung dazu beitragen, die Atmosphäre und Stimmung einer Szene zu verstärken. Eine Kamera, die sich langsam und gleichmäßig nach oben bewegt, kann beispielsweise ein Gefühl von Erhabenheit und Größe vermitteln, während eine schnelle seitliche Bewegung eine Dynamik und Spannung erzeugen kann. Durch die bewusste Auswahl der Bewegungsrichtung können Filmemacher also die emotionale Resonanz einer Szene gezielt steuern und die gewünschte Atmosphäre schaffen.
Darüber hinaus kann die Bewegungsrichtung auch dazu beitragen, die räumliche Dynamik einer Szene zu vermitteln und dem Zuschauer ein besseres Verständnis für die Beziehungen zwischen den verschiedenen Elementen innerhalb des Bildes zu vermitteln. Eine geschickte Kamerabewegung kann die räumliche Tiefe betonen und dem Zuschauer ein Gefühl für die Anordnung von Objekten und Personen im Raum vermitteln.
Insgesamt ist die Bewegungsrichtung bei der Videoproduktion ein mächtiges gestalterisches Werkzeug, das dazu beiträgt, die visuelle Erzählung zu verstärken, die Stimmung zu beeinflussen und die räumliche Dynamik einer Szene zu vermitteln. Durch die bewusste Auswahl und Umsetzung der Bewegungsrichtung können Filmemacher eine Vielzahl von Effekten erzielen, die das Zuschauererlebnis bereichern und die emotionale Resonanz ihrer Videos verstärken.
¹Flatt, Kate: Movement Direction. Developing Physical Narrative for Performance. Ramsbury: The Crowood Press 2022
Die Geschichte von Männern und Maskulinität im Tanz ist faszinierend und spiegelt oft die kulturellen Normen und Vorstellungen ihrer Zeit wider.
In vielen traditionellen Gesellschaften wurden bestimmte Tanzstile als männlich oder weiblich angesehen und entsprechend codiert. Männer wurden oft mit kraftvollen, heroischen oder rituellen Tänzen in Verbindung gebracht, die ihre Stärke und Macht betonten. Ein Beispiel hierfür sind die Kriegstänze einiger indigener Völker oder die rituellen Tänze der antiken griechischen Krieger.
Mit der Entwicklung des Balletts im 17. Jahrhundert in Europa wurden Männer zunächst oft in Nebenrollen besetzt, während Frauen die Hauptrollen in den Stücken übernahmen. Die Vorstellung von Männlichkeit im Ballett war stark von aristokratischen Idealen geprägt, die Eleganz, Anmut und Kontrolle betonten.
Im Laufe des 20. Jahrhunderts begannen männliche Tänzer jedoch, eine prominentere Rolle im Ballett einzunehmen, und es entstanden neue Tanzformen, die eine breitere Palette von Ausdrucksmöglichkeiten für Männer ermöglichten. Beispiele hierfür sind der moderne Tanz und der Ausdruckstanz, die Männer dazu ermutigten, ihre Emotionen und Körperlichkeit auf der Bühne auszudrücken, jenseits der traditionellen Vorstellungen von Männlichkeit.
Heute gibt es eine Vielzahl von Tanzstilen und -formen, in denen Männer unterschiedliche Aspekte ihrer Persönlichkeit und Identität ausdrücken können, von klassischem Ballett über zeitgenössischen Tanz bis hin zu Hip-Hop und Streetdance. Dabei werden traditionelle Vorstellungen von Männlichkeit oft herausgefordert und erweitert, was zu einer vielfältigeren und inklusiveren Tanzlandschaft führt.
Mögliche Problematiken dieser Abbildungen im Tanz:
Die Abbilder von Maskulinität im Tanz und in anderen künstlerischen Ausdrucksformen könnten für die Gesellschaft schwierig sein, wenn sie zu eng definiert sind und wenig Raum für Vielfalt und Individualität lassen.
Wenn bestimmte Tanzstile oder Rollen ausschließlich mit traditionellen Vorstellungen von Männlichkeit verbunden werden, kann dies zu einem Druck führen, der Männer dazu zwingt, sich in ein enges Konzept von Männlichkeit einzupassen, das ihren eigenen Interessen, Fähigkeiten und Emotionen möglicherweise nicht gerecht wird.
Darüber hinaus könnten stereotype Vorstellungen von Maskulinität im Tanz dazu führen, dass Männer, die sich nicht mit diesen Vorstellungen identifizieren können oder wollen, sich ausgeschlossen oder unwillkommen fühlen. Dies könnte zu einer Einschränkung der künstlerischen Vielfalt führen und dazu beitragen, dass bestimmte Talente und Perspektiven unterrepräsentiert bleiben.
Es ist wichtig, dass die Gesellschaft die Vielfalt der menschlichen Erfahrungen und Ausdrucksformen anerkennt und schätzt, sowohl im Tanz als auch in anderen Bereichen. Indem wir stereotype Vorstellungen von Männlichkeit herausfordern und Raum für unterschiedliche Ausdrucksformen schaffen, können wir eine inklusivere und vielfältigere Gesellschaft fördern.
This blogpost will be the final entry on the topic of character rigging and animation in Cinema4D. It will cover some of the more advanced tools Cinema4D provides for character rigging and animation and how they may be used to either achieve even better results or speed up the production process. Finally, it will give a short summary of the covered topic.
Deformation and changing of topology based on movement
Muscle Object
The muscle object follows its name by allowing for the set-up and simulation of anatomically correct muscles and sinews. These muscles can be attached to the joints and bones (the rig) allow the simulation of muscle movement beneath the mesh. Since the muscle object is a very complex and advanced tool, that requires lots of time to set up, however, it is only worth the effort when complete anatomical accuracy is paramount. In these particular cases, however, it is possible to simulate dynamic movement changes, skin deformation, different anatomies and their anatomical changes when influenced by different muscles, programm simulations and many more features that would require a whole seperate tutorial series.
Needless to say, the muscle object is a very powerful tool, if mostentimes a bit too complicated, especially since, as long as one’s goal is a more cartoonish style of animation – or rather just not 100% anatomical correctnes – simulating muscle movements by using the pose morph is usually a much quicker and easier alternative.
Pose Morph
As previously described, when working on muscle movements in a rig, where anatomical correctness is not the main focus, the pose morph can be used to transform mesh topology and animate this transformation. By adding the pose morph tag to the obejct or topology one wants to animate, it is possible to switch between different defined poses by simply moving a slider. The poses, between which the slider switches, can be defined in the edit tab of the tag.
While having the pose morph in edit mode, and while working in point mode on the topology, the pose-morph tag records the initial position of the topology / mesh as original position. Now, when working in point mode with the pose morph tag active in edit mode, any changes made to the mesh, e.g., movement of points or any other disformation, will be recorded and the new, updated mesh will be set as target pose. Now, by accessing the animate tab of the pose morph, the object can be blended seamlessly between the two set poses using a slider. This is also true for any and all affected points of the object – to animate the changing topology parameters like rotation, UVs, scale, normals, and many others can be simply changed and the change recorded. Furthermore, it is important to note, that not only one, but a multitude of target poses can be added, which makes it possible to easily animate and / or blend the same object from its starting position to a wide variety of different target postitions via sliders for all the different set poses. It is, in this regard, very similar to the blend-shapes option in other animation software This shows, that the pose morph is a very powerful tool, that allows for easy animation and keyframing of the different poses and blend between them seamlessly, by simply keyframing the blend-slider in the animate tab. This, in connection with Cinema4D’s intuitive auto-keyframe option, allows for a very easy, smooth and fast animation workflow while still producing remarkably realistic results.
Parametric and node based animation
As parametric and node based animation is a very deep and complex topic, this chapter will only cover the basics of the available tools, without diving too deep into the programming or concepts behind it, but aims just to show, which tools exist and, in simple terms, how they work and may be used to improve the animation workflow.
C-Motion
C-Motion is a tool so far unique to Cinema4D. It is a tag, which has been specifically created and optimised for animating repeating or cyclical motions, e.g., someone walking, a bird’s wings flapping, the pistons in an engine moving, etc. This tool works using hubs and targets, which have their own hierarchy similar to the already known parent and child hierarchy. When comparing the two, it would be adequate to say that Hubs could be seen as equal to parents, while targets are their child / children. Within the C-Motion object, to animate a cycle, it is first necessary to set a hub-joint and a target joint. These two can then be continuously animated in a cycle by adding rotations, movement or other actions to the target. The phase tab can then be used to set the length, strength and the start- and endpoint of the desired cyclical movement via a curve.
Using the C-Motion and making sure the movements are either in-phase or out-of-phase to each other makes it easy to make walking appear natural, e.g., to also animate the movement of the arms and legs while walking, so when one leg moves back, the other moves forward and vice versa. The ease, with which a movement can be adjusted by simply adjusting either the strength or entry and exit point of the phase makes the C-Motion a very powerful tool for parametric animation.
XPresso
XPresso is a node-based programming language within Cinema4D. Due to its node based character, all interactions happen within the XPresso shader graph. Within the shader graph, XPresso allows for the connection and relation of different parameters between different objects, which basically allows for interactions between them to be programmed freely via their relations. This way, it becomes possible to, for example, programme, that, whenever object A moves or behaves a certain way, object B behaves a certain way as well. It is, in this regard, similar to constraints, though of course it allows for a much more precise and free interaction, as any relation or behaviour can, with adequate skill, be programmed exactly how the user desires.
To make use of XPresso and manually programme node-based interactions between objects, it is first necessary to add the XPresso tag to the target objetct(s). Then, by double clicking the tag, the shader graph can be access and the desired interaction programmed. When working with XPresso, within the shader graph, it is important to be mindful of the different in- and output parameters and make sure, that values match the desired results, e.g., when working on rotation, making sure whether or not the output of an angle in in degrees or radians, since it can have a huge influence on the later interacations. As such, proper use of re-calculation and re-mapping nodes, where applicable, is crucial.
Now, while it is possible to programme every single interaction manually with XPresso, Cinema4D also offers a shortcut for it. To simply connect two parameters via XPresso, it is also possible to right click the first parameter, which is supposed to influence the other, and chose XPressions -> Set as a driver. Then, simply right click the second parameter, the one to be influenced, and choose XPressions -> set as driven (absolute). This will automatically create a XPresso tag on the target and connect the two parameter in it. It will also change the parameters keyframing appearances to indicate the driving, where the position of the triangle indicated, whether it’s the driver or the driven. This is a very simple way to automatically connect two parameters, though of course it is also prone to error, since there is much less control over what is happening. At this point, it is important to note, however, that, if one is unhappy with the automated results or if the automation produces undesirable results, the XPresso tag can now be accessed manually as well and the interaction refined the same way as if programming it manually. As such, XPresso can both be a very easy, but powerful tool, but also very deep and complex at the same time, as it allows for interactions between any objects or parameters within Cinema4D to be made as simple or complex as one’s skill allows. With it, a wide variety of complex interactions can be programmed, e.g., the influence of a light source on an object and its reflections or similar complex ideas.
The character object
Cinema4D’s character object is basically a built-in auto-rigging tool, that combines many of the different tools and techniques previously described and automates them to a certain degree. To understand what it is doing and how it works, however, it is important to understand all the previously described concepts, as it will help use the character object to its maximal potential.
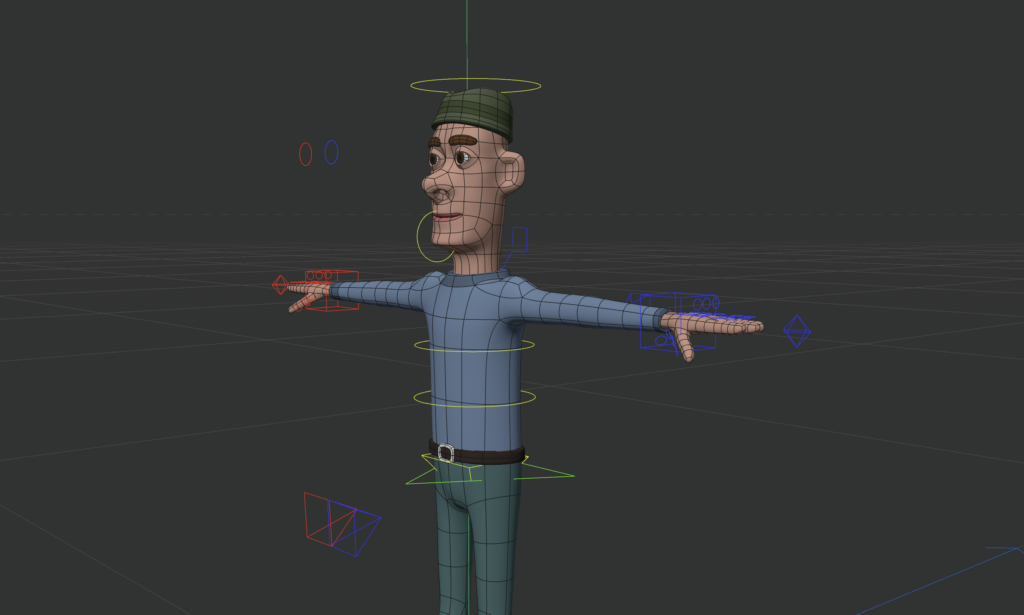
Simple character rigged using Cinema4D’s character object
The character object comes with a wide variety of pre-defined tools and settings, that can be a shortcut when working on very basic meshes and can further cut production time when animating. It is important to note, however, that, same as many other tools in Cinema4D, it can be manually extended or adjusted however needed by the user. With the character objects, the rig can be set up manually or automatically, in a similar way to how normal rigging with bones and joints works. The character object, however, has the advantage that controllers, IK chains and similar controlls / additions can be added and adjusted much more easily than by adding them one by one in a very holistic manner., thus speeding up both the rigging and the animation process. It is one of Cinema4D’s most powerful tools when it comes to animation, as it can be adapted to fit almost any topology and comes with as wide variety of presets and supports, that make adding, for example, mo-capped animations to your mesh very easy.
Summary
To sum up the previous three blogposts, Cinema4D is a very powerful software solution, with a wide variety of tools and approaches to work with, that, when used correctly, can achieve remarkable results when animating. To achieve said results, however, it is crucial to both know about the described tools and be steadfast and secure in their use, which is something, that I am still working on. It is also always important to keep in mind, what the desired endgoal for the animation should be like, as some tools, such as, for example, the muscle object, may yield very little gain for the considerable amount of effort that goes into setting it up. When keeping all these things in mind, however, it can be remarkably simple to achieve great and fun results when animating with Cinema4D and I am very much looking forward to the results my journey with this software may still lead me to.
This blogpost will expand further on the previous topic of character rigging and animation in Cinema4D. It will tackle the question, how a rig can be connected to a modelled geometry, how the created character can be animated and what role topology and edgeflow play when rigging a model. Furthermore, it will also explain the role of controllers and constraints when animating a rig.
Connecting the rig to the character / geometry
Parent – based rigging
Parent-based rigging is the most simple way to connect a piece of geometry and can be great for animating usually inanimate objects, like lamps or balls or smaller robots, such as claw-hands or the like. To parent – rig a geometry, simply make the geometry you want to animate a child of the joint you want it to affect. This allows for the geometry to the be influenced by only its parent joints, which makes it a great tool for animating basic shapes and geometry quickly. Furthermore, it also allows for the use of parametric objects when animating, since there is no need to access the points / vertices of the object. As a result of its rudimentary functions and due to these limitations, however, it is not suitable for animating more complex geometry.
Point weighting, weight management, normalisation and point – weight – based animation
Point weighting, in comparison to parent – based rigging, is much more precise in how it affects the rigged geometry. The main difference between the two is, that instead of each mesh / piece of geometry being assigned as a child of one joint, with point weighting you can, as the name implies, weigh each singular point / vertice to multiple different joints. Point weighting, in this regard, controls how the edge flow and overall topology react to the movement of the joint. As such, for effective point weighting and weight – based animation to be possible, it is imperative to have a clean, artifact-free topology and consistent edge flow.
The weight – assigned in percentage – thereby describes, how much the movement of a joint affects the weighted geometry. The difference hereby is, that one point / vertice can be weighted to multiple joints at the same time and thus be affected by their movement. The percentage of the weight, in such a case, controls how much the point gets affected by the joints movement. To give an example, if a point were to be assigned 50% weight of one joint A and 50% weight of another joint B, if you were to rotate joint A by 90° along the z-axis, but did not rotate joint B at all, the points would only rotate 45° (or, as assigned before, 50% of the weight). It is thus possible to say, that the assigned weight displays, how much control any given joint has over a point. It is important to note, however, that, in order to get clean animations and proper control over the points, each point needs to be assigned a total weight of 100% to the different joints, so it needs to be weighted at 100%. This is called normalisation and it ensures, that no point remains unaffected by the movement of the joints / remains stuck in place, when you move the rig along and thus deforms the topology and mesh in undesirable or unforeseen ways. As such, 100% absolute distribution is the goal when point weighting a mesh.
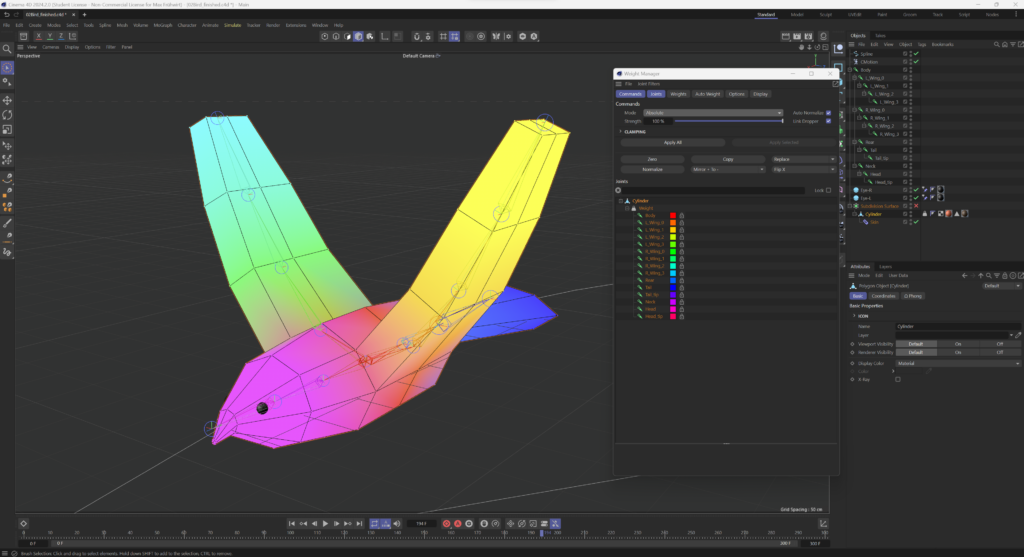
Simple weighted character mesh of a flying bird. The different colours show the weight distribution of the mesh to the different joints of the rig.
Of course, it is possible that, even with 100% absolute distribution, some parts of the mesh get squished or deform in a weird way when moved / rotated past a certain point. To prevent that, the fan-bones, mentioned in the previous blog entry, can be used. By simply assigning weight to the fan bone instead of its two parent joints, the rotation and movement of the mesh can be smoothened out and blended together in a way that prevents the undesirable squishing and / or deformation from occuring. Furthermore, a fan bone’s pole vector allows for a more precise control of the direction the topology deforms in, similar to how a joint’s pole vector allows for a more precise setting of the bend.
Constraints and controllers
To prevent self-intersections during movements and, as another way to influence and refine how a rigged mesh operates when animated, it is possible to use constraints. Contraints, as the name implies, constantly update and constrain certain parameters or properties of any object, joint or bone they are assigned to. This way, the assigned object can, for example, be made to follow a selected target or change its rotation or position depending on different situations. The set target for any given constraint is what is most commonly known as a controller.
Two good examples on a possible application of constraints would be the AIM and the PARENT constraint.
The AIM constraint
By adding the aim constraint to joint and setting a random object (e.g., a cube, sphere, camera, null, etc…) as a target (controller), the joint’s general direction and rotation as well as the direction of that joint’s bone will always follow the movement of the selected target, no matter, where in the workspace it is moved to. This can, for example, be used to rig a character’s head or eyes, so they follow an object’s movement or make them always focused on the camera.
The PARENT constraint
While the aim constraint mainly limits the direction an object is facing, without affecting its actual position, the parent constraint constrains the object it is applied to to the selected parent object and ensures that the position and rotation they have relative to each other remains the same. That way, if you move the parent object, you also move the constrained object / joint the same way, while, if you were to rotate the parent object, the constrained object would be rotated and moved around, so their relative postion would remain the same. Here, it is important to note that, unlike the aim constraint, which assigns just one target for the object to follow, with the parent constraint it is possible to set multiple such targets. When doing so, it is possible to regulate the strength with which each target affects the constrained object and even to blend two different influences together.
Just by looking at these two examples, it should already become obvious why, when rigging an object, proper use of constraints can not only help make the animators work easier, but become outright necessary to ensure a smooth and impeccable animation flow.
Controllers
As mentioned before, the set target for a constraint is usually called a controller. Here it is important to note, however, that, by setting a null object or similar target as a controller, and using the proper constraints, the animation of a mesh can become way easier since, instead of having to animate each movement of any given part of the mesh by hand, it becomes possible to just animate the respective controller and, due to the previously applied constraints, have the mesh react accordingly and, if set properly, correctly and as desired. This is another reason, aside from ensuring proper movement and deformation, that makes constraints and controllers paramount to rigging and character animation in general.
Produktion eines Kurzfilmes mit Unterstützung von KI und mixed media über die psychische Gesundheit im Medienbereich.
Forschungsthema
Das Forschungsthema konzentriert sich auf die Produktion eines Kurzfilms unter Verwendung von KI und Mixed Media, der sich mit psychischer Gesundheit im Medienbereich befasst. Die zentrale Forschungsfrage könnte lauten:
Wie können KI und Mixed Media eingesetzt werden, um komplexe Themen der psychischen Gesundheit auf eine informative Weise darzustellen und reflektieren?
Relevanz
Dieses Thema ist für Designer*innen von entscheidender Bedeutung, da es ihnen ermöglicht, die Arbeitsbedingungen und Herausforderungen im Medienbereich besser zu verstehen und zu adressieren. Zu den zu lösenden Problemen gehören möglicherweise der Umgang mit Stress, Zeitdruck, Burnout und anderen psychischen Belastungen, denen Mediengestalter*innen in ihrem Berufsleben meist ausgesetzt sind.
Eigenes Interesse
Meine Motivation liegt darin, ein Bewusstsein für die psychische Gesundheit von Mediengestalter*innen zu schaffen und Wege zu finden, wie die Arbeitsumgebung unterstützender gestaltet werden kann. Aus eigener Erfahrung in verschiedenen Arbeitsstellen im Medienbereich (Filmbranche, Grafikdesing) und aus dem Bekanntenkreis habe ich mitbekommen, wie sich die Lage anspannt, sei es am Dreh, mit Kunden oder Konkurrenten. Auch bei diversen Veranstaltungen darunter auch die pixel, wurde dieses Thema immer wieder angesprochen.
Erkenntnisse und Methoden
Aus diesen bereits oben genannten Erkenntnissen möchte ich mittels Interviews und Umfragen Daten sammeln und mithilfe von KI auswerten und weiter verarbeiten.
Stand der Technik
Dieser Aspekt bezieht sich auf den Kurzfilm, der daraus resultieren soll, um mehr Bewusstsein zu schaffen. In diesem Kurzfilm sollen die ausgearbeiteten Interviews von Filmschaffenden mit einfließen und mithilfe von mixed media kombiniert werden. Aus diesem Grund bezieht sich der Stand der Technik auf folgende Bereiche: Kurfilm, KI und Stop Motion/Motion Graphics
Nächste Schritte
Vertiefte Recherche und Konzeptentwicklung
Story-Entwicklung und Drehbucharbeit
Experten Meinungen einholen
Produktion
Vision für den Kurzfilm: Die Vision für den Kurzfilm ist es, ein einfühlsames und informatives Werk zu schaffen, das die Herausforderungen und Erfahrungen von Mediengestalter*innen im Zusammenhang mit ihrer psychischen Gesundheit am Arbeitsplatz auf eine respektvolle und unterstützende Weise darstellt. Er soll zudem auch Empathie fördern und positive Veränderungen in der Arbeitsplatzkultur innerhalb des Medienbereichs anregen. Letztendlich soll der Kurzfilm dazu beitragen, eine offene und unterstützende Umgebung zu schaffen, in der die psychische Gesundheit der Mediengestalter gefördert und respektiert wird.
Überlegungen/Motivationen
In einer Welt, die von ständigem Fortschritt und technologischer Innovation geprägt ist, werden die Grenzen des Storytellings ständig neu definiert. Ein spannendes Beispiel dafür ist die Produktion von Kurzfilmen, die sich der Unterstützung von KI und Mixed Media bedienen, um ein tieferes Verständnis für psychische Gesundheit im Medienbereich zu vermitteln.
Die psychische Gesundheit ist zu einem immer wichtigeren Thema geworden, insbesondere im Medienbereich, der oft die Realität verzerrt und Stereotypen verstärkt, aber auch die Arbeit in diesen Bereichen bringt viele Hürden mit sich. Die Verwendung von Kurzfilmen als Medium ermöglicht es, komplexe Emotionen und Erfahrungen in kurzer Zeit zu vermitteln, was es zu einer idealen Plattform macht, um das Bewusstsein für psychische Gesundheit zu schärfen.
Die Integration von KI in die Produktion von Kurzfilmen bietet eine faszinierende Möglichkeit, die Darstellung psychischer Gesundheit zu verbessern. KI-Algorithmen können große Datenmengen analysieren und Muster identifizieren und einige Tasks in der Produktion übernehmen.
Ein weiterer Schlüsselaspekt bei der Produktion von Kurzfilmen über psychische Gesundheit ist die Nutzung von Mixed Media. Durch die Kombination verschiedener Medien wie Animation, Live-Action-Film und Stop Motion können eine vielschichtige Erfahrung schaffen, die die Zuschauer*innen dazu einlädt, sich in die Welt der Charaktere hineinzuversetzen und ihre inneren Kämpfe besser zu verstehen.
Trotz dieser Herausforderungen bietet das Zusammenspiel von KI und Mixed Media in der Produktion von Kurzfilmen über psychische Gesundheit ein enormes Potenzial, das Bewusstsein zu schärfen, Vorurteile abzubauen und Menschen zu ermutigen, über ihre eigenen mentalen Herausforderungen zu sprechen. Durch die Kombination von Technologie und Kreativität können neue Wege gefunden werden, um komplexe Themen zu erforschen, um positive Veränderungen in der Medienindustrie und auch generell in der Gesellschaft herbeizuführen.
Literatur ist hierfür auch den bisherigen Blogposts zu entnehmen
Once I started further looking into the topic of character animation and rigging, it became increasingly obvious, how big a topic this would be. As such, a decision was made to currently limit my research only to rigging and animation with the tools Cinema4D provides, as it is my current go-to software solution when it comes to modelling, rendering and animation. As such, while this will aim to provide a general picture and insights on rigging, the tools described will be following a standard rigging process in Cinema4D.
After working through all of Maxon’s „Hands on“ series, which is more than 13 hours of lectures, dealing with the topic Animation and rigging, and since Cinema is such a powerful software, that provides lots of different tools, my findings will be split into multiple parts: The blog entries will explore what rigging even is, how it works, why it is important for character animation, how to build a rig, how to connect it to geometry and how to animate it. It will start with the very basics, giving an introduction and explaining concepts, and go all the way to the most advanced tools an animator can use when animating with Cinema4D.
First of all: What is rigging, and why is it important for character animation?
Rigging is a technique used in skeletal animation to move and / or present a character model using a series of interconnected digital bones and joints. More specifically, rigging refers to the actual process of creating a digital skeleton for a character model, that can then be linked to said model in order to move, rotate or animate it otherwise. The linked 3D geometry, in this case, then becomes almost like puppet of the created rigged skeleton and deforms and moves along with it. These movements of singular joints and bones, or even the complete model, can then be keyframed or otherwise recorded in order to create longer, continuous animations.
Great, but how does it work?
Bones and joints
To rig a model in Cinema4D, you first have to create its skeletal rig aand then assign you modeled character or geometry to it. By using the joints tool in the character menu, you can, as the name implies, place joints within your scene. These joints then get connected via bones and are what you would move around and / or rotate in order to animate your character later on. To connect two joints with a bone, simply make one joint into a child of the other joint in the object manager. Here, it is important to note, that hierarchy between the joints is VERY important during the rigging process and also later in animation, because, generally speaking, the direction of the bone goes from the object higher in the hierarchy to the object lower in the hierarchy, so always from parent to child. As such, it is usually a good idea, when animating a humanoid character, to start somewhere close to the center, where the spine would be, usually around the pelvis or the chest region, and go outwards from there creating shoulders, elbows, hips, knees, all the way to hands and toes. This is so important, since the direction of the bone also determines, in which way two joints influence each other.
Forward kinematics, inverse kinematics and their hybrid solutions
As mentioned before, the hierarchy between the joints determines their influence on one another. Generally speaking, a rig is dependent on the direction of the bones, as they are forward kinematic, meaning that, when you move or rotate a joint higher in the hierarchy (parent), all children of that joint (other joints and bones) get moved and / or rotated along with it. However, if you move a joint lower in the hierarchy (child), its parent does not get affected and remains in place. This is, in fact, intentional and desired and can be easily understood by imagining the following: When you turn your upper body / torso, usually your neck and shoulders along with your arm rotate with it. However, when you rotate only your wrist, your upper body / torso usually remains unaffected. The same principle applies here.
There are, however, situations, where it may become desirable for a lower-hierarchy joint to affect their parent, e.g., when animating a character walking or jumping. When lifting or otherwise moving the foot – which is usually lower in the hierarchy than the knee or the hip – in such a situation, it is only obvious that the knee should bend accordingly at the same time and maybe even the hip to slightly rotate or move upwards, in order to look natural and avoid uncanniness. To achieve that, it is necessary to create what is known as an inverse kinematic chain between the child-joint and its parent-joint. This chain can be understood as a direct reference between the goal joint, which is the end-joint of the chain (parent, upper hierarchy) and the influencing joint, which is the start-joint of the chain (child, lower hierarchy) and it enables for more fluid and natural looking movements to be created without the need of animating each joint seperately. It also is possible to define, which way a joint higher in the hierarchy / chain should bend or move by setting a pole vector.
So, to sum things up and break them down a little bit:
1) Forwards kinematics work from the top of the hierarchy downwards through the joint-chain, you have to tell each chain-link how to move seperately and animate every joint as you need it while manually forwarding the movement down the chain. 2) Inverse kinematics work from the bottom of the hierarchy upwards through the joint-chain, you influence the last joint in the chain and all the joints, that are connected and higher up in the chain react accordingly. This is especially helpful when animating legs, as it helps them stick to the floor without moving through it, while maintaining proper form.
Understanding how forward and inverse kinematics work and making use of both systems within a rig (hybrid solution) is paramount for proper, good looking animations, that don’t look uncanny or otherwise off.
Simple joint and bone rig using both forward and inverse kinematics
Fan bones / joints for smoother rotations
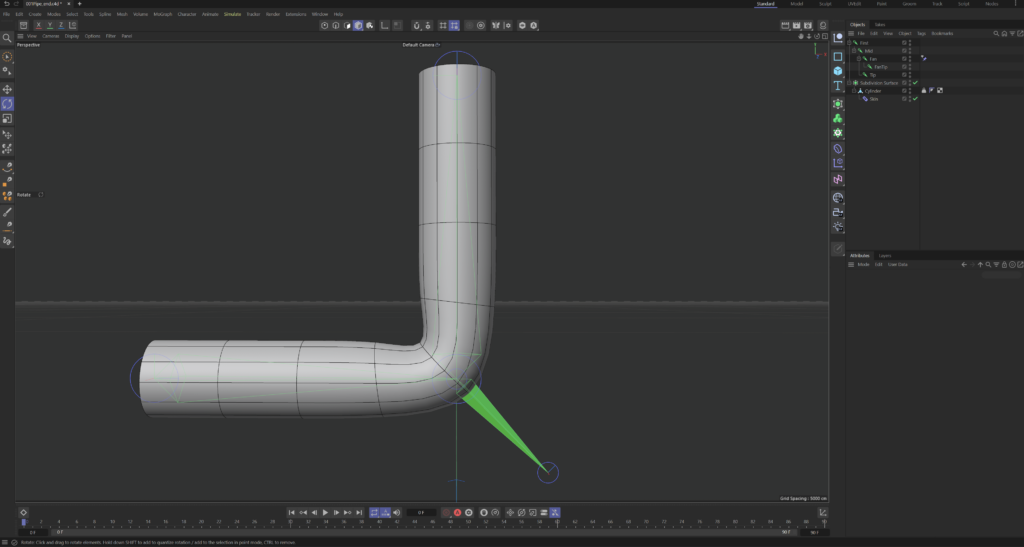
Fan joints and fan bones are a form of controller – more on controllers will be explained in a later blog post – that basically are a smaller bone and / or joint. These joints, while being the child of another joint and being zeroed-out towards it – meaning it shares its parent’s location, rotation and scale – , act as a support, that blends the rotation of two joints together. It does so, by using a rotational constraint (rigging tag), where the rotational strengths of the two joints can be set. The blending between the joints is dependent on the strength set. This may seem confusing at this point, but its purpose will become clear in later entries. All that is important at this point is to know, that fan joints / bones exist and that they can blend the rotation of two other joints together.
Fan bone sticking out of a simple rigged pipe
Next steps:
Connecting the created skeletal rig to the character model / geometry
Parent – based rigging vs. point – weighting and binding