Evaluation of a Master’s Thesis

The Master’s thesis I chose for this task was written by Diogo da Costa Alves Pinto for the acquisition of a Master Degree in Sound Design at the Portuguese Catholic University of Arts. It aims to explore the taxonomic and causal link between emotions and sound objects and is titled “A Sound is Worth a Thousand Words”.

I chose this thesis because I was hoping it might give me pointers in my own research, since the abstract hinted that there is an element of deconstruction in the audio experiments.

  • Level of Design

      As has been observed with multiple Master’s theses in the field of Sound Design, this one also just seems to follow university protocol – there are no special elements that stick out in terms of visual design, and it also does not seem like it was a requirement for fulfilment of the task. However, I did notice that there are mixed fonts throughout the thesis (i.e. index is formatted differently from the main body of text, headings are different than continuous text), so the coherence throughout the whole document in terms of readability is missing a bit.

      • Degree of Innovation

      The topic itself does not seem to bring an entirelynew idea into the field, however, there are good points that are being made about the translation of studies into other languages and possible bias or issues that could stem from that – in that sense, taking the field of study into an environment with a different mother tongue brings new insights.

      • Independence

      It seems like the author has carried out multiple experiments on their own and managed to evaluate the results thereof on their own, in addition to doing literature research in advance to inform those experiments.

      • Outline and Structure

      On the first glance, the structure makes sense in the index. However, when reading the thesis, the layout begins to seem a bit clumsy in a way that does not fully support the intended structure or the reading flow (e.g. numbering of chapters and subchapters). There is a separate chapter titled ‘Structure’ which is mostly self-explanatory or reiterates the methodology chapter. Overall, in its outline, the topic appears to be a bit too broad for its initially stated purpose. There is also one sub chapter which only consists of one sentence – this could have probably been combined with another sub chapter.

      • Degree of Communication

      The author does a good job of explaining basic concepts and ideas using appropriate literature and references from the field of study. Connections and comparisons in between sources and experiments are drawn, but sometimes in illogical order (e.g. comparison to other method is made before the reader has been introduced to other method). There is an awareness that external factors influence associations with sounds and that the rationalized involved in causal listening influences test results. This is expressed well, and there is a lot of needed detail about variances and why specific models are utilised more in sound and music.

      • Scope of Work

      There is mixed detail when it comes to analysis of the work that was undertaken. A lot of value was placed on literature research, but especially the evaluation and setup of the second experiment might have required a little more detail in the explanation. It was not clear whether the alterations in the sound should bring about a specific emotion or whether the individual original sounds were to be considered for their emotional feedback, and there is no Appendix showing the details of the test results in a way that could clarify that. The author managed to recruit quite large sample groups for the scope of the study twice, but there was not a lot of background on which sounds were used, why they were used and what the use of these specific sounds would bring to the conclusion, so in some ways, the thesis felt a little too broad-angled to concisely and effectively bring depth into a field that has been explored before.

      • Orthography and Accuracy

      Overall, the work is quite neat in terms of orthography. The citations seemed to be incomplete at time, so there is an aspect of the work that appears as if the diligence has been placed on other aspects, such as the experiment and the content over the formatting.

      • Literature

      The thesis cites mostly papers, books, dissertations and standard literature for the field. It draws back on historical references, but always puts them into context with more up-to-date literature examples.

      Overall, this thesis tries to approach a large topic with the help of two empirical experiments. A lot of effort has been put into those and the literature research, but it appears that some of the insights and critical evaluations get lost in the communication and the broad scope of the thesis.

      Audio Programming & Mapping Process

      So the audio programming process basically took the entire semester, and it continues to be a focus as I refine it to better align with the compositional idea and ensure the patches are as practical as possible.

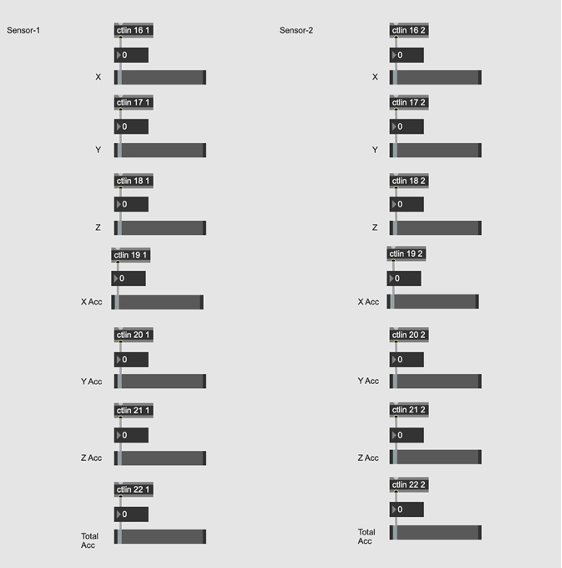
      I started by mapping the sensors in Max MSP. Each sensor can be mapped to seven parameters using MIDI numbers, the 7th parameter is a measure of total acceleration obtained directly from the SOMI-1 receiver. It’s calculated using a Pythagorean formula based on acceleration data, excluding gravitational force to improve accuracy.

      Figure I. Movement parameters of SOMI-1 around the X, Y, Z axis

      What I learned from the mapping process is that even though I tried to be specific with the movements, generally you cannot isolate just one of these parameters while moving. This is a key difference I need to consider when mapping movement sensors compared to other stable

      MIDI controllers. To effectively map the sensors and keep in mind the application of movements, I divided the motions into the 7 parameters for each sensor:

      • Rotation X
      • Rotation Y
      • Rotation Z
      • Acceleration X
      • Acceleration Y
      • Acceleration Z
      • Total Acceleration

         Figure II. An overview of sensor mapping in Max MSP

      After completing the initial movement mapping, I began creating patches for the interaction part using the aforementioned list. This process is ongoing and will likely continue until the project’s completion. Meanwhile, a crucial aspect I am keen to focus on this summer is implementing patches to the sensors and testing their compatibility both independently and with the violin.

      Throughout my learning, I am aware that due to the violin, my movement mapping is limited, and I am still trying to figure out how I can wear the sensors either on my hands or elsewhere, but it is also clear that the majority of the mapping is for the right hand or for the bowing part. However, there is also the possibility to map the sensors not only to the usual gestures that occur while playing the violin but also to some unconventional movements to trigger certain parameters, which would require more precise mapping in this case. In general, there are a few possibilities for the mapping process that I need to consider and examine thoroughly.

      There are several types of mapping strategies that can be employed, regardless of whether the relationship between the control input and the parameter output is linear or non-linear:

      One-to-One Mapping: This is the simplest form of mapping where each control or sensor input directly corresponds to a specific parameter or output

      Multi-Parameter Mapping: This approach allows a single sensor input to influence several aspects of the sound to control multiple parameters simultaneously or sequentially. There is also this possibility to change the works of the sensors via pedal to have the combination of different tasks for the sensors

      What I also have in mind is to avoid counter-intuitive mapping, which involves controlling parameters in unexpected ways, as it adds an element of unpredictability to the performance. I believe this is unnecessary for the project. Instead, my goal for the mapping part is to ensure that my movements have a clear and meaningful relationship with the parameters they control.

      Compositional Aspect

      As I started with audio programming, it felt like I walked into an unknown world with many possibilities, and it wasn’t clear to me which direction I should take. I came across a conference proceeding on New Interfaces for Musical Expression by Perry Cook15, which helped clarify my initial steps. In the conference paper mentioned that, “Make a piece, not an instrument or controller.” So, I decided to come up with the idea of a piece or specific musical composition because I didn’t want to create interesting research questions without a real product or future direction.
      During the semester, I came up with two compositional ideas, and I aim to work on both of them since the interaction parts between them are not significantly different.

      Piece No. I
      The first concept comes from my own experience as a classical violinist who transitioned into electronic music. The overall idea involves contrasting aspects of my experience, demonstrating how every action reflects on other elements, and showcasing the complexity of identity. This piece has three sections:

      Section I
      1. Introduction
      2. Then it goes to looping and layering
      3. Atonality
      4. Dissonant Intervals
      5. Full of aggressive bowing
      6. Using violin extended techniques
      • For the transition part from section I to section II, I will either put the violin aside or have it in my hands but not playing it, instead I will just control the recorded sound and manipulate it with the sensors.
      • Then will control the amplitude and do a smooth decrescendo to be prepared for the second section.

      Section II
      1. After some choreography, build the contrast on top of distorted and fading out loop
      2. Play tonal patterns
      3. With clear sentences
      4. Subtle movements
      5. Everything in this section is about contrast
      6. Probably no loops at all!

      Section III
      1. Back to the chaos but this time overlapping and layering consonant intervals and melodies
      2. End the piece immediately!
      So the concept for this piece is mostly based on multiple loops, evolving patterns, and layering them to create a some sort of polyphony. The goal is to alter these layers through various types of interaction to showcase the role of the sensors. I will also build a contrast between the manipulated sounds and the raw sound of the violin, primarily in section two, and then take ideas from each of the two sections to build the final section based on that, for the conclusion part.

      Piece No. II
      The second piece also evolves from the first one, but with a difference: we start with the violin just for the beginning, and then the focus is more on the transition from acoustic to electronic sounds.
      1. Playing violin melodically and record it into the buffer and create loops
      2. Put the violin aside
      3. Wear the sensors
      4. Start with different types of interactions step by step
      5. The end consists of many synth loops blending into each other

      02/09 Sound Design & Musik

      Um die Stimmung des Videos zu schaffen/zu verstärken und die Optik der Animation zu unterstreichen, habe ich mich entschieden, ein eigenes Sound Design zu gestalten. „AMA“ von Julie Gautier, hat mich nicht nur visuell, sondern auch mit dem Pianostück, das unterlegt ist, inspiriert. Mein Sound Design soll eine entspannte und immersive Atmosphäre zu erzeugen und vor allem die Unterwasserwelt widerspiegeln. Hier möchte ich die Stilelemente, die ich gewählt habe, zeigen.

      Stilelemente und Stimmung

      Meeresrauschen & Wellen
      Das Meeresrauschen ist ein zentrales Element des Sounds. Es vermittelt ein Gefühl von Ruhe und Weite. Als konstantes Hintergrundgeräusch erzeugt es eine beruhigende Atmosphäre, die die Zuschauer zusätzlich in die Szene eintauchen lässt.

      Tropfen
      Die Geräusche von Tropfen, die ins Wasser fallen, sind eine rhythmische Komponente. Diese habe ich mit den Synthesizern und Glockenklängen imitiert.

      Ein- und Ausatmen
      Das Einatmen zu Beginn und das Ausatmen zum Schluss bildet einen dramaturgischen Kreis und schafft Spannung. Gleichzeitig wird die Thematik Tauchen und Unterwasser aufgegriffen.

      Piano
      Ich verwende Pianoklänge als musikalisches Fundament. Die Melodien sind minimalistisch und klingen eher sanft.

      Synthesizer-Elemente (Rauschen, leichtes Dröhnen …)
      Die Synthesizer-Klänge fügen eine mystische Note hinzu. Damit kann ein Klangteppich erzeugt werden, der einen fließenden Übergang zwischen den verschiedenen Parts ermöglicht.

      Verwendete Technik
      Als Software zum Aufnehmen habe ich Reaper verwendet. Zur Klanggestaltung habe ich verschiedene Synthesizer (KORG) und einen Reverb verwendet.

      Zwei Spuren mit Meeresrauschen und Tropfen beinhalten Sounds von Freesound.org – ebenso ist das Ein- und Ausatmen ein fertiger Sound, der hier Verwendung gefunden hat.

      Workplace Reaper

      Zusammenfassung:

      Die Kombination aus den verschiedenen Elementen erzeugt eine beruhigende Klanglandschaft. Die akustischen Stilelemente unterstützen die Visuals und machen meiner Meinung nach einen großen Teil des Eindrucks aus.

      Sounds & Musik des finalen Videos

      “ontextC” – Technical Diary 4

      What happened so far?

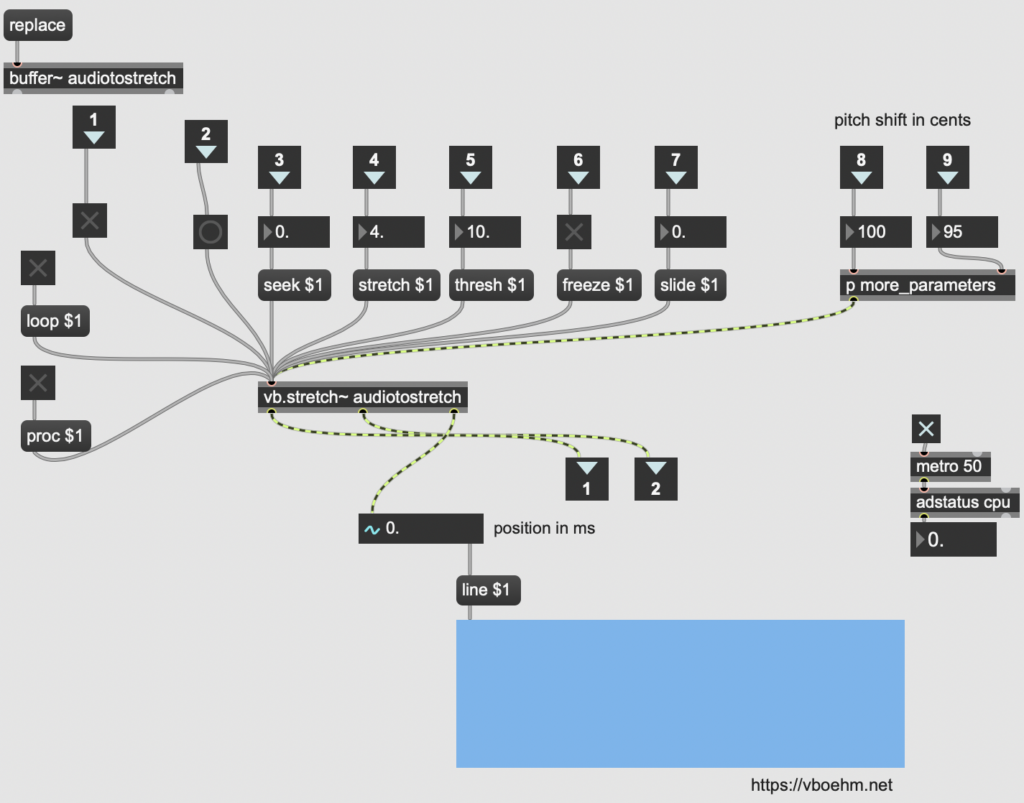
      To know where to start modifying the Max phase vocoder, I drew comparisons between the same stretch factors in PaulXStretch and the phase vocoder. To keep the conditions as similar as possible, I changed the FFT size in PaulXStretch to 1024 and turned off all of the other parameters in the processing chain (harmonics, tonal vs. noise, frequency shift, pitch shift, ratios, spread, filter, free filter and compressor), with the expectation that the resulting sounds would just stretch the source sound (a ten second snippet from an acoustic multitrack recording) using the respective stretching algorithm. This would then allow me to hear differences.

      When comparing the results, it quickly became evident that while the phase vocoder provided very transparent sounding stretches at lower stretch factors, the aesthetic quality of the Paulstretch algorithm and the smearing it introduces were a) very different sounding and b) more usable for the intended sound design purposes, where especially stretch factors over 10 become interesting and the original sound source becomes almost unrecognisable.

      Note: I have now switched to working with the default phase vocoder that comes with Max as a resource example (Max 8 > Show package contents > Resources > Examples > fft-fun > phase-vocoder-example-folder). It has a lot of similar components.

      Ongoing

      Currently I am in the process of settling on EQ, reverb and pitch shifting modules to use for the prototype. Another more research-based aspect of the project is to figure out how the provided Python code from the old Paulstretch algorithm works, which will hopefully allow me to modify the phase vocoder towards a direction that suits the imagined aesthetic outcomes of ontextC. My supervisors are kindly is helping me with this, since I am not familiar with Python at all.

      Results and Reflection

      The results of the comparison are useful, because they define the differences that need to be overcome in order to reach the aesthetic results I am looking for with this plug-in. While some of the inner workings of the Paulstretch algorithm still remain unknown as of now, the Python code will hopefully help to figure out what is missing. Furthermore, being able to set the FFT size over 2048 to a value closer to a value along 4400 would be a next step to imitate the workflow that started this project better – the steps that follow will show whether that is a limitation in Max or not.

      As a sidenote: The shortcuts CMD + Option + M to open a locked Max patch and CMD + 8 to remove the frame have been proven very helpful.

      Objectives for Next Time

      • Prep draft of sound example through all parts of the signal chain -> How does it start, which sound do we want to get to?
      • Check out Phase vocoder template, start to modify parameters in project draft and experiment
      • Settle on other modules in the processing chain

      Keep in Mind: Mapping parameters together will become relevant sooner rather than later – it makes sense to research this as well.

      “ontextC” – Technical Diary 3

      What happened so far?

      A recent priority was the comparison of different phase vocoders that are available in Max. With the help of the Cycling74 resources, I tested whether the difference between the modules using polar vs. cartesian coordinates affected my sound sources in a (noticeable) way that would make me choose one over the other – ultimately cartesian coordinates seemed like the better option for my project, also in terms of CPU usage. For windowing, the Hanning window is currently in use.

      Furthermore, to better understand the processes the signal goes through within the plug-in, I asked my supervisor about the meaning of phase coherence in this context, and was able to bit by bit (little terminology reference here) connect the theory and the practical application, which will help me a lot going forward.

      Ongoing

      The evaluation and development of EQ, pitch shifting and reverb modules for my project is ongoing. Fortunately, there are a lot of libraries and resources especially for filtering and spatial effects, so the main challenge here is to find what works best to achieve the sound results I am aiming for, while also being functional and relatively simple to integrate. By studying existing Max patches, even though they might not be 100% what I am looking for, I am learning more not just about the Max environment, but also about best practices and how I could translate certain organisational aspects (comments are so helpful for external people looking at a patch to know what is going on!) and connections into my own project patch. My main resources for this are free patches that I download from the Max for Live library patch page and explore.

      Results and Reflection

      While it is good to know that there is a phase vocoder that can help me to realise my vision for this project, now it is time to start thinking about how to best integrate it, and define which modifications need to be made in order to make it sound the way I want it to in the context of my project. To do so, I will draw comparisons between PaulXStretch and the Max phase vocoders, to determine limitations, potential areas of improvement and differences in sound quality at different stretch factors.

      Objectives for Next Time

      • Prepare and document sound examples to compare between the phase vocoder and PaulxStretch
      • Continue development of other modules

      “ontextC” – Technical Diary 2

      What happened so far?

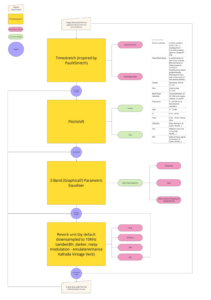
      Aside from a crude mockup in Max MSP, a diagram helps envision the signal flow and processing points of the plug-in now. The diagram is also quite a handy tool to identify challenges, as it lays the main idea out in a layout that is simplified, but representative of the core idea. Parameters have been defined and narrowed down further.

      I have also been provided with copies of all three volumes of Electronic Music and Sound Design – Theory and Practice with Max 8, which I am using as a reference and also a learning opportunity to further familiarise myself with the Max environment.

      The objective at this is to research and further refine the direction of the project. At this point, the audio signal chain has the potential to work, but the time stretch unit does not work by integrating PaulXStretch into the patch as an external VST, since the audio needs to be manually imported and exported in the application.

      Top Objects

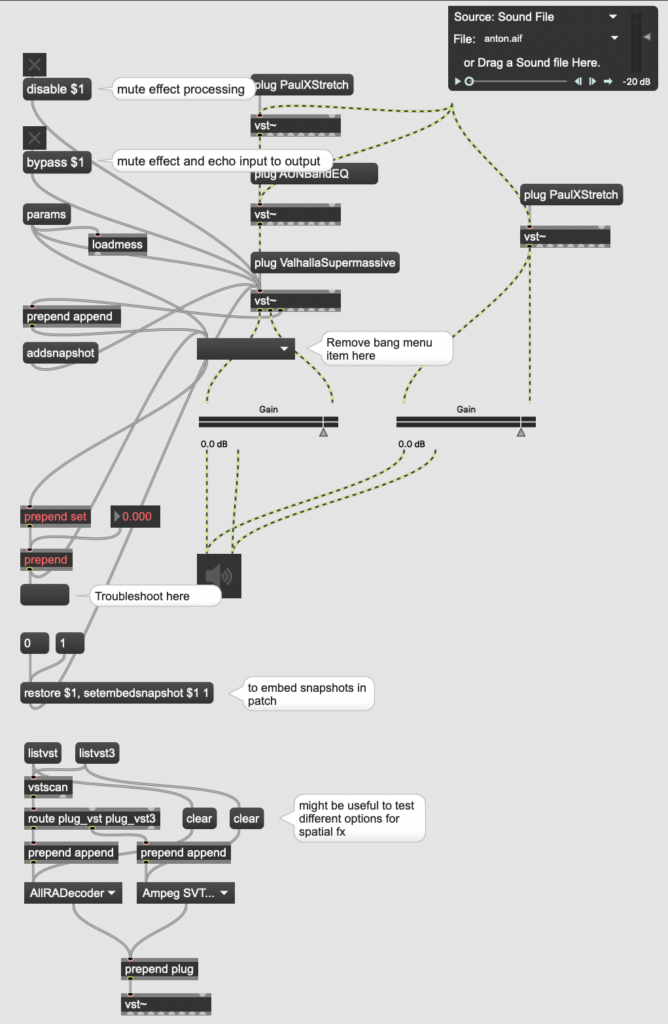
      In the mockup, the bangbang object proved very useful to initiate the loading of a list of parameters in a umenu – to experiment, this was done with a list of parameters from Valhalla Supermassive, but the same procedure could be useful later down the line for menus that should operate similarly.

      Results and Reflection

      The biggest challenge at the moment is the PaulXStretch implementation. The lack of documentation of the application makes it difficult to decipher which algorithms make the parameters work, and since it is at the top of the signal chain it blocks the audio signal from coming through to the next stages of processing. More research on the Paulstretch algorithm will be necessary. Furthermore, the commercial nature of my ideal reverb for this project makes it more difficult to implement, meaning that now is a good point to look into alternatives and emulations.

      Objectives for Next Week

      • Research reverb properties, documentation, and open source emulations/alternatives
      • Research publications on the Paulstretch algorithm
      • Find a good tool for pitch-shifting and EQ

      Research Resources for Next Week

      Timbral effects the Paulstretch audio time-stretching algorithm (Colin Malloy)

      An approach for implementing time-stretching as a live realtime audio effect (Colin Malloy)

      Max 8 Handbooks (Volume 1-3) – Alessandro Cipriani, Maurizio Giri

      Valhalla Lear Resources (Plug-In Design)

      “ontextC” – Technical Diary 1

      The objective for this week was to refamiliarize myself with the Max MSP environment with the help of a template that was provided to me as well as a series of tutorials on YouTube. The larger objective that this step will help me towards is to create a prototype of my plug-in by first using integrations of VST plug-ins that I am currently using for my workflow which I can then gradually substitute with effects units that I created myself to suit my needs.

      The Toolbox

      Toolbox Analysis

      The Max Standalone series was helpful in some regards, but overall, it felt like the videos included a lot of trial-and-error moments, which made them lengthy and tricky to follow along with. I often found myself trying to rebuild a patch component only to then find out it had lots of issues in it which had to be undone a couple minutes later. I could imagine this might be useful for someone who is not as familiar with how to troubleshoot in Max MSP, but for me it was not the best way to progress. There was valuable information on how to build a standalone project, and the fifth episode of the series demonstrated how to distribute an application to stores. While not applicable to my project at this early stage, this is information I will revisit. The most useful information that I will be taking away from this series is how to build an application (Part 1, from 10:30 onwards), work with dependencies (Part 2), and create presets (beginning of Part 3).

      The video by John Jannone managed to integrate a lot of useful information into 20 minutes, and it was relatively easy to follow along with it. Although it is specifically targeted towards synthesizers, it contained useful general information on how to set up umenus to work with parameters from a VST plug-in, manipulate them and save snapshots.

      Results and Reflection

      With the help of the videos and the template I was able to compile a beginning version of a patch, where a sample is fed through an effects chain. In the patch, I built separate components which might be useful for further prototyping, like a menu module which allows me to switch between external VST plug-ins. I faced some struggles with getting a sample output from PaulXStretch,which I plan on investigating further next week, but all the other plug-ins process the input sample smoothly. Another segment that needs troubleshooting is the umenu I attached to a reverb unit with the intention of being able to manipulate parameters from within Max (marked in red).

      Top 5 Objects of the Week

      Objectives for Next Week

      • Troubleshoot parameter manipulation tool
      • Properly integrate PaulXStretch/Research why it might not work
      • Start building a spatial effects unit

      Research resources for Next Week

      A list of resources I stumbled upon throughout my process this week and want to research further because they have the potential to help my project. The scope for these resources is varied and can go from scientific literature to tools that can help me learn more or become clearer on my ideal parameter mapping and UI.

      Plug-Ins

      Cecilia

      Monster Timestretch

      Soundmagic Spectral

      Prototype Development

      Getting Started With Reverb Design Part 1 & Part 2

      Literature/Websites

      A Tutorial on Spectral Sound Processing Using Max/MSP and Jitter

      Juce