Since the last blog post, I’ve spent some time on various platforms like Instagram, YouTube, and Pinterest, drawing inspiration. As a result, I developed two new visualizations using TouchDesigner for the prototype. I would like to introduce them to you now.
Plasmasphere
The idea behind this visualization was to create a sphere that changes with the values. The more negative the values, the more chaotic the representation should be, and vice versa. To achieve this, I followed a YouTube tutorial by Bileam Tschepe. This visualization is built on the ParticlesGPU component and has been enhanced with various settings. Additionally, I programmed the controller using Python scripts. By rotating the controller, you can change the values, and with the button function, you can change the values without affecting the visualization in real time or reset them to their original state. The screenshot below shows the TouchDesigner project.
Flowers
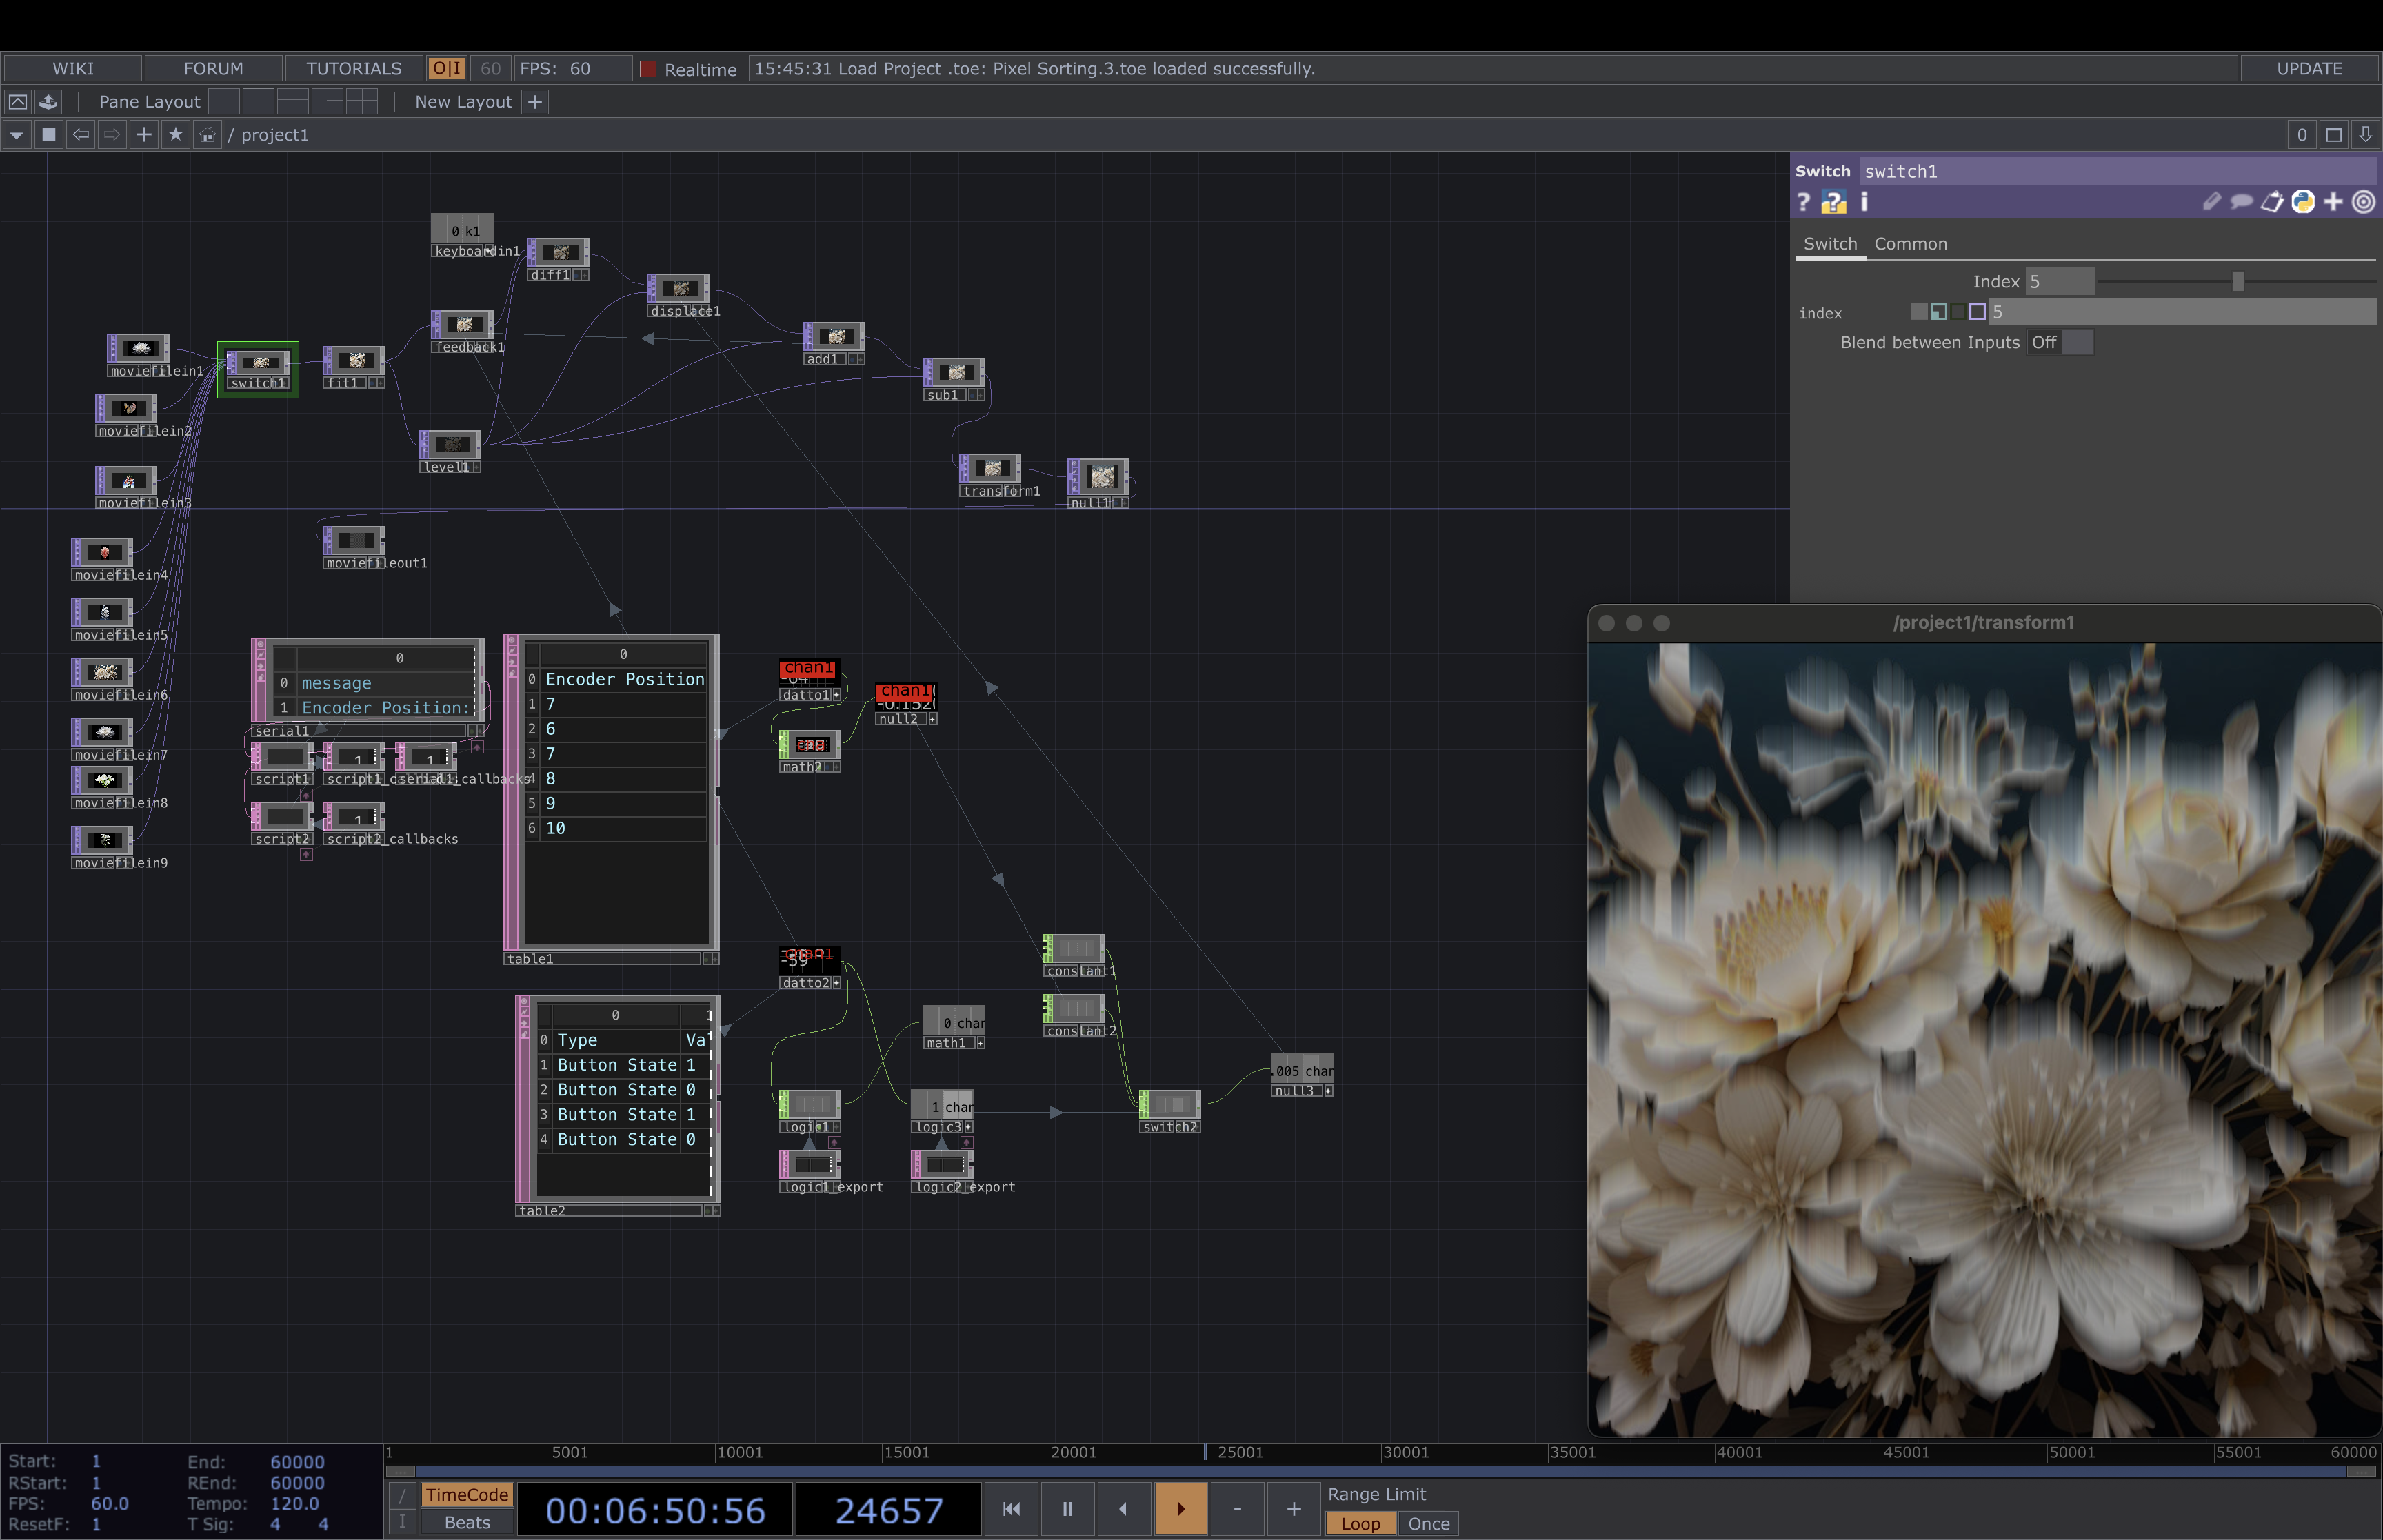
The concept behind this visualization is that flowers wilt when they are not properly cared for, much like how our Earth deteriorates if we do nothing about the global climate crisis. Therefore, I used various photos and AI-generated images of white flowers and applied the pixel sorting method to simulate wilting. The more negative the data, the faster and more intense the wilting becomes. This is the first visualization that somewhat relates to the subject matter being addressed. The TouchDesigner project is shown below.
To wrap up the two semesters, I want to repeat the defined problem statement and aim for this project.
Problem statement
Absence of social community and musical experimentation makes it challenging for young musicians to maintain motivation.
Aim
Inspire and encourage musicians to improvise and play by ear.
The product can be used as:
An education tool to compliment classical training
A fun game for sharing musical exploration with friends
Key phases of development
Research phase
Reading about the topic
Analyzing existing solutions
Looking into other disciplines
Conducting interviews
Design phase
Early stage prototypes
Structuring of problems
Defining problem statement
Defining concept and aim
Creating technical prototype
Conducting user tests
Creating visual prototype
It has been exiting to work with this project. I have gained valuable insight within the field, and learned how I can research and develop prototypes in an effective manner. It has been challenging to work alone, but it also made me more aware of my own workflow and how I perform best. As the topic music education is within the field of my interest, I have been inspired all the way to create a concept that makes a difference.
My final prototype is a basic MVP of the map I’m designing. It is live on vanlifezone.com/map and contains some basic layers and designs that I’ve integrated.
As it is with most projects when you don’t know much about the topic in the beginning, this was no easy feat and it took a lot of learning along the way. Mapping is so much more complicated than I’ve ever anticipated: Some things that you’d think are tricky are just a few lines of code away, while other things, like displaying icons on the map, require a week of research and coding (and arguing with ChatGPT) to get right. Nevertheless, I’m still super interested in continuing the development of this map, as it combines creativity, data, and coding – a combination I’m passionate about.
From exploring audio-reactive visuals in TouchDesigner to conceptualizing and designing a simple app prototype in Figma, it was so much fun! It all began with a curiosity about how different languages visually manifest through sound, leading me to experiment with various tools and techniques.
I am so happy that I dived into TouchDesigner a bit more I learned a lot about creating and manipulating visuals, especially making them respond to audio inputs which was very fun to learn. Also Along the way, I listened to the German alphabet countless times, which was unexpectedly useful (and quite amusing🤭)
Transitioning to Figma, I designed a mini prototype for a pronunciation visualizer app. This app allows users to select their native language and a language they wish to learn, providing real-time visual feedback on pronunciation patterns. The thing is, I had so many ideas for using the visuals in a practical application. Ultimately, I focused on perfecting the visuals, which was both challenging and rewarding.
Next Step
Looking ahead, I see a lot of potential for expanding this project. For example a Language Learning Kit with developing a comprehensive language learning kit using these types of visuals could make learning more engaging. Different visuals for different languages might be interesting. Or in the testing phase, it would be interesting to test the visuals with deaf individuals to see if they can detect patterns in each language. This could open up new ways of understanding and teaching languages. So I’m excited about the possibilities and let’s see if I will work on more on this project in the future!
Here is my finished first prototype. I did enjoy making it, even with all the obstacles I encountered. I truly hope you enjoy it, and I’m looking forward to your feedback.
For the final blog post of this series, I have taken the time to prepare a comprehensive demonstration video, which provides a detailed overview of my low-fidelity prototype. This video is designed to give viewers an understanding of the basic functionalities and design elements of our prototype, showcasing its potential and the direction we are heading in with this project.
Video
Conclusions
The process of prototyping has been incredibly valuable in visualizing the potential of Story Teller. It has allowed me to identify key functionalities and design elements and brought to light areas that need further development and refinement. As I move forward, I plan to conduct further user testing to gain valuable feedback and insights. This feedback will inform my next iterations and help me continually improve and refine the tool. My ultimate goal is to create a user-friendly and intuitive platform that supports the creative process of interactive storytelling, as part of my final Master’s Thesis.
I did receive some feedback, and it was mostly very positive. However, I won’t be posting the feedback here. Instead, I’ll show some of the additional work that I’ve done—not all, because some have to stay a surprise, hehe. I added and implemented icons and a few more details. Now, I’m going to finish recording everything so I can post it, and you can have a little sneak peek of my application.
In this blog post, I want to showcase and discuss my finished prototype. Additionally, I’ll theorize about the future outlook and potential advancements in this area.
For this prototype, I used the sensors embedded in my smartphone, which I found to be a valid approach. However, for future prototypes, using a smartwatch or another tracking device may prove to be more useful. There is also the potential for creating specific health devices, such as a resistance band with sensors to detect how strongly the band is being stretched or pulled.
Device Selection: The weight of the phone was noticeable during use. For a more refined prototype, a lighter device would be preferable. For reference, the phone I used, a Motorola Edge 30, weighs 155 g.
Sensor Integration: Utilizing wearables like smartwatches can provide more accurate and convenient tracking. Alternatively, integrating sensors directly into exercise equipment (e.g., resistance bands) could enhance the user experience and data accuracy.
The research I did and the buidling of the prototype taught me a lot about gamification and therapy methods. It was the first time where I really took a look at how therapy exercises look like and how they should be performed. Also from the technical side I gained many valuable insights. Right now the prototype gives immediate feedback. However, in the future it could be enhanced by creating really gamifying it. This could happen in the form of characters, stories that are being told, audio feedback, rewards, etc. This is definitely something I want to explore more of in the future.
One of the proplems I personally have with most of the gamified approaches to therapy which I have seen during my research phase is that so many of them seem either too silly for my personal taste and that they are old and not up-to-date. Finding something new and novel that is both fun, engaging and yet still serious enough that people will see it as a legitimate form of therapy will be one of the challenges which need to be overcome.
Conclusion
The process of researching and creating the prototype has provided me with valuable insights into the potential of gamified physical therapy. Moving forward, I plan to refine the technology and explore new avenues for enhancing the user experience and effectiveness of these solutions. I am currently in contact with some experts in the field so hopefully there will also be the possbility of cooperation in the future.
This blog post details my first proper implementation of a gamified exercise prototype. I will explain the steps I took and share my thought process along the way.
As mentioned before, there are multiple ways of providing (gamified) feedback to a user. I briefly want to talk about the differences between short-term immediate and long-term delayed feedback:
Timing: Immediate feedback is instantaneous, while long-term feedback is delayed.
Purpose: Immediate feedback enhances the act of exercising, while long-term feedback enhances the overall experience by providing a broader perspective on progress.
Type of Feedback: Immediate feedback is typically corrective and directly related to the action performed, while long-term feedback is cumulative and provides a broader perspective on progress.
Choosing the Exercise and Sensors
When creating an actual prototype, I first looked at:
a) Which exercise I could replicate, and b) Which sensors were available to me.
Selecting the Exercise
I researched various sources and training programs to find exercises that could be easily enhanced digitally. I chose this specific exercise because it seemed easy to track, the resistance band allowed space to mount the phone, and it was a good exercise mentioned in different therapy programs.
Testing the Sensors
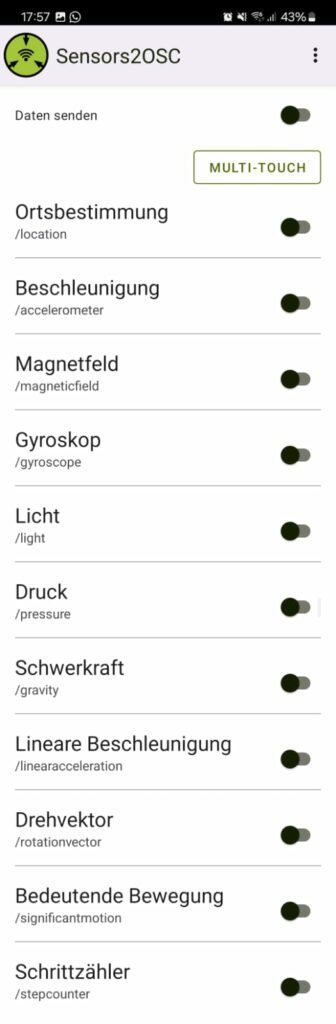
I explored various sensors available through Sensors2OSC. After testing, I found that the gyroscope, gravity, and accelerometer provided the clearest feedback when performing the exercise. I decided to use the gravity.z value as it gave the most reliable data.
Developing the Prototype
I initially wanted to send data to Unity as a Vector3 (using Keijiro’s OSCJack) but encountered issues with proper message transmission from Max 8 to Unity. I eventually decided to send the data as an integer.
Structuring the Code
Before starting the actual coding, I planned how to structure it. I modified my previous approach and decided to handle all game logic in Unity, using Max 8 only to receive and send data.
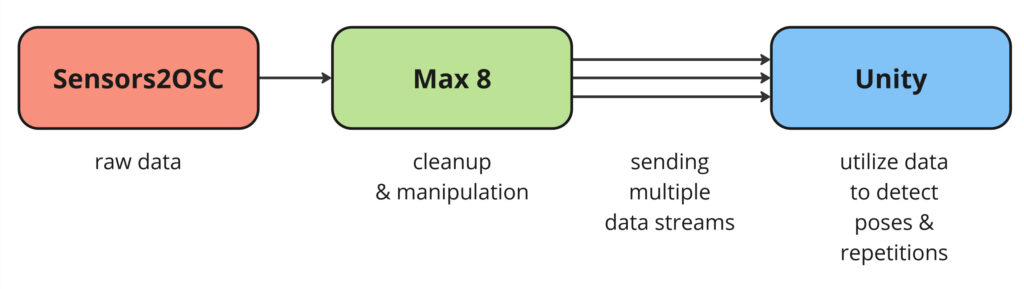
Updated flowchart for the data processing. Now there is a manipulation step in Max 8, and multiple values are sent to Unity for detecting repetitions and triggering actions/events accordingly.
I then modified my script and scene from last time. The UI now tracks repetitions and sets, showing the user when they have successfully performed the exercise. The code has grown significantly to handle these changes. It includes checks to recognize repetitions, locking mechanisms to ensure the count increases only once per repetition, UI updates, etc.
Coding was mostly a matter of planning and trial and error to figure out exact values. Interestingly, some planned functionalities, like setting a base value when pressing the spacebar, turned out unnecessary as the gravity data didn’t require it.
Lessons Learned
For this first prototype, handling all aspects (receiving data, triggering events, checking values, updating UI, etc.) in one script was manageable. However, for future iterations, separating the code into multiple classes and following the principle of data encapsulation from object-oriented programming would provide more structure. Additionally, establishing a naming convention beforehand could help avoid confusion in the future.
In the next blog post, I will show and discuss my findings and results from this prototype, along with a video demonstration.
Here is my final prototype! I ended up making a second hand app for children’s shoes. I chose this user group because children are constantly growing and need a rapid change of shoes. I also have a theory that it might be more acceptable to buy used shoes for children when it comes to the hygiene aspect.
If you want to learn more about the process of making the app, you can read blogpost 18 and 19 (18 | Final Idea & Paper Prototype, 19 | User Testing).