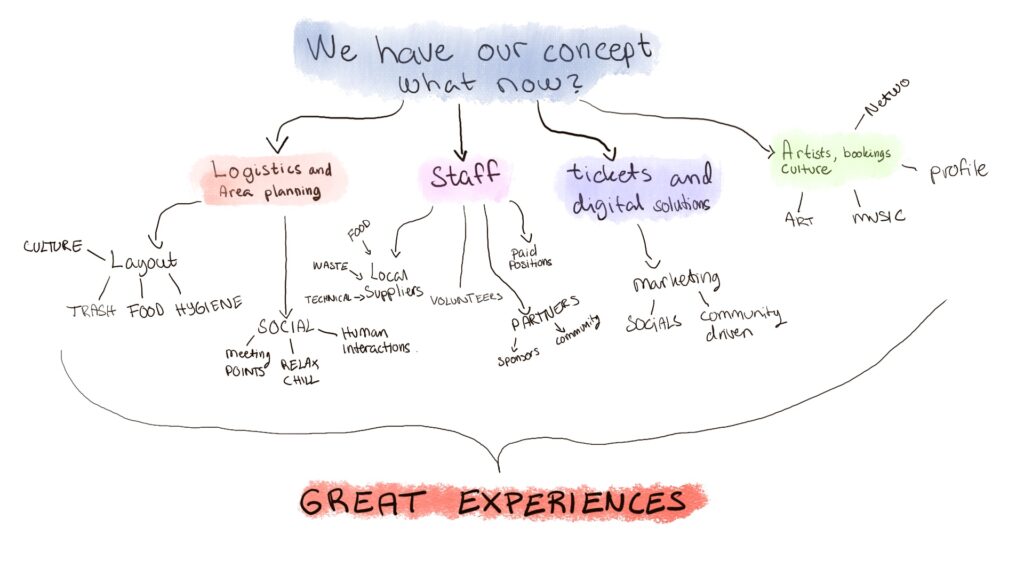
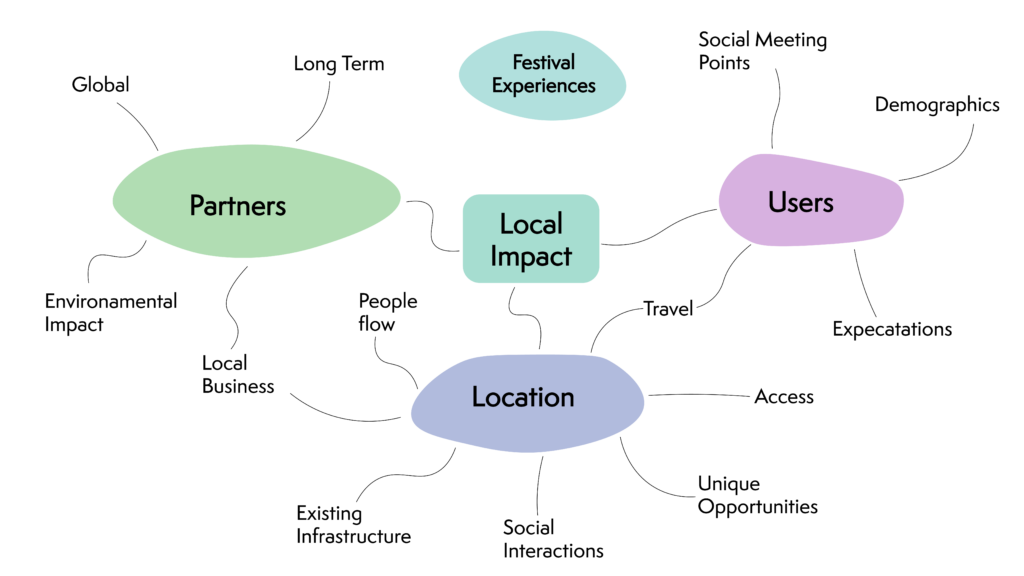
I have continued with the development of my graphics from hand drawn to to digital, and also in the process refined them and worked on making them clearer for the end-user. The final iteration of the second graphic can be seen below.
I have worked on making it a bit more organized, and also added some more information. Below you can see the previous hand drawn iteration.
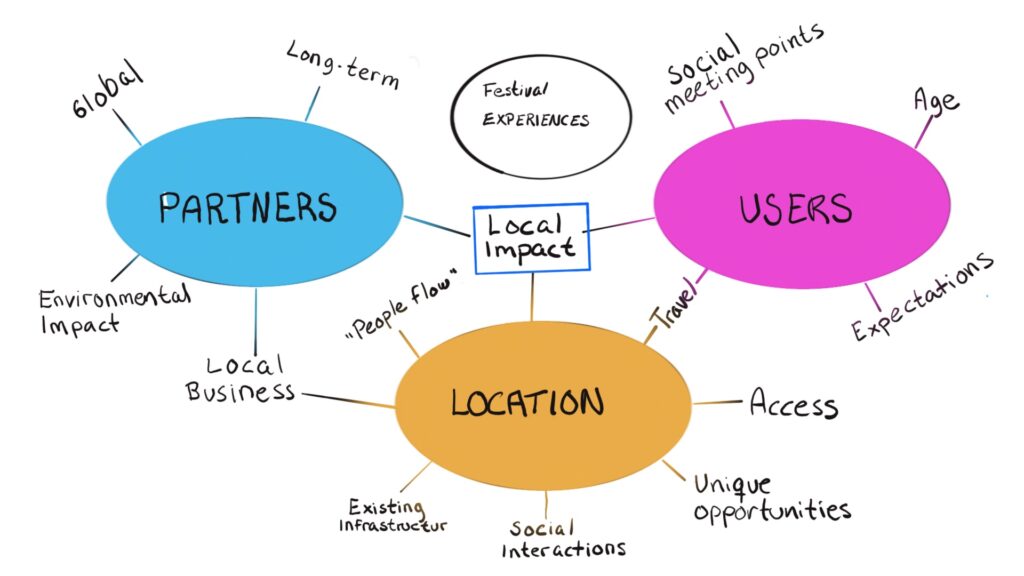
The two graphics i have finished so far are mainly about tasks and workflow, but as designer we also now that our stakeholders and users are important to understand for a project to be successful. I therefore also made a graphic for who might be considered the key users in a musical festival.
This was the first hand drawn version that you could see a couple of posts ago, this is the one that was the most refined, so it is also the one with the least changes between the hand drawn and digital version.
The main differences are that the digital version is a bit “cleaner” and therefore easier to read. This one can also be viewed as an example of how it can look, but should be adapted to every unique festival. There are definitely some things that can be universal, but overall a festival should generate take these graphics and make them their own.
For now, my progress is small but still progress. For whatever reason, I’ve decided not to look at tutorials and instead try to figure out how to use Figma by myself. Let’s just say that I have some work done, but it is not going too fast, haha. I also found some free resources on Freepik that I downloaded (I also have the paid version) for the profile pictures. This is in case users are not comfortable putting their own picture or don’t have a picture of a family member at that moment. They can use some of the icons that will be available.
In addition, I have made the login page, password reset page, account creation page, and the first page of the dashboard.
With my new prototype set up, I was ready to start scripting the different gestures for Tap. I decided to make three different gestures for now: the wave, the tap and the knock. The wave for Tap to say hello or to acknowledge a new command. The tap as a way of interacting with other objects and bringing them into the user’s focus. And finally, the knock as a more analogue way of notifying the user of, for example, a timer or a specific event.
Waving
The first gesture is the wave gesture. It is intended to let the user know that Tap is active or has accepted the new command or task. In this movement, the top rotates from left to right and the tapper waves from one side to the other a few times.
Tap waving
#include <AccelStepper.h>

#define motorInterfaceType 1

// Define the stepper motor and the pins that is connected to // (STEP, DIR)
AccelStepper stepper1(motorInterfaceType, D5, D6);
AccelStepper stepper2(motorInterfaceType, D7, D8);

// Set the target positions for both steppers
int PositionDown = 0;
int PositionUp = 0;

// State variable to keep track of movement sequence
int state1 = 0;
int state2 = 0;

////////////////////////////////////////////////////////////////////////////////////


void setup() {

  Serial.begin(9600);

  // Settings for Motor 1
  stepper1.setMaxSpeed(1000);
  stepper1.setAcceleration(500);
  stepper1.setCurrentPosition(0);

  // Settings for Motor 2
  stepper2.setMaxSpeed(1000);
  stepper2.setAcceleration(500);
  stepper2.setCurrentPosition(0);

}


////////////////////////////////////////////////////////////////////////////////////


void loop() {

  Wave1();
  Wave2();

}


////////////////////////////////////////////////////////////////////////////////////


void Wave1() {

  switch (state1) {

    case 0:
      stepper1.setAcceleration(200);
      PositionDown = 40;
      stepper1.moveTo(PositionDown);
      state1 = 1;
      break;

    case 1:
      if (stepper1.distanceToGo() != 0) {
        stepper1.run();
      } else {
        stepper1.stop();
        PositionDown = -40;
        stepper1.moveTo(PositionDown);
        state1 = 2;
      }
      break;

    case 2:
      if (stepper1.distanceToGo() != 0) {
        stepper1.run();
      } else {
        stepper1.stop();
        PositionDown = 20;
        stepper1.moveTo(PositionDown);
        state1 = 3;
      }
      break;

    case 3:
      if (stepper1.distanceToGo() != 0) {
        stepper1.run();
      } else {
        stepper1.stop();
        PositionDown = -20;
        stepper1.moveTo(PositionDown);
        state1 = 4;
      }
      break;

    case 4:
      stepper1.setAcceleration(100);
      if (stepper1.distanceToGo() != 0) {
        stepper1.run();
      } else {
        stepper1.stop();
        PositionDown = 0;
        stepper1.moveTo(PositionDown);
        state1 = 5;
      }
      break;

    case 5:
      if (stepper1.distanceToGo() != 0) {
        stepper1.run();
      } else {
        stepper1.stop();
      }
      break;

  }
}


void Wave2() {

  if (state1 >= 4){

    switch (state2) {

      case 0:
        stepper2.setAcceleration(275);
        PositionUp = 25;
        stepper2.moveTo(PositionUp);
        state2 = 1;
        break;

      case 1:
        if (stepper2.distanceToGo() != 0) {
          stepper2.run();
        } else {
          stepper2.stop();
          PositionUp = -25;
          stepper2.moveTo(PositionUp);
          state2 = 2;
        }
        break;

      case 2:
        if (stepper2.distanceToGo() != 0) {
          stepper2.run();
        } else {
          stepper2.stop();
          PositionUp = 15;
          stepper2.moveTo(PositionUp);
          state2 = 3;
        }
        break;

      case 3:

        if (stepper2.distanceToGo() != 0) {
          stepper2.run();
        } else {
          stepper2.stop();
          PositionUp = -15;
          stepper2.moveTo(PositionUp);
          state2 = 4;
        }
        break;

      case 4:
        if (stepper2.distanceToGo() != 0) {
          stepper2.run();
        } else {
          stepper2.stop();
          PositionUp = 15;
          stepper2.moveTo(PositionUp);
          state2 = 5;
        }
        break;

      case 5:
        if (stepper2.distanceToGo() != 0) {
          stepper2.run();
        } else {
          stepper2.stop();
          PositionUp = -15;
          stepper2.moveTo(PositionUp);
          state2 = 6;
        }
        break;

      case 6:
        if (stepper2.distanceToGo() != 0) {
          stepper2.run();
        } else {
          stepper2.stop();
          PositionUp = 0;
          stepper2.moveTo(PositionUp);
          state2 = 7;
        }
        break;

      case 7:
        if (stepper2.distanceToGo() != 0) {
          stepper2.run();
        } else {
          stepper2.stop();
        }
        break;

    }
  }
}
Tapping
The second gesture is the tap gesture. It is intended as an object-based reminder for things like drinking water or airing out your room. It can also be used in combination with objects to create a different sound for timers and reminders than knocking on the ground. In this gesture, the tapper moves down a quarter turn and the entire base then rotates the tapper twice against the object before returning to the default position.
Tap tapping
#include <AccelStepper.h>

#define motorInterfaceType 1

// Define the stepper motor and the pins that is connected to // (STEP, DIR)
AccelStepper stepper1(motorInterfaceType, D5, D6);
AccelStepper stepper2(motorInterfaceType, D7, D8);

// Set the target positions for both steppers
int PositionDown = 0;
int PositionUp = 0;

// State variable to keep track of movement sequence
int state1 = 0;
int state2 = 0;

////////////////////////////////////////////////////////////////////////////////////


void setup() {

  Serial.begin(9600);

  // Settings for Motor 1
  stepper1.setMaxSpeed(1000);
  stepper1.setAcceleration(500);
  stepper1.setCurrentPosition(0);

  // Settings for Motor 2
  stepper2.setMaxSpeed(1000);
  stepper2.setAcceleration(500);
  stepper2.setCurrentPosition(0);

}


////////////////////////////////////////////////////////////////////////////////////


void loop() {

  Tap1();
  Tap2();

}


////////////////////////////////////////////////////////////////////////////////////


void Tap1() {

  if (state2 >= 2){

    switch (state1) {

      case 0:
        stepper1.setAcceleration(300);
        PositionDown = -20;
        stepper1.moveTo(PositionDown);
        state1 = 1;
        break;

      case 1:
        if (stepper1.distanceToGo() != 0) {
          stepper1.run();
        } else {
          stepper1.stop();
          PositionDown = 5;
          stepper1.moveTo(PositionDown);
          state1 = 2;
        }
        break;

      case 2:
        stepper1.setAcceleration(600);
        if (stepper1.distanceToGo() != 0) {
          stepper1.run();
        } else {
          stepper1.stop();
          PositionDown = -20;
          stepper1.moveTo(PositionDown);
          state1 = 3;
        }
        break;

      case 3:
        if (stepper1.distanceToGo() != 0) {
          stepper1.run();
        } else {
          stepper1.stop();
          PositionDown = 0;
          stepper1.moveTo(PositionDown);
          state1 = 4;
        }
        break;

      case 4:
        stepper1.setAcceleration(100);
        if (stepper1.distanceToGo() != 0) {
          stepper1.run();
        } else {
          stepper1.stop();
        }
        break;

    }
  }
}


void Tap2() {

  switch (state2) {

    case 0:
      stepper2.setAcceleration(400);
      PositionUp = 50;
      stepper2.moveTo(PositionUp);
      state2 = 1;
      break;

    case 1:
      if (stepper2.distanceToGo() != 0) {
        stepper2.run();
      } else {
        stepper2.stop();
        PositionUp = 0;
        stepper2.moveTo(PositionUp);
        state2 = 2;
      }
      break;

    case 2:
      if (state1 >= 4) {
        stepper2.setAcceleration(200);
        if (stepper2.distanceToGo() != 0) {
          stepper2.run();
        } else {
          stepper2.stop();
        }
      }
      break;

  }
}
Knocking
The third gesture is the knock gesture. It is intended as an analogue notification for timers, reminders or other events. In this gesture, only the tapper itself moves. It moves slightly backwards and then knocks twice on the ground before returning to its normal position.
Tap knocking
#include <AccelStepper.h>

#define motorInterfaceType 1

// Define the stepper motor and the pins that is connected to // (STEP, DIR)
AccelStepper stepper1(motorInterfaceType, D5, D6);
AccelStepper stepper2(motorInterfaceType, D7, D8);

// Set the target positions for both steppers
int PositionDown = 0;
int PositionUp = 0;

// State variable to keep track of movement sequence
int state1 = 0;
int state2 = 0;

////////////////////////////////////////////////////////////////////////////////////


void setup() {

  Serial.begin(9600);

  // Settings for Motor 1
  stepper1.setMaxSpeed(1000);
  stepper1.setAcceleration(500);
  stepper1.setCurrentPosition(0);

  // Settings for Motor 2
  stepper2.setMaxSpeed(1000);
  stepper2.setAcceleration(500);
  stepper2.setCurrentPosition(0);

}


////////////////////////////////////////////////////////////////////////////////////


void loop() {

  Knock1();

}


////////////////////////////////////////////////////////////////////////////////////


void Knock1() {

  switch (state1) {

    case 0:
      stepper2.setAcceleration(400);
      PositionUp = -20;
      stepper2.moveTo(PositionUp);
      state1 = 1;
      break;

    case 1:
      if (stepper2.distanceToGo() != 0) {
        stepper2.run();
      } else {
        stepper2.stop();
        PositionUp = 80;
        stepper2.moveTo(PositionUp);
        state1 = 2;
      }
      break;

    case 2:
      if (stepper2.distanceToGo() != 0) {
        stepper2.run();
      } else {
        stepper2.stop();
        PositionUp = 60;
        stepper2.moveTo(PositionUp);
        state1 = 3;
      }
      break;

    case 3:
      stepper2.setAcceleration(800);
      if (stepper2.distanceToGo() != 0) {
        stepper2.run();
      } else {
        stepper2.stop();
        PositionUp = 80;
        stepper2.moveTo(PositionUp);
        state1 = 4;
      }
      break;

    case 4:
      if (stepper2.distanceToGo() != 0) {
        stepper2.run();
      } else {
        stepper2.stop();
        PositionUp = 0;
        stepper2.moveTo(PositionUp);
        state1 = 5;
      }
      break;

    case 5:
      if (stepper2.distanceToGo() != 0) {
        stepper2.run();
      } else {
        stepper2.stop();
      }
      break;

  }
}
The scripting and testing of the gestures went almost smoothly with the help of ChatGPT for the coding part. Except for one problem where the lower motor started to overheat and slowly melt my 3D print. Luckily I caught it before it did any irreversible damage. The problem ended up being that I set the current flow in the motor controller for the lower motor too high, which was quickly fixed and everything went smoothly again. From here I will now start to implement all the different gestures into one script and add the functionality of triggering the different gestures via OSC messages so that I can then create a dedicated interface to control Tap.
As we look towards the future of vanlife map design, we’re poised to witness significant changes influenced by technological advancements and evolving user expectations. The integration of Geographic Information System (GIS) technology with emerging trends promises to revolutionize how vanlifers interact with maps.
Emerging Trends in Vanlife Map Design
Cloud-Based GIS Solutions
Cloud technology is increasingly adopted in the GIS industry, allowing for real-time analysis, sharing, and purchasing of geodata over the internet. This shift to cloud-based systems facilitates streamlined operations and enhances real-time interaction with maps, a feature that could be incredibly beneficial for vanlifers needing up-to-date information.
3D Mapping and Digital Twins
The advancement in drone technology and LiDAR scanning is making 3D mapping more accessible and accurate. This could lead to vanlife maps offering virtual, as-built infrastructures, providing a more immersive understanding of terrains and landscapes.
Real-Time Data and IoT Integration
The growing importance of real-time data in sectors like transportation and emergency management indicates that future vanlife maps might incorporate real-time traffic updates, weather conditions, and even spot potential hazards, leveraging the Internet of Things (IoT) for comprehensive data integration.
Augmented Reality (AR) in Mapping
AR is set to provide an interactive and immersive mapping experience. For vanlifers, this could mean enhanced navigation with overlaid information about the surrounding environment, blending the physical and digital worlds seamlessly.
Automation and Machine Learning
Machine learning and automation are expected to play a crucial role in future map designs. These technologies could automate route optimization and predictions based on user behavior, making maps more intuitive and personalized for vanlifers.
Conclusion
The future of vanlife mapping is geared towards creating more dynamic, interactive, and personalized experiences. These advancements will not only enhance the practicality of maps for navigation but also enrich the overall experience of living on the road. By embracing these technological trends, vanlife maps are set to become an indispensable tool for the modern nomad.
Creating maps that are both visually appealing and functionally effective is a delicate art. This blog post examines how to achieve a balance between aesthetics and practicality in map design, ensuring that maps are not only engaging to look at but also serve their intended purpose efficiently.
Principles of Effective Visual Design in Maps
Legibility and Clarity
Legibility is paramount in map design. This involves selecting symbols that are familiar and appropriately sized to ensure that they are effortlessly seen and understood. For example, using geometric symbols for airports and more complex symbols, like a mortarboard for universities, but ensuring they are large enough to be legible.
Hierarchical Organization
Maps should visually separate information into layers, helping users focus on what is important. For reference maps, many features should lie on the same visual plane, while thematic maps should highlight the theme more than the base providing geographic context.
Balance and Composition
Balance in map design involves organizing the map and other elements on the page to create an impression of equilibrium and harmony. This can be achieved by considering visual weight and direction of the elements on the page.
Adapting to Screen Sizes
In the digital age, maps must be designed to work across different devices. For mobile devices, prioritize essential functions and streamline controls for touch, while on desktops, offer detailed controls and capitalize on hover interactions.
Enhancing User Experience Without Compromising Usability
Responsive Design
Responsive design ensures maps look great and function seamlessly across all platforms, especially important given the increasing use of mobile devices. Simplifying design for smaller screens and using larger buttons can facilitate user interaction.
UX Principles in Map Design
Clear, instinctive navigation and alleviating load times are crucial. Optimizing site speed through image compression and code minification can maintain aesthetic appeal while ensuring a seamless user experience.
The Role of Aesthetics in User Engagement
Aesthetics influence user behavior and perceptions significantly. People form opinions of a website within milliseconds, making first impressions crucial. Paying attention to elements like white space and using high-quality images and illustrations can greatly enhance user engagement.
Conclusion
Balancing aesthetics with functionality in map design is crucial for creating maps that not only attract users but also provide a seamless and efficient navigational experience. By adhering to principles of legibility, hierarchical organization, balance, responsive design, and incorporating user experience elements, designers can create maps that are both beautiful and useful.
With all the core functionality in place, the final steps of my Unreal Engine project involve fine-tuning interactions, decorating the scene, and setting up the final camera. These steps are crucial for transforming the technical elements into a cohesive and visually stunning piece of interactive art.
Interaction
The first task was fine-tuning the interaction mechanics. This stage involved several iterations to ensure that the interactions felt natural and intuitive. I spent a significant amount of time adjusting the responsiveness and fluidity of the controls, ensuring that the user experience was smooth and engaging. This fine-tuning is essential for maintaining immersion and enhancing the overall quality of the scene.
Importing Assets
To enrich the visual appeal of the scene, I imported various assets and materials from the Quixel library. Quixel’s high-quality assets significantly improved the realism and detail of the environment. Additionally, I imported a futuristic eye model from the internet, which I planned to control via OSC. Integrating these assets required careful adjustment to ensure they blended seamlessly with the rest of the scene.
Post-Processing
A considerable amount of effort went into post-processing to achieve the desired aesthetic. I aimed for a colder, more eerie look to match the futuristic theme of the scene. This involved tweaking color grading, contrast, and adding effects such as bloom and vignette. Post-processing is a powerful tool in Unreal Engine, allowing me to significantly alter the atmosphere and mood of the scene.
Terrain
I sculpted the terrain to match the envisioned layout of the scene. This step involved shaping the landscape to create a believable and immersive environment. The terrain sculpting tools in Unreal Engine are intuitive and powerful, allowing for detailed and realistic terrain creation. After sculpting, I applied textures and materials to give the terrain a polished look.
Camera
Setting up the camera was a critical step in finalizing the scene. I positioned the camera to capture the most compelling view of the environment, ensuring it worked like a real camera. Unreal Engine’s camera system allows for advanced setups, including the use of camera cranes and dollies, although for this project, a simpler setup sufficed.
One challenge I encountered was getting Unreal to render the scene through the camera in Play mode. This process is less straightforward compared to Unity, where switching to the camera view in Play mode is more intuitive. Despite this, I managed to configure the camera to achieve the desired perspective and visual impact.
Final Thoughts
These final steps were integral to bringing my project to life. Fine-tuning interactions, importing and integrating assets, enhancing the scene with post-processing effects, sculpting the terrain, and setting up the camera all contributed to creating a polished and immersive piece of interactive art.
You will see the Final Result of thiis semesters prototype in my next Blog Post.
The Deliver phase is the final step in the Double Diamond framework. This phase focuses on refining and implementing the best solution, ensuring it meets user needs and is ready for launch. Here’s a detailed look at what the Deliver phase involves and how to effectively navigate it.1
Purpose of the Deliver Phase
The main goal of the Deliver phase is to finalize the design solution and prepare it for market launch. This phase involves rigorous testing, refining, and implementing the solution to ensure it is functional, user-friendly, and aligns with business goals.
Key Activities in the Deliver Phase
Testing and Validation
Final Usability Testing: Conduct thorough usability tests with a wider audience to validate the solution. Ensure that the product meets user expectations and performs well under various conditions.
Beta Testing: Release a beta version of the product to a select group of users. Gather feedback on real-world usage and make necessary adjustments.
Refinement
Iterative Improvements: Based on the feedback from usability and beta testing, refine the product to address any remaining issues. This includes improving usability, fixing bugs, and enhancing overall performance.
Final Adjustments: Make final adjustments to the design, ensuring that all elements are polished and ready for launch.
Implementation
Technical Integration: Work with development and technical teams to ensure the solution is fully integrated and functional within the existing systems.
Production and Deployment: Prepare the product for production and deploy it to the market. This includes manufacturing physical products or launching digital solutions on the relevant platforms.
Launch and Evaluation
Marketing and Launch Strategy: Develop a comprehensive marketing and launch strategy to promote the product. This includes creating marketing materials, planning launch events, and executing promotional campaigns.
Post-Launch Evaluation: After the product launch, evaluate its performance and user reception. Gather data on usage, satisfaction, and any issues that arise, and be prepared to make further refinements if necessary.
Tools and Methods
Quality Assurance (QA) Testing: Use QA testing methods to ensure the product meets all quality standards and is free of defects.
Analytics Tools: Implement analytics tools to track user behavior and product performance post-launch.
Customer Feedback Channels: Establish channels for ongoing customer feedback, such as surveys, support tickets, and user forums.
Benefits of the Deliver Phase
User Satisfaction: By rigorously testing and refining the product, the Deliver phase ensures that the final solution meets user needs and expectations.
Market Readiness: This phase prepares the product for a successful market launch, increasing its chances of acceptance and success.
Continuous Improvement: Post-launch evaluation and feedback help identify areas for further improvement, ensuring the product evolves to meet user needs over time.
Challenges and How to Overcome Them
Resource Management: The Deliver phase can be resource-intensive. Plan and allocate resources efficiently to handle testing, refinement, and launch activities.
Time Constraints: Tight timelines can pressure the Deliver phase. Prioritize critical tasks and focus on the most impactful improvements to ensure timely delivery.
User Feedback: Managing and responding to user feedback can be challenging. Implement structured feedback processes and prioritize changes based on impact and feasibility.
Conclusion
The Deliver phase is a crucial step in the Double Diamond framework. It ensures that the final product is user-centered, functional, and ready for market launch. By focusing on testing, refinement, and implementation, the Deliver phase helps turn design solutions into successful products that meet user needs and achieve business goals.
After discussing my topic and thinking about what the first prototype could look like, I have decided to narrow down my approach. The goal is to create a simple learning experience from start to finish, that could be tested in a real life situation.
First step was to discover the struggles that children with cognitive disabilities face in traditional learning environments. After that, I looked into different curriculums for the first 3 grades of elementary school, as that would be the demographic that I want to address for the start. While doing my research, I came across an interesting observation. Children with cognitive disabilities, more specifically ASD, often struggle with subjects like math, but when approached carefully by their teachers, with special care and focus on the subject, they thrive and become very good.
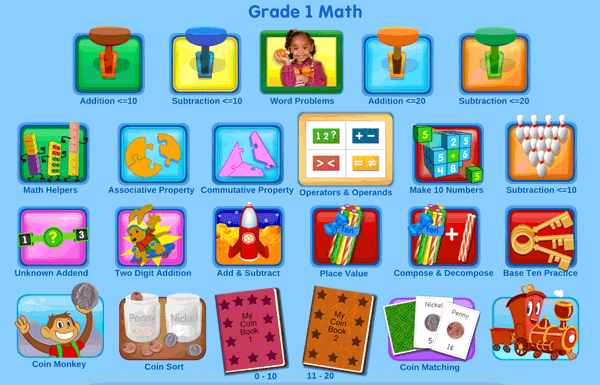
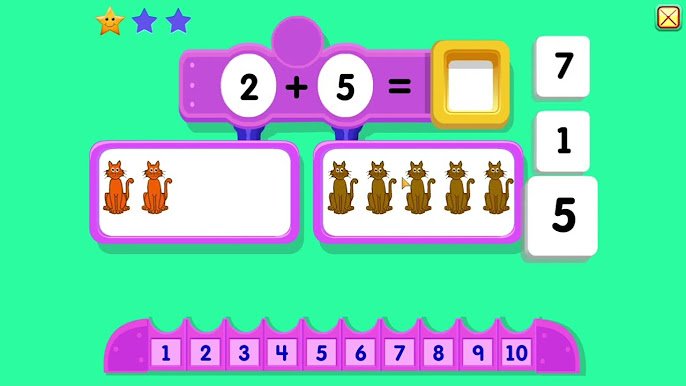
Looking into existing solutions for interactive math learning platforms, I’ve realizes that there is a lot of online learning platforms that offer interactive and engaging experiences. Platforms like Starfall and CTC Math are popular choices among educators and parents for enhancing math learning. However, when it comes to catering to children with cognitive disabilities, there is room for improvement.
1. Starfall: A Playful Approach to Learning
Strengths
Engaging Content – Starfall is renowned for its engaging and visually appealing content that captures the interest of young learners. Its use of animations, songs, and interactive activities makes learning fun and helps to keep students engaged for longer periods.
Foundational Skills Focus – The platform emphasizes foundational math skills, such as counting, addition, and subtraction, which are crucial for young learners and serve as the building blocks for more complex math concepts. This is particularly beneficial for students who need to strengthen their basic math skills.
Accessibility – Starfall offers a user-friendly interface with simple navigation, making it accessible for young children and those with limited digital literacy.
Limitations for Students with Cognitive Disabilities
Lack of Personalized Learning Paths – While Starfall provides a range of activities, it lacks the ability to create personalized learning paths that adapt to the individual needs and progress of each student. Children with cognitive disabilities often benefit from tailored instruction that meets their specific learning requirements.
Limited Support for Higher-Order Skills – The platform’s focus on basic skills means it does not adequately support the development of higher-order thinking and problem-solving skills, which are essential for more advanced math learning. This can limit its usefulness as students progress to higher grade levels.
Minimal Sensory Accommodations – Starfall does not offer significant sensory accommodations such as adjustable audio levels, customizable visual settings, or alternative input methods that could benefit students with sensory processing disorders or other cognitive disabilities.
2. CTC Math: Comprehensive Learning with Room for Growth
Strengths
Comprehensive Curriculum – CTC Math offers a comprehensive curriculum that covers a wide range of math topics from basic arithmetic to advanced calculus. This breadth ensures that students can progress through the curriculum at their own pace and access material appropriate for their grade level and ability.
Interactive Lessons – The platform features interactive lessons with step-by-step video tutorials, which can be particularly helpful for visual and auditory learners. This format allows students to revisit and review lessons as needed, reinforcing their understanding of key concepts.
Assessment Tools – CTC Math provides extensive assessment tools, including quizzes and tests that allow educators to monitor student progress and identify areas where additional support is needed. This feature is useful for tracking the development of students with cognitive disabilities and tailoring instruction to their needs.
Limitations for Students with Cognitive Disabilities
Limited Customization – Despite its comprehensive curriculum, CTC Math does not offer significant customization options to adapt lessons to the unique learning needs of students with cognitive disabilities. Personalized learning experiences that cater to individual strengths and challenges are essential for these students.
Complex Interface – The platform’s interface can be overwhelming for students with cognitive disabilities, who may struggle with navigation and the multitude of features available. Simplifying the user interface and providing clear, intuitive navigation could improve accessibility for these students.
Insufficient Sensory Support – CTC Math lacks features that address the sensory needs of students with cognitive disabilities, such as adjustable contrast, text-to-speech capabilities, or interactive elements that cater to sensory preferences. Incorporating these features could significantly enhance the learning experience for these students.
3. Improving Math Learning Platforms for Everyday Classroom Use
Enhancing Personalization
One of the primary ways to improve math learning platforms for students with cognitive disabilities is through enhanced personalization. Adaptive learning technologies that tailor content to the individual needs, pace, and learning style of each student can provide more effective and inclusive educational experiences. Incorporating algorithms that adjust the difficulty of tasks and offer personalized feedback can help ensure that each student receives the appropriate level of challenge and support.
Simplifying User Interfaces
A common barrier to accessibility in existing math learning platforms is complex user interfaces. Simplifying these interfaces by reducing clutter, using clear and consistent navigation elements, and providing visual cues can make the platforms more user-friendly for students with cognitive disabilities. Features such as larger buttons, minimalistic design, and straightforward instructions can help these students navigate the platform more independently.
Incorporating Sensory Accommodations
To better serve students with sensory processing issues, math learning platforms should incorporate a variety of sensory accommodations. Options like adjustable audio settings, customizable visual themes, and the ability to use tactile or kinesthetic inputs can create a more inclusive learning environment. Additionally, providing alternative input methods, such as speech recognition or switch access, can make the platforms more accessible to students with a range of physical and cognitive disabilities.
Providing Real-Time Feedback and Support
Platforms should include features that offer real-time feedback and support to help students understand their progress and areas for improvement. Interactive elements that provide instant feedback on tasks and offer hints or explanations for incorrect answers can facilitate learning and prevent frustration. Incorporating a help feature that allows students to ask questions or seek assistance can also be beneficial, particularly for those who may struggle with certain concepts.
Encouraging Collaboration and Social Interaction
Math learning platforms can benefit from incorporating features that encourage collaboration and social interaction among students. Tools such as shared problem-solving activities, collaborative projects, and discussion forums can help students develop important social skills and learn from their peers. For students with cognitive disabilities, these features can provide valuable opportunities for social engagement and support.
Gamification refers to the use of game design elements in non-game contexts to increase user engagement and motivation. This involves integrating concepts such as scoring points, earning badges, completing quests, and competing in challenges into lesson plans and educational activities. The goal is to leverage the natural human desire for play, achievement, and social interaction to make learning more enjoyable and effective.
Children with cognitive disabilities often face unique challenges in traditional learning environments, such as difficulties with attention, memory, and social interactions. Gamification can address these challenges by:
Enhancing Engagement and Motivation – Game elements like points, rewards, and progress tracking can make learning more engaging and motivating for children who may struggle with traditional teaching methods.
Providing Personalized Learning Paths – Gamified activities can be tailored to meet the individual needs and abilities of each student, allowing for differentiated instruction and personalized learning experiences.
Encouraging Social Interaction – Games often involve teamwork and competition, which can help children with cognitive disabilities develop social skills and build relationships with their peers.
Creating Safe Learning Environments – Gamification provides a safe space for children to take risks, make mistakes, and learn from them without fear of failure, fostering a growth mindset.
Improving Retention and Recall – Interactive and immersive gamified activities can enhance memory and retention of information, making it easier for children to recall what they have learned.
References:
Mubin, Siti Azreena, et al., Gamification Design Framework to Support Autism Children Interaction Skills: A Systematic Review, January 2020. https://ijcrr.com/uploads/3096_pdf.pdf.
Like I mentioned in my previous blog post, visual aids can be a very powerful and important tool in helping children with cognitive disabilities to overcome struggles in school and every-day life. In this blog post I will explore different types of visual aids and their benefits.
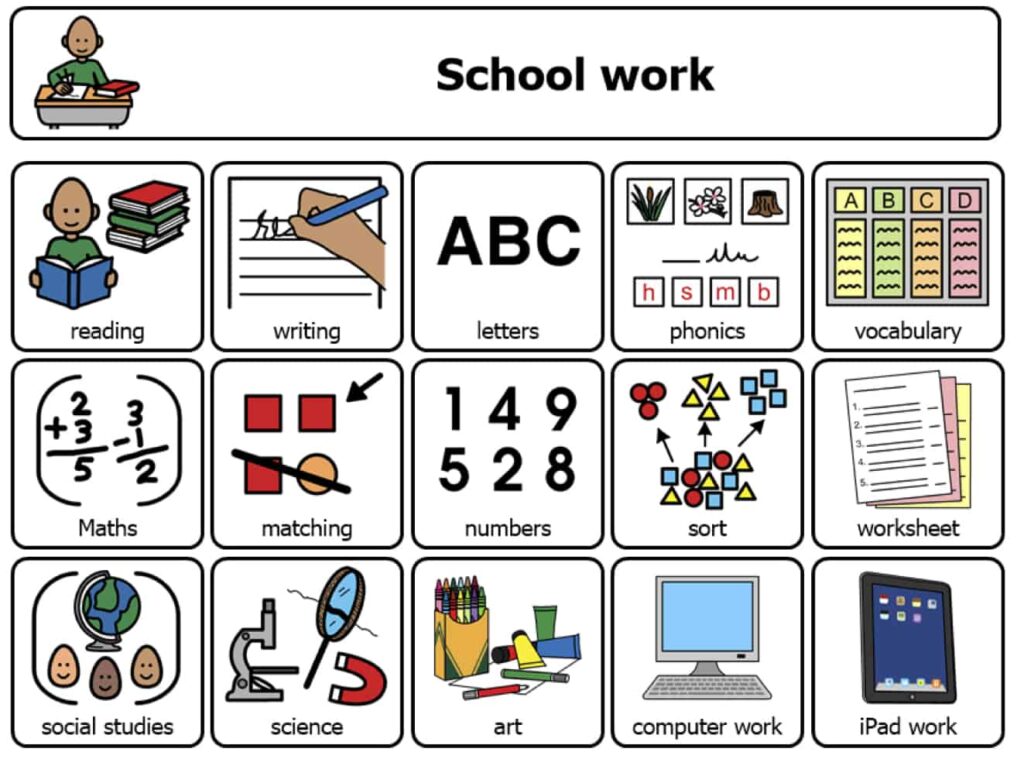
Visual aids encompass a wide range of tools including visual schedules, picture cards, emotion charts, and other non-verbal communication methods. These tools help children understand their daily activities, transitions, and expectations, thereby reducing anxiety and resistance. Visual schedules, for example, can include illustrations, photographs, words, or videos outlining a series of tasks or events.
Visual aids are particularly beneficial for autistic children, who often process information better visually than verbally. These aids help in reducing stress associated with unplanned changes and enhance their ability to communicate and interact with their surroundings.
Benefits of Visual Aids for Children:
Routine and Predictability – Visual aids help children establish and follow routines, reducing anxiety associated with unpredictability. A well-structured schedule showing tasks such as waking up, brushing teeth, and packing a school bag can give children a sense of control and stability.
Smooth Transitions – Knowing what comes next helps children transition more easily between activities. This is particularly beneficial in a classroom setting where transitions occur frequently.
Enhanced Independence – Visual aids can empower children by giving them the tools to understand and manage their tasks independently. This fosters a sense of responsibility and self-reliance.
Reduced Negotiations – With a visual schedule in place, children can see what is expected of them, reducing the need for verbal negotiations and repeated instructions.
Improved Communication – For non-verbal children or those who struggle with verbal communication, tools like the Picture Exchange Communication System (PECS) provide a way to express needs and preferences effectively.