ProtoPie 101 Crash Course | ProtoPie School
For this semester and next, we have been given the opportunity to use Protopie with a full licence as part of our studies. Because this was introduced in a subject where we could choose the topic, we wanted to work on ourselves, and the topic I chose was a group project to further develop a game we made in the first semester of the Masters. I decided to use two of my impulse blog posts to learn how to use and prototype with Protopie. Fortunately, Protopie offers a comprehensive crash course, divided into six lessons, to learn and master many of the possibilities it offers. As the course is quite extensive, I have split it into two parts, each covering three lessons of the course. So here is the first half of the course on the basics, interactive transitions & sensor-based interactions.
Lesson 1: An Introduction to ProtoPie’s Core Features
The course started off with a comprehensive introduction to ProtoPie. The first lesson covered the tool’s three main purposes: to create, test, and share prototypes. This was perfect for me, as I’d only ever worked with Figmas prototyping tools before. ProtoPie promised to enable more dynamic and realistic interactions.
Creating Prototypes
It started with learning how to set up our projects. The process was straightforward. Once the project was ready, we explored how to seamlessly import designs from tools such as Figma, Adobe XD or Sketch. Next, we were introduced to the basic features of ProtoPie. I learned how to create interactions by simply dragging and dropping elements. The interface was intuitive, even for someone with limited experience of advanced prototyping. Creating interactions felt like building with digital Lego – any action or trigger could be linked to create a seamless process.
Testing and Sharing
Once my prototype was ready, the next step was to test and share it. ProtoPie allows us to view our prototypes directly on devices such as smartphones and tablets, which made them tangible. I could see how the designs would work in real-life scenarios. Sharing was just as easy. I uploaded my project to the ProtoPie Cloud, which made it easy to collaborate with others. Another good feature is the interaction recordings. These allow you to document specific interactions. ProtoPie also has the functionality of Interaction Libraries, which allows teams to standardise design components. This can certainly save a lot of time on larger projects.
Lesson 2: Exploring Interactive Transitions
In the second lesson, it was time for hands-on with creating various types of interactions.
Screen Transitions
It started by teaching how to prototype automatic, semi-automatic, and fully custom screen transitions. I particularly enjoyed working on custom transitions because they allowed me to design interactions tailored to specific design case.
Scrolling and Paging
Next, the course dived into scrolling and paging interactions. I had always struggled to make scrolling interactions look good or useful in Figma. In ProtoPie the results were realistic, exactly like the scrolling you’d expect in a native app.
Sliding Menus
The last part of this lesson was designing sliding menus. We explored three different ways to create them, ranging from simple swiping gestures to more complex interactions that combined multiple triggers.
Lesson 3: Sensor-Aided Interactions
The third lesson took ProtoPie’s capabilities to the next level by introducing sensor-aided interactions. This feature truly sets ProtoPie apart from other prototyping tools because it enables designers to use device sensors without needing any coding knowledge.
Using Device Sensors
The workshop started with an introduction to using a phone’s camera in prototypes. I created interactions where the camera’s feed became part of the design. This was particularly useful for scenarios like augmented reality apps or interactive tutorials.
Input Fields and Native Keyboards
Next, the course explored prototyping with input fields and native keyboards. This feature was a pleasant surprise, as it allowed me to create realistic forms and search bars that behaved just like the ones in real apps. I can already see how this could improve user testing sessions, as participants would interact with the prototypes in a natural way.
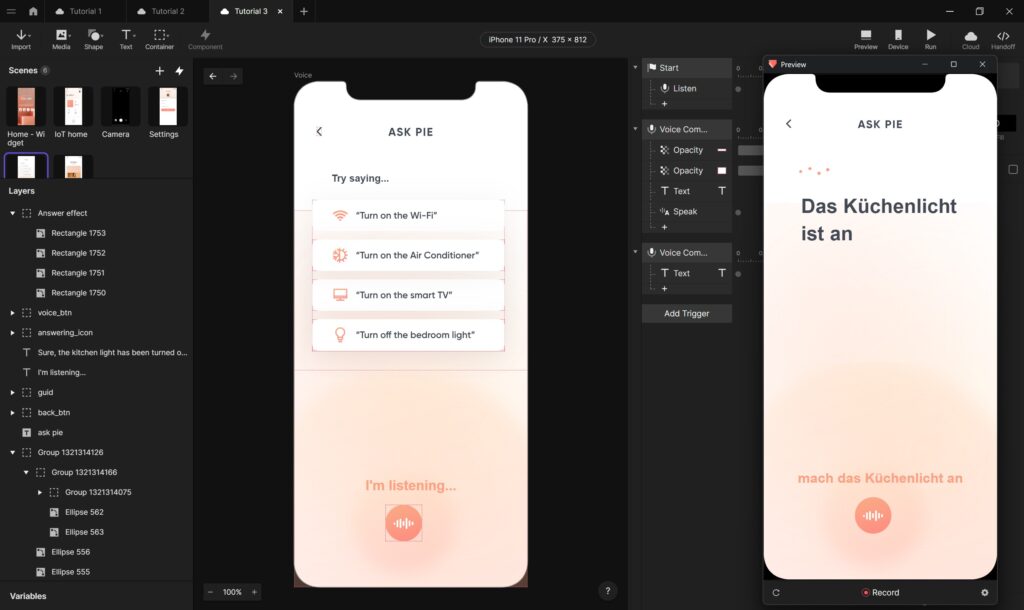
Voice Interactions
The final part of this lesson focused on voice interactions. ProtoPie made it easy to incorporate voice commands and responses into prototypes. This feature opened endless possibilities for designing interfaces for voice-activated devices or accessibility features. I was amazed at how simple it was to implement this functionality.
Reflections
The first three lessons of the ProtoPie crash course already showed a lot of possibilities in prototyping. Each lesson built on the previous one, gradually introducing more complex features. I appreciated the hands-on approach, as it allowed me to apply what I learned immediately, which is the best way for me to learn and retain things.