08 – Trevor Paglen’s “Cyclops” – A complex ARG for a complex storytelling

Introduction

In the realm of digital storytelling, few experiences are as intricate and immersive as „Cyclops,“ an alternative reality game crafted by artist Trevor Paglen. „Cyclops“ serves as a masterclass in nonlinear, interactive narrative, demanding a blend of diverse knowledge areas from its players. This makes it an ideal case study for my authoring tool, which is designed to enable the creation of complex, multifaceted stories that engage audiences in unique and profound ways. Through this blog post, I want to explore how „Cyclops“, with its sophisticated storytelling structure, perfectly aligns with the capabilities of a robust authoring tool.

Summary

„Cyclops“ is an intricate and intimidating alternative reality game designed by artist Trevor Paglen. It features a basic black-and-white digital interface reminiscent of 1970s computer systems and demands extensive knowledge in fields like cryptography, vintage computers, logic, music, and PSYOPS history. Launched at the 2023 Chaos Communication Congress, it required 700 professional hackers three days to reach just the fourth level. Since then, a dedicated group on Discord has continued to collaborate, achieving 53% completion of level three. The game immerses players in complex puzzles and psychological challenges, often guided by Eliza, a reference to the first chatbot, enhancing the sense of psychological warfare.

Paglen’s goal was to create a public art project native to the online world, fostering a community united by shared interests in digital security and coded messages. Cyclops prompts players to reflect on their relationship with digital media and social interactions, blurring the lines between gaming and psychological manipulation. Paglen and his team of experts spent a year developing this intricate digital landscape, which echoes the haunting possibility that today’s internet might be an extension of historical psychological control programs like MK Ultra.

My Conclusions

The main reasons why “Cyclops” is a suited as a case study for my project are:

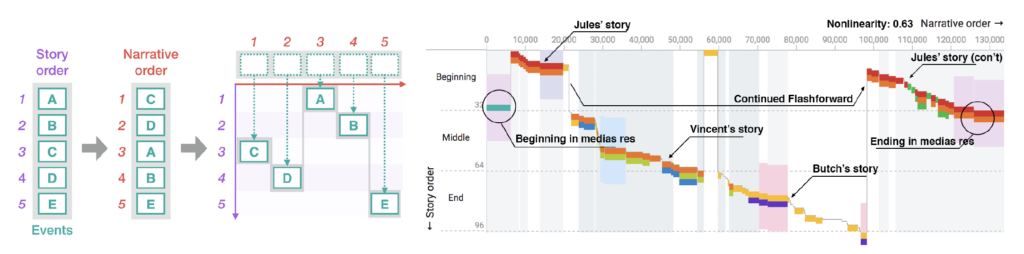
  • Its Complex Narrative Structure: „Cyclops“ features a nonlinear storyline that challenges players to navigate through cryptographic puzzles, vintage computer systems, and psychological tests. This complexity requires an authoring tool that can handle multiple narrative branches and interconnected storylines seamlessly.
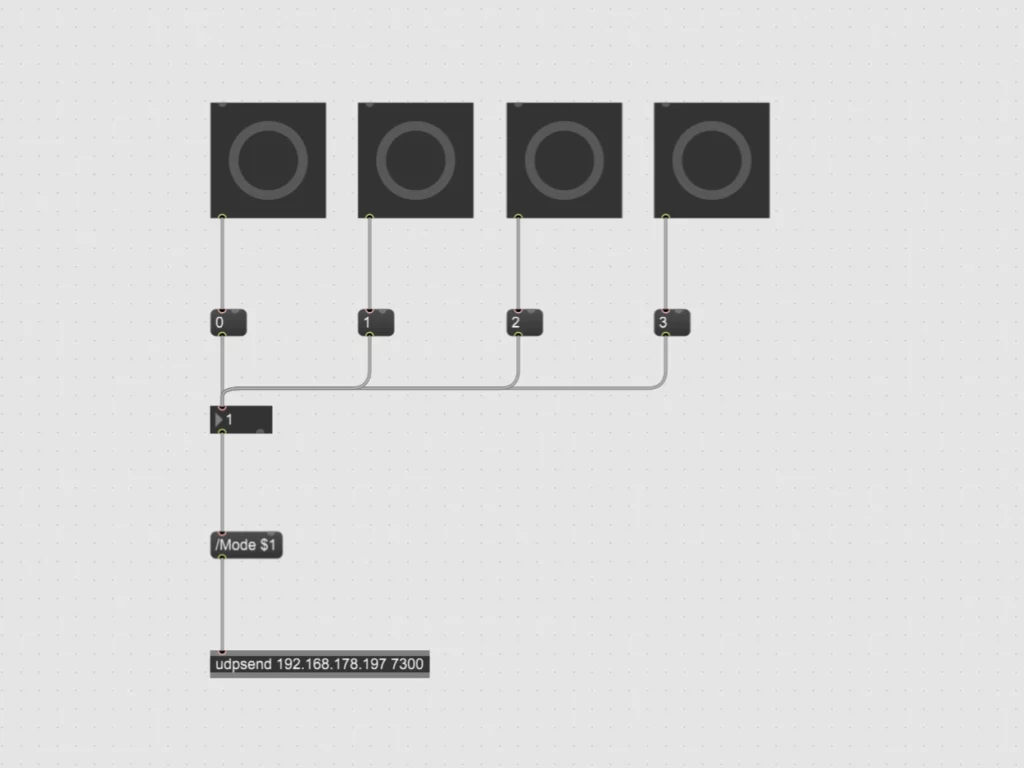
  • Interactive and Immersive Elements: The game’s integration of various media forms, such as audio tracks, ASCII scripts, and visual puzzles, demonstrates the need for an authoring tool capable of embedding diverse interactive elements that enhance user engagement.
  • Collaborative Problem-Solving: „Cyclops“ necessitates collective intelligence and collaboration, which can be facilitated by an authoring tool that supports multi-user interaction and real-time collaboration features. This feature would go outside of the pure realm of an authoring tool for storytellers but could be an interesting future feature to give the player of any ARG a platform where they are able to collaborate, solve and piece together the story that the artist is trying to convey.

References

https://donotresearch.substack.com/p/artist-profile-trevor-paglens-cyclops

07 – Authoring Tools for Storytelling – G-Flash, StoryTec & Story Explorer

Introduction

In my research for case studies on tools for storytelling I’ve read and analysed the two following papers, „G-Flash: A Simple, Graphical Authoring Environment for Interactive Non-Linear Stories“ and „StoryTec: A Digital Storytelling Platform for the Authoring and Experiencing of Interactive and Non-linear Stories“. They provide insightful perspectives on authoring tools designed for different user groups. These tools vary significantly in complexity and user experience, offering valuable insights for developing a prototype authoring tool for interactive, non-linear storytelling. My goal is to gather the insights from these research papers and use them to design my prototype. Furthermore, I will use insights from the research paper “Visualising Nonlinear Narratives with Story Curves”, already discussed in the previous blogpost, to have in mind clear UX goals for my prototype.

Summary

G-Flash and StoryTec are both digital storytelling platforms designed to support the creation of interactive and non-linear stories, but they differ in their specific features and approaches.

G-Flash, as described by Jumail et al. in 2011, focuses on providing guided learning and assistance to young children in creating digital stories using flashcards as the main media element. It emphasizes the tutored approach to guided learning, allowing students to receive the right amount of assistance without compromising their creativity and motivation. The system architecture of G-Flash is Flash-based and web-based, with a focus on using illustrated flashcards to guide story creation.

On the other hand, StoryTec, as introduced by Göbel et al. in 2018, is a digital storytelling platform that enables the authoring and experiencing of interactive and non-linear stories. It provides an authoring environment with different editors for creating and manipulating story units, as well as a runtime engine for controlling interactive scenarios during runtime. StoryTec also includes a Story Editor for managing story structures and an Action Set Editor for defining transitions among scenes..

In summary, G-Flash focuses on providing guided learning and assistance to young children using flashcards, while StoryTec is designed to enable the creation and visualization of interactive and non-linear stories through its authoring environment and runtime engine.

Both platforms aim to facilitate the creation of digital stories, but G-Flash emphasizes guided learning for children, while StoryTec provides a comprehensive authoring framework for interactive and non-linear narratives.

My conclusions

From G-Flash, I could incorporate the concept of guided learning and assistance giving within the digital storytelling application to help beginner creative writers. This can be achieved by providing a tutored approach and using flashcards-like visuals as a media element to guide story creation. According to the study, the use of illustrated flashcards motivates children and helps them recall their experiences; this can be a valuable feature to include in my authoring tool to improve recall of more complex events in a non-linear story.

From StoryTec, I can take the focus on a user-friendly and intuitive graphical user interface (GUI) for the authoring environment to help beginner creative writers without programming skills to create interactive stories. Additionally, the separation of story structure and story content in StoryTec can be a valuable insight to consider when developing your authoring tool, as it allows for flexibility in creating and playing different story elements based on the same structure. A runtime engine for the interactive storytelling platform would be interesting to implement but requires more research.

To enhance the user experience, I want to incorporate the visualization technique of Story Curves, [Blogpost 6] to reveal nonlinear narrative patterns and provide a helpful overview of the story structure. This visualization method can be used to help beginner creative writers understand the nonlinear narrative patterns in their stories and provide a visual representation of the story’s structure. I am going to take in consideration UX issues discussed in the Story Curve paper regarding the Story Explorer tool:

  1. Readability and Learnability: The evaluation of Story Explorer highlighted that some participants had difficulty in reading both story and narrative order at the same time. This suggests that providing a clear distinction between different narrative orders and visual aids for reading two axes could be useful for reading story curves.
  2. Control of Origin and Time Jumps: Participants in the evaluation study of Story Explorer struggled with the initial disorientation caused by the placement of the origin at the upper left corner and confusion between flashforwards and flashbacks. The analysis suggested that providing control of the origin of the axes and visual aids for time jumps could improve user experience.
  3. Scalability and Clean Visualization: Story Explorer integrated mechanisms to ensure a clean and scalable visualization, even for stories with hundreds of scenes. The semantic zoom feature with different representations for story elements was identified as a key factor in preventing clutter in the story graph representation.

In conclusion, by combining the insights from G-Flash, StoryTec and Story Explorer I can develop an authoring tool that provides guided learning, assistance giving, and a user-friendly interface for creating interactive, non-linear stories using the Story Curves visualization Method.

References

  1. Jumail, D. R. A. Rambli and S. Sulaiman, „G-Flash: An authoring tool for guided digital storytelling,“ 2011 IEEE Symposium on Computers & Informatics, Kuala Lumpur, Malaysia, 2011, pp. 396-401, doi: 10.1109/ISCI.2011.5958948.
  2. S. Göbel, L. Salvatore and R. Konrad, „StoryTec: A Digital Storytelling Platform for the Authoring and Experiencing of Interactive and Non-Linear Stories,“ 2008 International Conference on Automated Solutions for Cross Media Content and Multi-Channel Distribution, Florence, Italy, 2008, pp. 103-110, doi: 10.1109/AXMEDIS.2008.45.
  3. N. W. Kim, B. Bach, H. Im, S. Schriber, M. Gross and H. Pfister, „Visualizing Nonlinear Narratives with Story Curves,“ in IEEE Transactions on Visualization and Computer Graphics, vol. 24, no. 1, pp. 595-604, Jan. 2018, doi: 10.1109/TVCG.2017.2744118.

06 – Visualizing Nonlinear Narratives with Story Curves

Introduction

In the realm of digital storytelling, presenting nonlinear narratives can be particularly challenging due to their complex structures and the intricacies involved in their visualization. The paper „Visualizing Nonlinear Narratives with Story Curves“ introduces an innovative approach to tackling this issue through the development of story curves and the Story Explorer tool. As I move on into the creation of my prototype, the insights from this paper will be instrumental in shaping the way I visualize and manage nonlinear narratives. By integrating story curves into my prototype, I aim to enhance the user’s understanding and interaction with complex storylines, providing a more intuitive and engaging experience.

Summary

The paper introduces story curves, a visualization technique designed to reveal patterns in nonlinear narratives by mapping events in a two-dimensional plot based on their chronological and narrative order. The core component of this system is the Story Explorer, an interactive tool that allows users to curate and explore the chronological sequence of scenes in a movie script. The Story Explorer parses scripts to extract scenes, characters, and metadata, presenting them alongside the story curves for a comprehensive view of the narrative structure.

A schematic diagram showing how to construct a story curve from a sequence of events in story and narrative order (left). An example of a story curve of the movie Pulp Fiction (right) showing characters (colored segments), location (colored bands), and day-time (gray backdrop). A nonlinearity index is calculated based on the degree of deviation of narrative order from actual story order.

User tests were conducted to evaluate the readability and learnability of story curves. Participants were asked to answer questions regarding pattern recognition within the story curves, and the results indicated a generally high level of comprehension, with an average correctness rate of 80%. The tests highlighted some challenges, such as the simultaneous interpretation of both story and narrative orders, but overall demonstrated the effectiveness of story curves in conveying complex narrative patterns.

The goals of these tests were to assess the practicality of story curves in real-world applications and to identify areas for improvement. The results showed that story curves are a valuable tool for screenplay analysis, education, and film production, offering new perspectives on narrative structures that were previously difficult to visualize. The feedback from professional writers and scholars further emphasized the potential of story curves to revolutionize the way nonlinear narratives are understood and created.

My conclusions

Story Curves are a type of narrative visualization that is able to help both novice and experienced storytellers build a coherent non-linear narrative in, potentially, any kind media of their choice (ARG, video, web, installation, etc.).

With an improved version of Story Explorer new narrative patterns could arise due to new variables, such as media and readers interaction with the story. Adding new feature related to the challenges of multiple media and community creation would be a very interesting topic to explore and could be the ground for my digital prototype.

References

N. W. Kim, B. Bach, H. Im, S. Schriber, M. Gross and H. Pfister, „Visualizing Nonlinear Narratives with Story Curves,“ in IEEE Transactions on Visualization and Computer Graphics, vol. 24, no. 1, pp. 595-604, Jan. 2018, doi: 10.1109/TVCG.2017.2744118.

First VR Training Prototype

Introduction

As a novice in VR development, creating my first prototype for gamified VR training was both a challenging and enlightening journey. This project focused on developing a simple yet interactive training module that incorporated various user interactions and gamification elements. Here’s a look at the design and the learning process involved.

Prototype Overview

For my first prototype, I designed a VR training module where users interact with different shapes and perform tasks using various controls. The goal was to create an engaging and educational experience that could be used for training purposes. Here are the key components of the prototype:

Key Interactions

  1. Changing Cube Color
  • Interaction: Users can press a button to change the color of a cube.
  • Gamification: Each time the cube changes color, the user earns 1 point.
  • Feedback: Immediate visual feedback shows the color change, and the points system provides motivation to continue interacting.
  1. Moving the Cube with a Joystick and Stepper
  • Interaction: A joystick allows users to move the cube around the VR environment.
  • Learning Objective: This helps users practice fine motor skills and control within the VR space.
  1. Smashing the Cube with a Hammer
  • Interaction: Users can use a virtual hammer to smash the cube.
  • Engagement: This fun and interactive element keeps users engaged and helps relieve stress while practicing precision and coordination.
  1. Placing the Cube in the Correct Box
  • Interaction: Users must move the cube and place it into the correct box.
  • Feedback: Sound feedback is provided to indicate if the cube is placed in the correct or wrong box, enhancing the learning experience through auditory cues.

Gamification Elements

  1. Points System
  • Users earn points for successfully changing the cube’s color and completing tasks.
  • The points system adds a competitive and motivational aspect to the training, encouraging users to improve their performance.
  1. Visual and Sound Feedback
  • Visual Feedback: Immediate color changes and placement indicators help users understand their actions.
  • Sound Feedback: Auditory cues indicate correct or incorrect actions, reinforcing learning and improving task accuracy.

Learning Experience

Developing this prototype was a significant learning experience. The process involved understanding how to create interactive elements within a VR environment and effectively implementing gamification mechanics. Despite being a beginner in VR development, I learned to design simple interactions that provide immediate feedback and keep users engaged.

Conclusion

My first VR training prototype successfully integrated basic gamification elements to create an engaging and educational experience. By allowing users to interact with different shapes, change colors, move objects, and receive immediate feedback, this prototype serves as a foundational step towards more complex VR training modules. The challenges I faced and the skills I acquired during this project have been invaluable, and I look forward to further developing and refining my VR development capabilities.

Calm Technology // 19

Since I had scripted the different gestures I wanted to have for Tap in Arduino, I could now combine all the gestures into one script. I then connected the Wemos board that controls Tap to the wifi so that I could trigger each of these gestures wirelessly from my laptop via a simple interface.

To create the interface, I used Max 8 to build a simple patch to send OSC messages to my Wemos board. The patch consists of a few buttons that trigger messages with a value between 0 & 3, which are then sent as an OSC message via UDP to trigger different parts of the Arduino script.

Max patch interface to control tap

I combined all the different gesture scripts into one Arduino script that can receive OSC messages via UDP. These messages set the value for a variable which is then queried in the loop of the script to start the desired gestures. After the gestures have finished, the variable is reset to put Tap back into a suspended state.

#include <AccelStepper.h>
#include <ESP8266WiFi.h>  // The Library for WIFI
#include <WiFiUdp.h>  // Library for UDP
#include <OSCMessage.h>  //Library for OSC

#define motorInterfaceType 1

// Define the stepper motor and the pins that is connected to // (STEP, DIR)
AccelStepper stepper1(motorInterfaceType, D5, D6); 
AccelStepper stepper2(motorInterfaceType, D7, D8);

// Set the target positions for both steppers
int PositionDown = 0;
int PositionUp = 0;

// State variable to keep track of movement sequence
int state1 = 0;
int state2 = 0;

// For triggering movements
int mode = 0;

WiFiUDP Udp;

const char* ssid = "************";           
const char* password = "************";      

const IPAddress dstIp(192,168,1,129); 
const unsigned int dstPort = 7250;  // Destination OSC
const unsigned int localPort = 7300; // Reciving OSC


////////////////////////////////////////////////////////////////////////////////////


void setup() {
  
  Serial.begin(9600);

  // Settings for Motor 1
  stepper1.setMaxSpeed(1000); 
  stepper1.setAcceleration(500);
  stepper1.setCurrentPosition(0);

  // Settings for Motor 2
  stepper2.setMaxSpeed(1000);
  stepper2.setAcceleration(500);
  stepper2.setCurrentPosition(0);

  // Connecting to WIFI
  Serial.print("Connecting WiFi ");
  // Prevent need for powercyle after upload.
  WiFi.disconnect();

  // Use DHCP to connect and obtain IP Address.
  WiFi.mode(WIFI_STA);
  WiFi.begin(ssid,password);

  // Wait until we have connected to the WiFi AP.
  while (WiFi.status() != WL_CONNECTED) {
    delay(500);
    Serial.print(".");
  }

  Serial.println("Done!");
  Serial.print("IP address: ");
  Serial.println(WiFi.localIP());

  Udp.begin(localPort);

}


////////////////////////////////////////////////////////////////////////////////////


void loop() {

  handleOSC();

  if (mode == 0) {

    state1 = 0;
    state2 = 0;

  }

  if (mode == 1) {

    Wave1();
    Wave2();

  }

  if (mode == 2) {
    
    Knock1();

  }

  if (mode == 3) {
    
    Tap1();
    Tap2();

  }

}


////////////////////////////////////////////////////////////////////////////////////


void Wave1() {

  switch (state1) {

    case 0:
      stepper1.setAcceleration(200);
      PositionDown = 40;
      stepper1.moveTo(PositionDown);
      state1 = 1;
      break;
    
    case 1:
      if (stepper1.distanceToGo() != 0) {
        stepper1.run();
      } else {
        stepper1.stop();
        PositionDown = -40;
        stepper1.moveTo(PositionDown);
        state1 = 2;
      }
      break;
    
    case 2:
      if (stepper1.distanceToGo() != 0) {
        stepper1.run();
      } else {
        stepper1.stop();
        PositionDown = 20;
        stepper1.moveTo(PositionDown);
        state1 = 3;
      }
      break;

    case 3:
      if (stepper1.distanceToGo() != 0) {
        stepper1.run();
      } else {
        stepper1.stop();
        PositionDown = -20;
        stepper1.moveTo(PositionDown);
        state1 = 4;
      }
      break;

    case 4:
      stepper1.setAcceleration(100);
      if (stepper1.distanceToGo() != 0) {
        stepper1.run();
      } else {
        stepper1.stop();
        PositionDown = 0;
        stepper1.moveTo(PositionDown);
        state1 = 5;
      }
      break;
    
    case 5:
      if (stepper1.distanceToGo() != 0) {
        stepper1.run();
      } else {
        stepper1.stop();
      }
      break;
  }
}


void Wave2() {

  if (state1 >= 4){

    switch (state2) {

      case 0:
        stepper2.setAcceleration(275);
        PositionUp = 25;
        stepper2.moveTo(PositionUp);
        state2 = 1;
        break;
      
      case 1:
        if (stepper2.distanceToGo() != 0) {
          stepper2.run();
        } else {
          stepper2.stop();
          PositionUp = -25;
          stepper2.moveTo(PositionUp);
          state2 = 2;
        }
        break;
      
      case 2:
        if (stepper2.distanceToGo() != 0) {
          stepper2.run();
        } else {
          stepper2.stop();
          PositionUp = 15;
          stepper2.moveTo(PositionUp);
          state2 = 3;
        }
        break;

      case 3:
        
        if (stepper2.distanceToGo() != 0) {
          stepper2.run();
        } else {
          stepper2.stop();
          PositionUp = -15;
          stepper2.moveTo(PositionUp);
          state2 = 4;
        }
        break;

      case 4:
        if (stepper2.distanceToGo() != 0) {
          stepper2.run();
        } else {
          stepper2.stop();
          PositionUp = 15;
          stepper2.moveTo(PositionUp);
          state2 = 5;
        }
        break;

      case 5:
        if (stepper2.distanceToGo() != 0) {
          stepper2.run();
        } else {
          stepper2.stop();
          PositionUp = -15;
          stepper2.moveTo(PositionUp);
          state2 = 6;
        }
        break;

      case 6:
        if (stepper2.distanceToGo() != 0) {
          stepper2.run();
        } else {
          stepper2.stop();
          PositionUp = 0;
          stepper2.moveTo(PositionUp);
          state2 = 7;
        }
        break;  
      
      case 7:
        if (stepper2.distanceToGo() != 0) {
          stepper2.run();
        } else {
          stepper2.stop();
          mode = 0;          
        }
        break;
    }
  }
}


void Knock1() {

  switch (state1) {

    case 0:
      stepper2.setAcceleration(400);
      PositionUp = -20;
      stepper2.moveTo(PositionUp);
      state1 = 1;
      break;
    
    case 1:
      if (stepper2.distanceToGo() != 0) {
        stepper2.run();
      } else {
        stepper2.stop();
        PositionUp = 80;
        stepper2.moveTo(PositionUp);
        state1 = 2;
      }
      break;
    
    case 2:
      if (stepper2.distanceToGo() != 0) {
        stepper2.run();
      } else {
        stepper2.stop();
        PositionUp = 60;
        stepper2.moveTo(PositionUp);
        state1 = 3;
      }
      break;

    case 3:
      stepper2.setAcceleration(800);
      if (stepper2.distanceToGo() != 0) {
        stepper2.run();
      } else {
        stepper2.stop();
        PositionUp = 80;
        stepper2.moveTo(PositionUp);
        state1 = 4;
      }
      break;

    case 4:
      if (stepper2.distanceToGo() != 0) {
        stepper2.run();
      } else {
        stepper2.stop();
        PositionUp = 0;
        stepper2.moveTo(PositionUp);
        state1 = 5;
      }
      break;
    
    case 5:
      if (stepper2.distanceToGo() != 0) {
        stepper2.run();
      } else {
        stepper2.stop();
        mode = 0;
      }
      break;
  }
}


void Tap1() {

  if (state2 >= 2){

    switch (state1) {

      case 0:
        stepper1.setAcceleration(300);
        PositionDown = -20;
        stepper1.moveTo(PositionDown);
        state1 = 1;
        break;
        
      case 1:
        if (stepper1.distanceToGo() != 0) {
          stepper1.run();
        } else {
          stepper1.stop();
          PositionDown = 5;
          stepper1.moveTo(PositionDown);
          state1 = 2;
        }
        break;
        
      case 2:
        stepper1.setAcceleration(600);
        if (stepper1.distanceToGo() != 0) {
          stepper1.run();
        } else {
          stepper1.stop();
          PositionDown = -20;
          stepper1.moveTo(PositionDown);
          state1 = 3;
        }
        break;

      case 3:
        if (stepper1.distanceToGo() != 0) {
          stepper1.run();
        } else {
          stepper1.stop();
          PositionDown = 0;
          stepper1.moveTo(PositionDown);
          state1 = 4;
        }
        break;

      case 4:
        stepper1.setAcceleration(100);
        if (stepper1.distanceToGo() != 0) {
          stepper1.run();
        } else {
          stepper1.stop();
        }
        break;
      
    }
  }
}


void Tap2() {

  switch (state2) {

    case 0:
      stepper2.setAcceleration(400);
      PositionUp = 50;
      stepper2.moveTo(PositionUp);
      state2 = 1;
      break;
    
    case 1:
      if (stepper2.distanceToGo() != 0) {
        stepper2.run();
      } else {
        stepper2.stop();
        PositionUp = 0;
        stepper2.moveTo(PositionUp);
        state2 = 2;       
      }
      break;

    case 2:
      if (state1 >= 4) {
        stepper2.setAcceleration(200);
        if (stepper2.distanceToGo() != 0) {
          stepper2.run();
        } else {
          stepper2.stop();
          mode = 0;
        }
      }
      break;
        
  }
}


////////////////////////////////////////////////////////////////////////////////////


void handleOSC() {
  
  OSCMessage msg("/Mode");
  int size = Udp.parsePacket();
  if (size > 0) {
    while (size--) {
      msg.fill(Udp.read());
    }
    if (!msg.hasError()) {
      msg.dispatch("/Mode", Activating);
    }
  }
}


void Activating(OSCMessage &msg) {
  
  if (msg.isInt(0)) {
    int receivedMode = msg.getInt(0);
    mode = receivedMode;
    Serial.println("Received Mode Command");
    Serial.println(mode);

  }
}

After finishing the interface and the now complete Arduino script, I tested them together. With my laptop set up as a touch interface running Max 8 and the Wemos board running Tap as usual. All went quite smoothly and after some tweaking everything is now running stable. You can see the result below.

Tap controlled via a remote interface

With this, my prototype for this semester’s Design & Research project is almost finished. The last step will be to make the interface a bit cleaner and more intuitive, and then I will make a video explaining my prototype Tap and how it works.

Double Diamond #9 // 20 years of the Double Diamond and a glimpse into the future.

https://www.youtube.com/watch?v=5FpKuJSCbx0

Our aim was to open up how we talked about design, to make that process accessible in a simplified way. We built directly on the shoulders of so many process-modelling designers, so watching its adoption and adaptation is an inspiring reflection of that flow. We never anticipated that this particular model would have so much impact, be so repeated and widely taken up by the industry, especially by non-designers.

Gill Wildman
Founder Upstarter Incubator,
Member of the Design Council team who published the Double Diamond

20 years of Double Diamond

The Double Diamond, created by the Design Council in 2003, marked its 20th anniversary last year. This iconic design process model has become a global standard, widely used by different organisations. The framework simplifies the design process into four key phases, as we already discovered, guiding both designers and non-designers through a structured approach to problem-solving and innovation.1

Key Milestones and Impact

  • Launch and Adoption: Since its inception in 2003, the Double Diamond has been embraced by numerous design courses and organisations worldwide. It provides a clear, visual representation of the design process, making it accessible and easy to understand.
  • Global Influence: The model has millions of references on the web and has been integrated into the workflows of many well-known entities, helping tackle a wide range of social, economic, and environmental challenges.
  • Extensions and Adaptations: Over the years, the Design Council has developed additional tools based on the Double Diamond, such as the Framework for Innovation and the Systemic Design Framework, to address more complex, systemic issues. And other companies have developed their own systems from it, which they use successfully.
  • Creative Commons License: To celebrate the 20th anniversary, the Design Council has made the Double Diamond available under a Creative Commons license, allowing free use and adaptation. They have also partnered with Mural, a digital collaboration platform, to offer an online template of the Double Diamond. This initiative aims to facilitate its use in digital and remote settings. I would definitely like to take a closer look at this for my project and prototype.

Double Diamond Examples
https://www.designcouncil.org.uk/our-resources/the-double-diamond/history-of-the-double-diamond/

A Glimpse into the Future

As the Double Diamond enters its third decade, the Design Council continues to adapt and expand the framework to meet contemporary challenges. The Systemic Design Framework is one such evolution, aiming to address complex, interconnected issues such as climate change, social inequality, and other global challenges. This new framework builds on the principles of the Double Diamond but provides a broader, more flexible approach to systemic problems.2

Systemic Design Framework
https://www.designcouncil.org.uk/our-resources/systemic-design-framework/

The Systemic Design Framework is a powerful tool that helps designers create innovative methods and tools tailored to their specific needs. It is guided by six key principles: focusing on people and the planet, zooming in and out to see the big picture and details, testing and evolving ideas, embracing diversity, fostering collaboration, and promoting circular and regenerative practices. Designers take on four crucial roles: system thinker, leader and storyteller, designer and maker, and connector and convenor. The framework outlines four types of design activities: exploring, reframing, creating, and catalyzing. Additionally, it emphasises the importance of enabling activities like setting a vision, building connections, showing leadership, and storytelling to ensure continuous progress.3

The future of the Double Diamond therefore involves integrating it more deeply with other methodologies like Agile and Lean, ensuring it remains relevant in fast-paced and dynamic environments. Additionally, the focus is shifting towards making the framework even more inclusive and collaborative, ensuring it can be used effectively by diverse teams across different sectors. The Design Council is committed to continuously learning from the design community and adapting the Double Diamond to ensure it remains a valuable tool for innovation and problem-solving. They are exploring new ways to apply the Double Diamond in various contexts, ensuring it evolves with the changing needs of the world. And that’s the point where I want to start and contribute as well.

  1. https://www.designcouncil.org.uk/fileadmin/uploads/dc/Documents/Press_Releases/The_Double_Diamond_turns_20_-_9_May_2023_Final.pdf ↩︎
  2. https://medium.com/design-council/the-double-diamond-design-process-still-fit-for-purpose-fc619bbd2ad3 & https://medium.com/design-council/developing-our-new-systemic-design-framework-e0f74fe118f7 ↩︎
  3. https://www.designcouncil.org.uk/our-resources/systemic-design-framework/ ↩︎

The Importance of Incorporating Kinesthetic and Tactile Learning Styles for Children with Cognitive Disabilities

Children with cognitive disabilities often face unique challenges in processing and responding to sensory stimuli. Understanding and catering to their specific learning needs can make a significant difference in their educational experiences and outcomes. Kinesthetic and tactile learning styles, which involve hands-on activities and physical movement, are particularly beneficial for these children. This blog post explores the importance of incorporating these learning styles, supported by recent studies and practical strategies.

Understanding Kinesthetic and Tactile Learning

Kinesthetic learners thrive on movement and physical activities. They learn best by doing rather than observing or listening. Tactile learners, on the other hand, benefit from using their sense of touch to explore and understand the world around them. These learning styles are crucial for children with cognitive disabilities, including those with Autism Spectrum Disorder (ASD), who often exhibit heightened sensory sensitivities.

The Benefits of Kinesthetic and Tactile Learning

Enhanced Sensory Processing

A study by Asmika et al. (2016) found that children with autism are more sensitive to tactile sensory stimuli compared to their neurotypical peers. This heightened sensitivity means they respond more intensely to touch and other tactile inputs. By incorporating tactile learning activities, educators can help these children engage with their environment in a controlled and supportive manner, aiding in sensory integration and reducing anxiety.

Improved Engagement and Focus

Children with cognitive disabilities often struggle with attention and focus, especially in traditional classroom settings. Kinesthetic and tactile activities, such as building models, engaging in role-play, or using manipulatives, can capture their interest and keep them engaged. These activities align with their natural preferences for movement and touch, making learning more enjoyable and effective.

Development of Motor Skills

Hands-on activities help children develop fine and gross motor skills, which are essential for daily living and academic tasks. For instance, activities like tracing letters in sand or playing with clay can improve fine motor control, while more extensive physical activities like obstacle courses can enhance gross motor skills. These skills are particularly important for children with cognitive disabilities who may experience motor coordination challenges.

Strategies for Incorporating Kinesthetic and Tactile Learning

Use Props and Hands-On Activities

Incorporate a variety of props and tactile materials into lessons. For example, use rubber bands and pegboards to teach geometric shapes or provide textured materials for art projects. These tactile experiences help children connect abstract concepts with physical sensations, reinforcing their learning.

Make Story Time Interactive

Turn story time into an interactive experience by having children act out scenes or use puppets and props. This approach not only makes the stories more engaging but also helps children understand and remember the content better through active participation.

Incorporate Movement Breaks

Regular movement breaks can help children maintain focus and reduce restlessness. Activities like jumping jacks, stretching, or a quick dance session can refresh their minds and bodies, making it easier for them to return to more structured tasks.

Combine Learning Modalities

Using a multimodal approach can cater to various learning preferences simultaneously. For instance, combining auditory and kinesthetic learning through music and dance can be highly effective. An example is teaching the alphabet with a freeze dance game, where children dance to a song and freeze when the music stops. This method engages multiple senses and keeps learning dynamic and fun.

Conclusion

Incorporating kinesthetic and tactile learning styles into the education of children with cognitive disabilities is not just beneficial but essential. These approaches align with their natural learning preferences, enhance sensory processing, improve engagement, and support motor skill development. By understanding and implementing these strategies, educators and parents can create a more inclusive and effective learning environment that meets the needs of all children.

By embracing these methods, we can ensure that every child has the opportunity to succeed and thrive in their educational journey, regardless of their cognitive abilities.

References:

https://mybrightwheel.com/blog/kinesthetic-learner

Asmika, Asmika, Lirista Dyah Ayu Oktafiani, Kusworini Kusworini, Hidayat Sujuti, and Sri Andarini. „Autistic Children Are More Responsive to Tactile Sensory Stimulus.“ Journal of Medical Sciences 50, no. 2 (2018).

Supporting Visual Learning Methods for Children with Cognitive Disabilities

Children with cognitive disabilities often face challenges in communication and learning. Traditional teaching methods might not always work for them, so it’s important to use special approaches that meet their unique needs. Visual learning methods are especially helpful in supporting their education and development. This article explores how visual learning works and shares some tools and resources that can make learning easier for children with cognitive disabilities.

Why Visual Learning is Important

Visual learning uses the strengths of children with cognitive disabilities, especially those with autism, who often think in pictures rather than words. Visual supports like photos, drawings, objects, and written words help communicate more effectively. Studies show that these visual aids can improve understanding, reduce anxiety, and enhance learning.

How Visual Learning Works

Visual learning helps by providing clear, simple representations of ideas. Children with cognitive disabilities may find it hard to understand verbal instructions. Visual supports make communication easier by turning words into pictures they can understand. This approach is part of Universal Design for Learning (UDL), which means using different ways to teach so everyone can learn.

Visual Learning Strategies

There are several visual learning strategies designed to help children with cognitive disabilities. These strategies focus on creating a predictable and supportive learning environment.

Visual Schedules

Visual schedules are key tools that show a clear plan for daily activities. They help children understand what will happen and when, reducing uncertainty and stress. Visual schedules can use pictures, symbols, or words to represent different tasks. For example, the Picture Exchange Communication System (PECS) uses visual schedules to help with communication and routines.

First-Then Boards

First-Then Boards are useful for teaching children to follow directions and complete tasks. This visual strategy shows a preferred activity (the „then“ task) that will happen after completing a less preferred one (the „first“ task). It helps motivate children to do tasks they might not like by showing what comes next.

Visual Prompts and Social Stories

Visual prompts and social stories are great for teaching social skills and managing behavior. Social stories provide visual explanations of social situations and appropriate responses, helping children understand social cues and expectations.

Combining Play and Formal Learning

While learning through play is crucial for development, formal learning is also important for core skills like reading, writing, and math. A balanced approach that includes both play and structured learning can be very effective. Various visual resources and activities support this mixed approach.

Modern Tools: Goally

Technology offers new solutions for visual learning. Goally is a tablet designed for children with cognitive disabilities, featuring visual schedules, task analysis, and reward systems in a user-friendly format. Goally supports independent learning and helps children manage their routines effectively.

References:

https://www.theautismpage.com/visual-learning

https://vkc.vumc.org/assets/files/resources/visualsupports.pdf

https://getgoally.com

Why Text-to-Speech with Highlighted Text is Crucial for Prototypes and Children with Cognitive Disabilities

For children with cognitive disabilities, traditional learning methods can often be challenging and frustrating. Reading long passages of text requires sustained attention, which can be particularly difficult for these students. TTS with highlighted text addresses this issue by providing an auditory learning experience that keeps students engaged. As the text is read aloud, each word is highlighted, allowing students to follow along visually and aurally. This dual-input method reinforces learning and helps improve comprehension and retention.

Reducing Cognitive Load

Children with cognitive disabilities often experience a higher cognitive load when processing text. The need to decode and comprehend text simultaneously can be overwhelming. TTS reduces this cognitive load by allowing students to focus on understanding the content rather than struggling with the mechanics of reading. Highlighting text as it is read ensures that students can keep track of where they are in the text, further reducing the mental effort required.

Supporting Multimodal Learning

Different students have different learning preferences. While some may excel with visual aids, others may find auditory learning more effective. TTS with highlighted text supports multimodal learning by combining auditory and visual elements. This approach caters to various learning styles, ensuring that all students have the opportunity to succeed. For instance, in an interactive table prototype, students can interact with the content in multiple ways, making learning more dynamic and inclusive.

Fostering Independence and Confidence

One of the critical goals in special education is to foster independence among students. TTS with highlighted text empowers children with cognitive disabilities to access information independently. They no longer need to rely solely on teachers or peers to read aloud to them. This autonomy boosts their confidence and encourages them to take charge of their learning journey. As they become more comfortable with using TTS tools, their self-esteem and motivation to learn improve significantly.

Text-to-Speech with highlighted text is more than just a technological feature; it is a bridge to a more inclusive and accessible education system. By reducing cognitive load, supporting multimodal learning, fostering independence, and broadening access to information, TTS with highlighted text has the potential to transform the learning experiences of children with cognitive disabilities. As developers and educators continue to innovate, incorporating such features in educational tools and prototypes will be crucial in ensuring that every child has the opportunity to learn and succeed.

References:

https://medium.com/engineered-publicis-sapient/creating-immersive-product-experiences-with-audio-and-animated-text-highlighting-in-react-9a88c9b2acd2

https://www.xda-developers.com/best-text-to-speech-extensions-browsers

https://www.metaview.ai/resources/blog/syncing-a-transcript-with-audio-in-react