“ontextC” – Technical Diary 10

What happened so far?

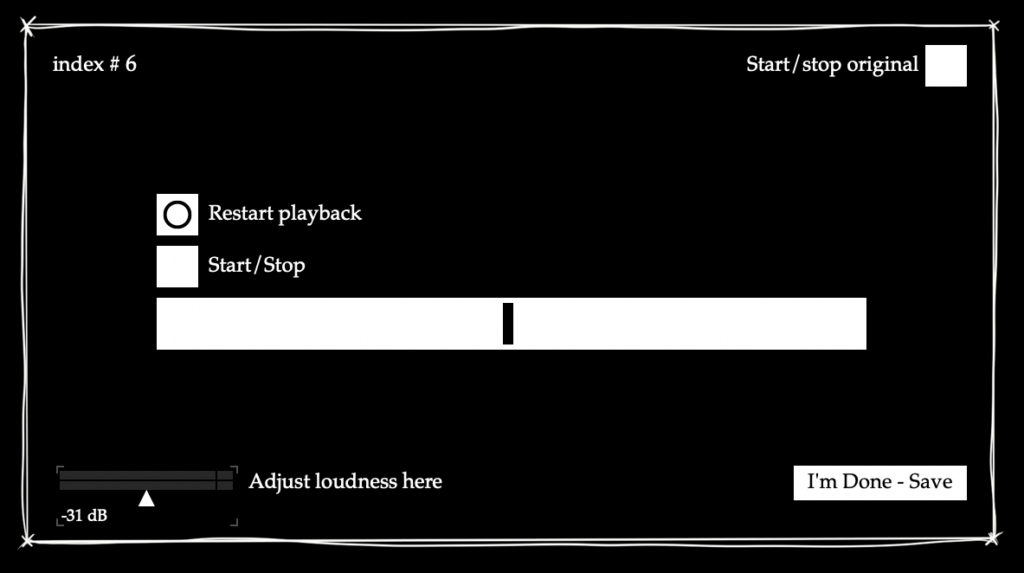
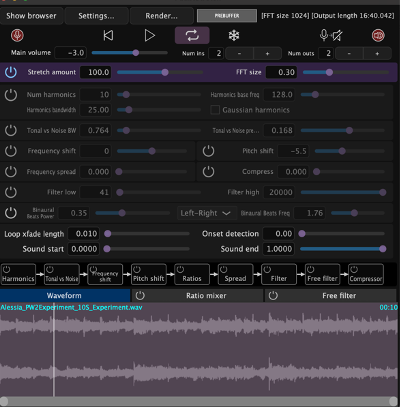
For the exhibition, I set up an interface with a parameter slider with values relative to the actual value. I set up the software so the reference audio alternates between a stretch factor of 110 and 25 every time someone saves their result, to get an idea of how good the recognition resolution is at higher values. I noticed in my testing stage with myself that in the last third of the values, my own guesses strayed a bit further from the actual parameter value, whereas in the lowest third they were usually very accurate.

The final exhibition setup in presentation mode (Picture credit: Mahtab Jafarzadehmiandehi)


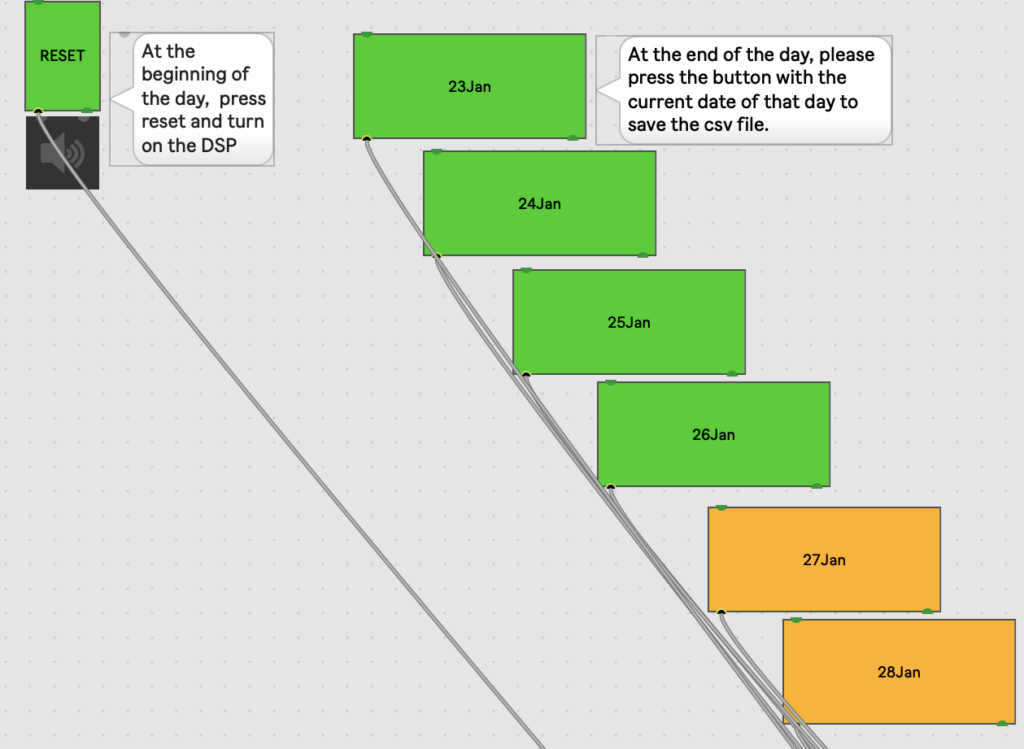
Since I would not be able to be present for the opening myself, I added a minimal interface in the patching mode so my colleagues would be able to save the data at the end of the day.

Max interface for saving the collected data

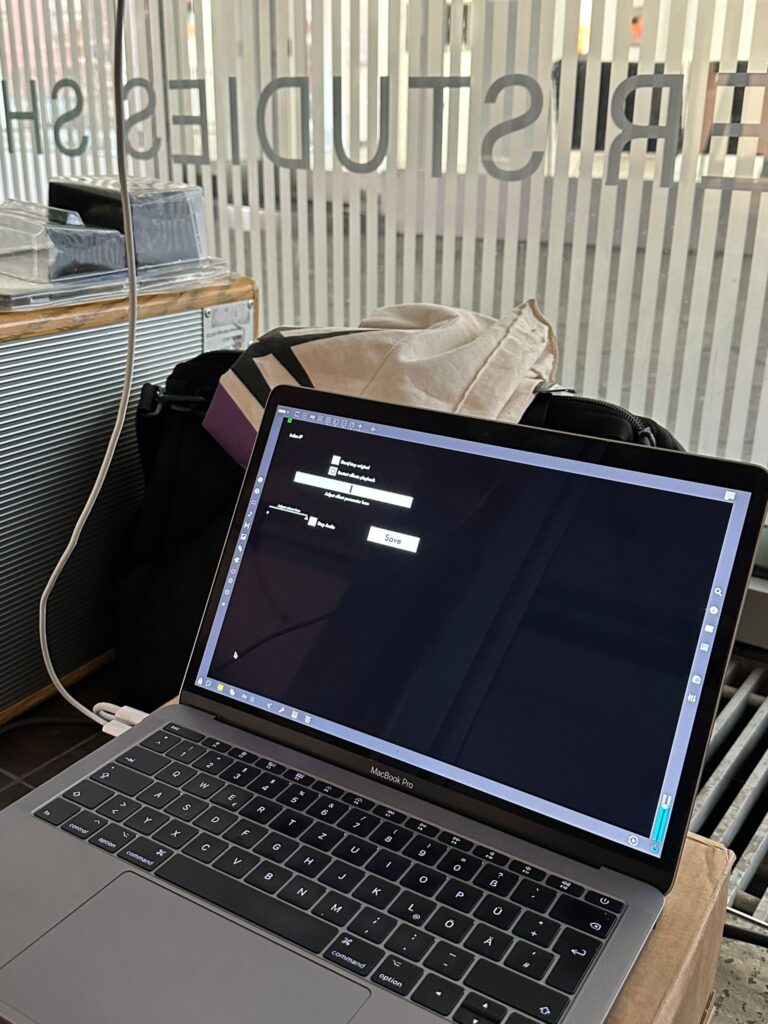
For the exhibition setup, I rented an iPad, a laptop, and an iPad stand, and I ran Cycling’74’s Mira app on the iPad with guided access enabled. Like this, I could pretty much maintain the GUI I had set up in Max’s presentation mode already, with some minor changes (e.g.: changing slider objects into Mira-compatible live.slider objects). Initially, I wanted to try connecting the laptop and iPad via Wi-fi to be more flexible with the placement of the laptop on site, but ultimately connecting the two devices via USB was a safer option, especially since I also had to consider the ease of setup for my colleagues on site.

Building the test setup for the exhibit at home

I also fastened a hook onto the iPad stand using zip ties to be able to hang a pair of headphones there. On-site, a white box with a hole in the middle for the cables was put over the laptop to protect it and give the exhibit a clean look. I recorded a video of myself explaining and turning the exhibit on and off in advance, so my colleagues could have it as a reference when setting up.

When I returned, I found that there had been some issues with turning the exhibit off and on some days, and some of the data was unfortunately lost because it had been overwritten in my absence. Luckily, the data for two days remained available, leaving me with a total of 31 test results (16 for the factor of 110 and 15 for the factor of 25). As expected, the results were a little bit all over the place, since of course an exhibition is also an informal setting that can (and should) invite people to primarily explore, but I was also able to detect some subtle trends of the nature that I had observed with myself. Of course, with this small sample size and setting it is not recommended to come to fixed conclusions, since there are just so many uncontrolled variables, but it was still interesting to see how some people seemed to have used the tool and that they did in fact try it out.

Ongoing

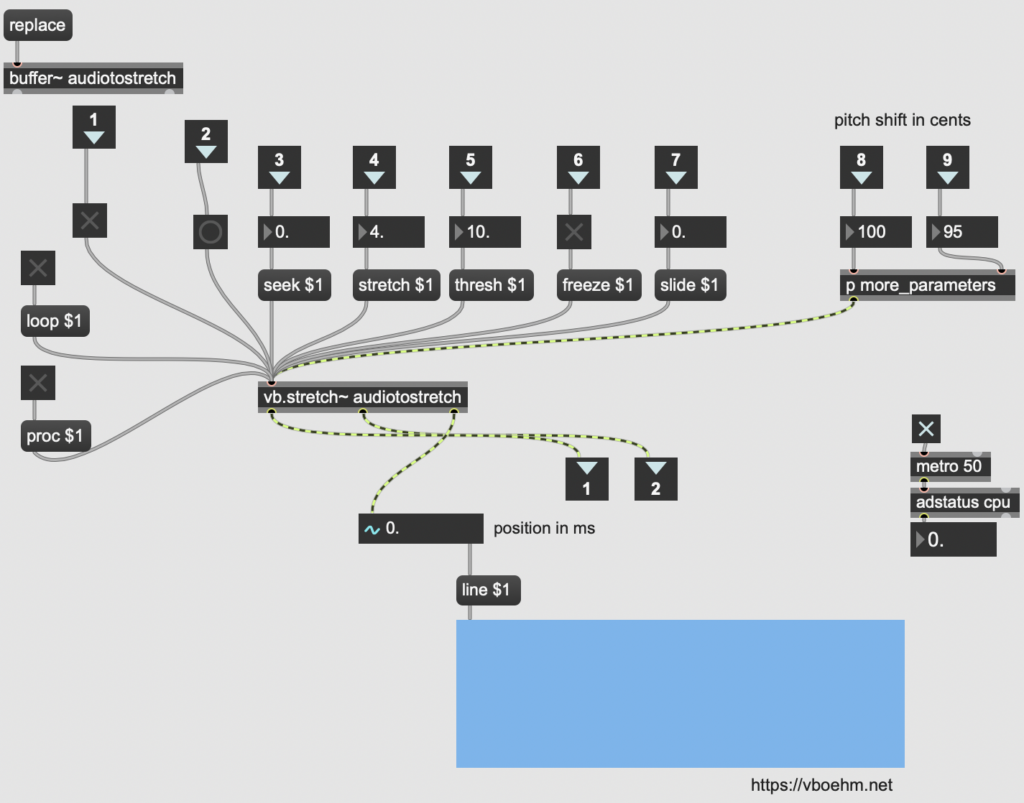
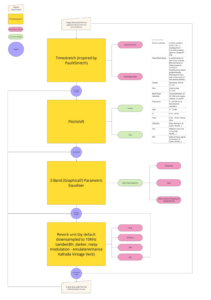
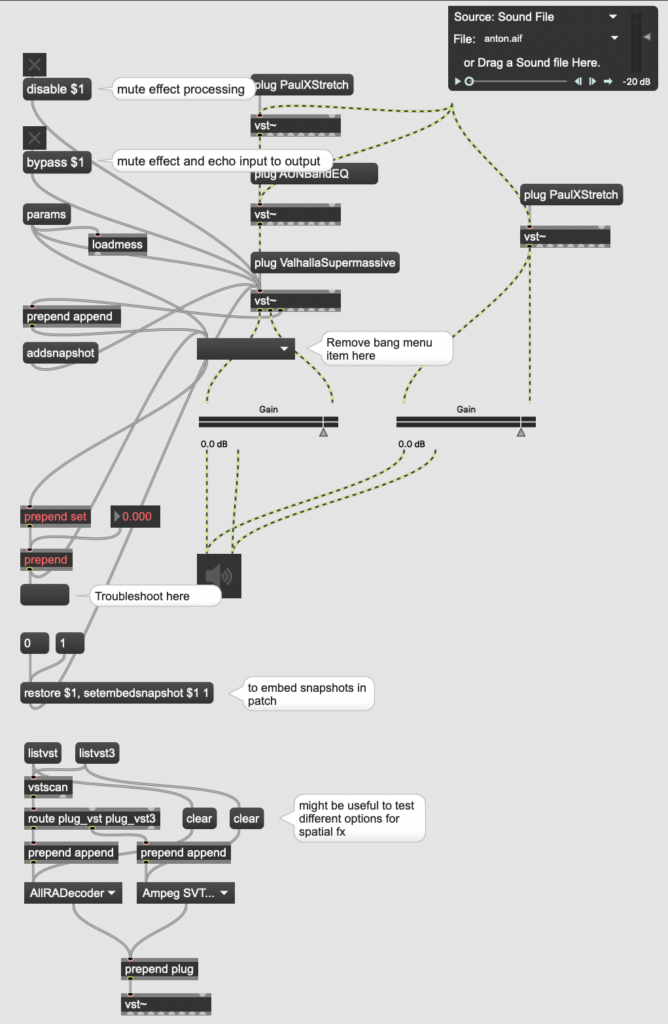
Now it is time to properly discuss and evaluate the test setup and the data results, as well as reflect on the overall process of creating the Max4Live device. There is still some work that I want to do for the GUI, and I also want to clean up the cord connections in my Max patch to make them easier to trace for others in case I ever do decide to share the patch. Lastly, I would like to prepare sound examples to show during the presentation in advance.

Results and Reflection

The exhibition setup was definitely a new experience for me, since it forced me to articulate my process in a way that could be understood by any other person, and I also needed to provide documentation that would enable people to use the setup regardless of me being available on site or not. Of course, it was unfortunate that I missed out on the larger amount of data from the opening, but I am glad that there is at least some data from days when I received confirmation that the exhibit worked as intended – the whole process really added a new layer of learning outcomes to the project for me. Not only did I have to figure out data collection in the Max environment, but I also learned about an application I had been unfamiliar with before, thought about setup considerations in a real location (safety, cable management, exhibit design) and took mental notes on how the process of saving data could be simplified for other projects.

Objectives for Next Time (= the final presentation)

  • Document project implementation
  • Finalise GUI
  • Prepare presentation

“ontextC” – Technical Diary 9

What happened so far?

Recently, time spent working on the project was dedicated to figuring out how to best turn it into an exhibit that is both somewhat valuable for the user, as well as for research purposes. I knew that it would be important to keep the interface intuitive, and at the same time not to clutter it with information. Furthermore, a good solution was needed to collect parameter data – after some research and experiments I found that the coll object would work best for my purpose, with its ability to capture an index number and separate data input with commas, allowing me to then export the anonymous results as a CSV file. The save button and volume adjustments were non-negotiable, but I struggled a bit with how to best implement options to play back the source sound as well as the processed sound in a way that made sense just from looking at the interface. Another aspect I considered was that I would need a “phantom” slider for the visible interface for the user, meaning that after the previous person saves it always jumps to a random value, but looks as if the slider is back at the center. Like this, test subjects cannot copy the results from the previous person and really have to rely on their hearing to match the processed audio as closely as possible to the source sound.

Preliminary interface for the exhibition/survey

Ongoing

During a supervisor meeting, we tried think of a way to improve the playback situation – ideally three buttons at the centre of the screen would be enough. One option would be to have the playback of the original sound be gated, so that whenever it stops playing, the processed sound starts automatically. It is definitely something that still needs more thought and a better practical solution.

Results and Reflection

That this part of the project will be shown to the public definitely added a new challenge, because now it is not just about whether the software makes sense to me, but also whether it can be translated to a first-time user with little to no experience. The idea of people using their hearing to adjust the parameter in a sort of audioscope-like manner is very interesting to me though, and I look forward to seeing the results – I wonder how accurate the resolution of the parameter has to be for people to not notice a significant difference anymore, and how much it varies between people.

Objectives for Next Time

  • Finalise exhibit version (software)
  • Figure out physical exhibition setup
  • Write guideline how to set up/turn the exhibit off and on for the showcase supervisors

“ontextC” – Technical Diary 8

What happened so far?

After building a working signal chain with the vb.stretch~ external, I worked on fine-tuning some bugs that I had noticed in the patch, but so far had not been given priority treatment because the signal chain had not been fully functional previously. This included adjusting the filter indexes in the parametric EQ to reflect the features I wanted for my production process (1 – low shelf, high pass, 2 – bell, 3 – bell, 4 – high shelf, low pass), correcting the units and patching in the pitch shift unit to reflect semitone and cent adjustments separately, and implementing a line object on the reverb faders to remove crackling while changing a parameter. Then I started working on the patch in presentation mode to represent only the parts of it which I also wanted accessible during my production process. To do this, I worked with my initial sketch from the first semester, the GUI capabilities within Max and Max4Live for cross referencing the result. I also tried to somewhat make the signal flow (in series) clear through the interface, but it definitely still needs some cleaning up. This necessity was also reflected during my first testing session with a Max4Live export in Ableton Live, but it was good to see that the parameter selection was already working quite well for my production process, as I had hoped. I also managed to set up a simple preset function (but I am hoping to advance that as well with proper dropdown menu presets).

Rudimentary GUI loosely based on my original sketch, using internal Max GUI tools.

Ongoing

Off the basis of this patch, I am starting to plan out the look and feel of the exhibit version, where only one parameter will be adjustable (probably the stretch factor). Considerations for this endeavour are: usability, how playback of the source sound and the processed sound should be triggered, an index number for survey content and a volume adjustment to cater to individual hearing sensitivity.

Results and Reflection

This stage of the process was very exciting! The testing stage made me remember why I had wanted to set out on this process in the first place, and it was very satisfying to hear the first working results playing back through my DAW. Since it was also my first time seriously working on a graphical user interfaces, that came with new challenges and insights, and I look forward to where my GUI research and testing will lead me.  

Objectives for Next Time

  • create mockup for exhibit version
  • figure out an effective play/stop mechanism for alternating between the processed and original sound
  • test GUI and figure out which changes to make in which order (also consider typography, style…)

“ontextC” – Technical Diary 7

What happened so far?

While I managed to get a (very imperfect, but at least audible) signal through my phase vocoder pfft patch, changing the FFT size manually and incrementally while playing the audio was not possible within its framework. I researched options for this, and found that something similar to the block~ object in pure data might help fix this problem, but unfortunately all the equivalents or similar objects I found during my search did not work for this purpose, so I had to look into other options. I briefly considered writing an external, but quickly realized that this would require a whole new toolbox and set of skills, which would not work within the timeframe I had set for myself. But during the time I studied max patches from others I stumbled across a promising option: Volker Böhm’s vb.stretch~, an external which is based on the Paulstretch algorithm and provides the parameters I had wanted to include in my compiled plug-in anyways. I was not entirely sure why I had not stumbled across it earlier during my research, because I had already looked for externals once, but decided to try it out in the context of my patch and came up with sounds results that were so far the most similar to what I was looking (or in this case listening) for.

Exploring the parameter options of the external

Ongoing

With a working patch, now the plan is to fine tune parameters, iron out inconsistencies and get a more refined prototype with a simple GUI working.

Results and Reflection

Honestly, while I was glad to have found a solution with sound results I liked, I initially felt a bit disappointed and discouraged that my intended solution did not work out the way I had wanted it to, since I had already put so many hours into exploring and setting it up. But that is part of an iterative process, and it is a process I have learned a lot from – much more than had I immediately found the external. The current setup allows me to more freely explore and improve other aspects of the patch, and gives me more time to work on usability and actually using and testing the patch in my own productions.

Objectives for Next Time

  • fix EQ inconsistencies and pitch shift units
  • look into and start setting up a (simplified) GUI for testing in the form of a max4live device
  • plan which parameters might be best to explore for the exhibit

“ontextC” – Technical Diary 6

What happened so far?

One thing that I found has helped me quite a lot when building my setup was to study and learn from other plug-in constructions that worked with effects similar to the one I am trying to achieve (there’s lots of them available to download for free) for practice. Of course, you could always just look at the connections and figure out what is going on, but for me personally copying them into a new patch object by object and really having to think about which connection was made why helped significantly improve my general understanding of the Max environment, and how I could best organise my complex, growing patches for my own understanding.

Insight into one of the patches I re-built – here I learned that colouring patcher cables can really be a huge help, especially as patches grow larger and larger. It’s a simple thing really, but it helps!

To get a cross-platform overview of how the problem can be approached, I also looked at some pure data patches and examined what was done differently there.

Here’s a list of the patchers I learned from:

For Future Reference

I found that the block~ object in puredata seemed like a really useful option for working with FFT sizes and especially FFT sizes that are supposed to be changeable through a parameter, so it might be worth looking into a Max equivalent/alternative for this.

Ongoing

I found that if I am to do a version of the patch for the exhibit, I would like to try it with just one or two parameters in order to prevent information overload for the target audience and make the procedure straightforward and easy to understand. I also used my learning experiences to note down GUI designs that I found easy to navigate, and which constructions worked intuitively for me to inform my own GUI once it is time to create that.

Results and Reflection

While studying these patches dedicated to stretching sound, I found a lot of methods and patching ideas to come closer to an extremely time-stretched result – however, I still found that most of the units did sound close enough to what I wanted to achieve for me to adapt them for my prototype, so this will definitely be a priority for the next stage of the project. Nonetheless, this little excursion helped me get to know my preferred Max workflow a lot, helped me to navigate patches made by others better and gave me new perspectives on problem solving and syntax.

Objectives for Next Time

  • look into jitter objects to determine graphical user interface possibilities
  • integrate stretch units into the prototype with working signals
  • research block~ equivalents and alternatives for Max

“ontextC” – Technical Diary 4

What happened so far?

To know where to start modifying the Max phase vocoder, I drew comparisons between the same stretch factors in PaulXStretch and the phase vocoder. To keep the conditions as similar as possible, I changed the FFT size in PaulXStretch to 1024 and turned off all of the other parameters in the processing chain (harmonics, tonal vs. noise, frequency shift, pitch shift, ratios, spread, filter, free filter and compressor), with the expectation that the resulting sounds would just stretch the source sound (a ten second snippet from an acoustic multitrack recording) using the respective stretching algorithm. This would then allow me to hear differences.

When comparing the results, it quickly became evident that while the phase vocoder provided very transparent sounding stretches at lower stretch factors, the aesthetic quality of the Paulstretch algorithm and the smearing it introduces were a) very different sounding and b) more usable for the intended sound design purposes, where especially stretch factors over 10 become interesting and the original sound source becomes almost unrecognisable.

Note: I have now switched to working with the default phase vocoder that comes with Max as a resource example (Max 8 > Show package contents > Resources > Examples > fft-fun > phase-vocoder-example-folder). It has a lot of similar components.

Ongoing

Currently I am in the process of settling on EQ, reverb and pitch shifting modules to use for the prototype. Another more research-based aspect of the project is to figure out how the provided Python code from the old Paulstretch algorithm works, which will hopefully allow me to modify the phase vocoder towards a direction that suits the imagined aesthetic outcomes of ontextC. My supervisors are kindly is helping me with this, since I am not familiar with Python at all.

Results and Reflection

The results of the comparison are useful, because they define the differences that need to be overcome in order to reach the aesthetic results I am looking for with this plug-in. While some of the inner workings of the Paulstretch algorithm still remain unknown as of now, the Python code will hopefully help to figure out what is missing. Furthermore, being able to set the FFT size over 2048 to a value closer to a value along 4400 would be a next step to imitate the workflow that started this project better – the steps that follow will show whether that is a limitation in Max or not.

As a sidenote: The shortcuts CMD + Option + M to open a locked Max patch and CMD + 8 to remove the frame have been proven very helpful.

Objectives for Next Time

  • Prep draft of sound example through all parts of the signal chain -> How does it start, which sound do we want to get to?
  • Check out Phase vocoder template, start to modify parameters in project draft and experiment
  • Settle on other modules in the processing chain

Keep in Mind: Mapping parameters together will become relevant sooner rather than later – it makes sense to research this as well.

“ontextC” – Technical Diary 3

What happened so far?

A recent priority was the comparison of different phase vocoders that are available in Max. With the help of the Cycling74 resources, I tested whether the difference between the modules using polar vs. cartesian coordinates affected my sound sources in a (noticeable) way that would make me choose one over the other – ultimately cartesian coordinates seemed like the better option for my project, also in terms of CPU usage. For windowing, the Hanning window is currently in use.

Furthermore, to better understand the processes the signal goes through within the plug-in, I asked my supervisor about the meaning of phase coherence in this context, and was able to bit by bit (little terminology reference here) connect the theory and the practical application, which will help me a lot going forward.

Ongoing

The evaluation and development of EQ, pitch shifting and reverb modules for my project is ongoing. Fortunately, there are a lot of libraries and resources especially for filtering and spatial effects, so the main challenge here is to find what works best to achieve the sound results I am aiming for, while also being functional and relatively simple to integrate. By studying existing Max patches, even though they might not be 100% what I am looking for, I am learning more not just about the Max environment, but also about best practices and how I could translate certain organisational aspects (comments are so helpful for external people looking at a patch to know what is going on!) and connections into my own project patch. My main resources for this are free patches that I download from the Max for Live library patch page and explore.

Results and Reflection

While it is good to know that there is a phase vocoder that can help me to realise my vision for this project, now it is time to start thinking about how to best integrate it, and define which modifications need to be made in order to make it sound the way I want it to in the context of my project. To do so, I will draw comparisons between PaulXStretch and the Max phase vocoders, to determine limitations, potential areas of improvement and differences in sound quality at different stretch factors.

Objectives for Next Time

  • Prepare and document sound examples to compare between the phase vocoder and PaulxStretch
  • Continue development of other modules

“ontextC” – Technical Diary 2

What happened so far?

Aside from a crude mockup in Max MSP, a diagram helps envision the signal flow and processing points of the plug-in now. The diagram is also quite a handy tool to identify challenges, as it lays the main idea out in a layout that is simplified, but representative of the core idea. Parameters have been defined and narrowed down further.

I have also been provided with copies of all three volumes of Electronic Music and Sound Design – Theory and Practice with Max 8, which I am using as a reference and also a learning opportunity to further familiarise myself with the Max environment.

The objective at this is to research and further refine the direction of the project. At this point, the audio signal chain has the potential to work, but the time stretch unit does not work by integrating PaulXStretch into the patch as an external VST, since the audio needs to be manually imported and exported in the application.

Top Objects

In the mockup, the bangbang object proved very useful to initiate the loading of a list of parameters in a umenu – to experiment, this was done with a list of parameters from Valhalla Supermassive, but the same procedure could be useful later down the line for menus that should operate similarly.

Results and Reflection

The biggest challenge at the moment is the PaulXStretch implementation. The lack of documentation of the application makes it difficult to decipher which algorithms make the parameters work, and since it is at the top of the signal chain it blocks the audio signal from coming through to the next stages of processing. More research on the Paulstretch algorithm will be necessary. Furthermore, the commercial nature of my ideal reverb for this project makes it more difficult to implement, meaning that now is a good point to look into alternatives and emulations.

Objectives for Next Week

  • Research reverb properties, documentation, and open source emulations/alternatives
  • Research publications on the Paulstretch algorithm
  • Find a good tool for pitch-shifting and EQ

Research Resources for Next Week

Timbral effects the Paulstretch audio time-stretching algorithm (Colin Malloy)

An approach for implementing time-stretching as a live realtime audio effect (Colin Malloy)

Max 8 Handbooks (Volume 1-3) – Alessandro Cipriani, Maurizio Giri

Valhalla Lear Resources (Plug-In Design)

“ontextC” – Technical Diary 1

The objective for this week was to refamiliarize myself with the Max MSP environment with the help of a template that was provided to me as well as a series of tutorials on YouTube. The larger objective that this step will help me towards is to create a prototype of my plug-in by first using integrations of VST plug-ins that I am currently using for my workflow which I can then gradually substitute with effects units that I created myself to suit my needs.

The Toolbox

Toolbox Analysis

The Max Standalone series was helpful in some regards, but overall, it felt like the videos included a lot of trial-and-error moments, which made them lengthy and tricky to follow along with. I often found myself trying to rebuild a patch component only to then find out it had lots of issues in it which had to be undone a couple minutes later. I could imagine this might be useful for someone who is not as familiar with how to troubleshoot in Max MSP, but for me it was not the best way to progress. There was valuable information on how to build a standalone project, and the fifth episode of the series demonstrated how to distribute an application to stores. While not applicable to my project at this early stage, this is information I will revisit. The most useful information that I will be taking away from this series is how to build an application (Part 1, from 10:30 onwards), work with dependencies (Part 2), and create presets (beginning of Part 3).

The video by John Jannone managed to integrate a lot of useful information into 20 minutes, and it was relatively easy to follow along with it. Although it is specifically targeted towards synthesizers, it contained useful general information on how to set up umenus to work with parameters from a VST plug-in, manipulate them and save snapshots.

Results and Reflection

With the help of the videos and the template I was able to compile a beginning version of a patch, where a sample is fed through an effects chain. In the patch, I built separate components which might be useful for further prototyping, like a menu module which allows me to switch between external VST plug-ins. I faced some struggles with getting a sample output from PaulXStretch,which I plan on investigating further next week, but all the other plug-ins process the input sample smoothly. Another segment that needs troubleshooting is the umenu I attached to a reverb unit with the intention of being able to manipulate parameters from within Max (marked in red).

Top 5 Objects of the Week

Objectives for Next Week

  • Troubleshoot parameter manipulation tool
  • Properly integrate PaulXStretch/Research why it might not work
  • Start building a spatial effects unit

Research resources for Next Week

A list of resources I stumbled upon throughout my process this week and want to research further because they have the potential to help my project. The scope for these resources is varied and can go from scientific literature to tools that can help me learn more or become clearer on my ideal parameter mapping and UI.

Plug-Ins

Cecilia

Monster Timestretch

Soundmagic Spectral

Prototype Development

Getting Started With Reverb Design Part 1 & Part 2

Literature/Websites

A Tutorial on Spectral Sound Processing Using Max/MSP and Jitter

Juce